


ITEM NO.: SV-38 AND SV-38B
ISSUED DEC 20, 2017
Printed in Vietnam
THIS ITEM IS PACKED IN TWO CARTONS
- 9 -
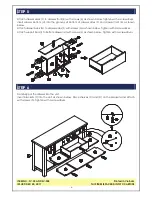
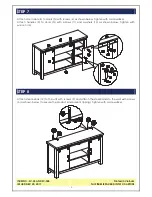
STEP 7
Attach door rollers (8) to doors (N) with screws (4) as shown below. Tighten with a screwdriver.
Attach handles (9) to doors (N) with screws (11) and washers (10) as shown below. Tighten with
wrench (14).
STEP 8
Attach steel bands (12) to the unit with screws (5) and attach the steel bands to the wall with screws
(6) as shown below (to secure the product and prevent tipping). Tighten with a screwdriver.


