background image

27

27

General Information

General

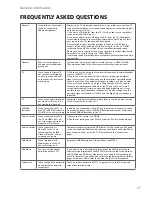
I would like to have louder 
sound by connecting 
additional speakers

Subject to the TV model and connections, it is possible to connect the TV 
to an external amplifi er or surround sound (subject to connections/inputs 
on the device) as follows:-
1) Connect a COAX cable* from the TV’s COAX output to your amplifi er/
surround systems COAX input
2) Connect a 3.5mm jack to L/R phono cable* from the TV’s headphone 
socket (where fi tted) to your amplifi er/surround sound L/R input. Please 
note sound to the TV’s speakers will be disabled.  
3) On selected models, it maybe possible to connect a SCART input/
output* switch with an additional L/R Phono cable* to the TV’s SCART 
socket and to the L/R Phono Input of your amplifi er/surround sound. 
Please note due to copyright laws it is not possible to output video/sound 
from the TV on certain sources, i.e. HDMi, DVD etc. 
*cables and switches mentioned are available to purchase separately from 
your retailer.

General

Why are some options in 
the menu unavailable and 
greyed out

Some options are only available in certain sources, i.e. HDMI, PC/VGA. 
They are unavailable in the other sources where they have no affect.

TV

I have tuned in Digital TV 
but I am not  receiving any 
or all of the channels and/
or the channels I receive are 
breaking up

1) Check you are in an area that can receive Freeview. Visit www.freeview.
co.uk or call 08701 111 270.
2) Check you are using an aerial that is able to receive a good digital 
signal. In most cases, you will need an outdoor digital hi-gain/wideband 
aerial. In areas that have excellent Freeview coverage, you may be able 
to use a loft type aerial but it is highly likely that you will also need to 
connect a booster between the back of the TV and the TV aerial wall 
socket. Unfortunately, to receive a good enough digital signal, it is not 
possible to use a portable/indoor type aerial. This may change once the 
analogue signal is switched off in 2012 and the Digital signal strength is 
increased.

TV

I have re-tuned my television 
but when I switch it off it is 
not storing the channels

Complete a fi rst time installation, please refer to the set-up menu section 
of the manual for how to do this

VCR/DVD
Recorder

I have connected the TV to 
my VCR or DVD Recorder via 
SCART but it is not recording

In addition to connecting via SCART, you should connect the aerial cable 
from the wall socket to your VCR/DVD Recorder and another aerial cable 
from the VCR/DVD Recorder to the TV

Game Consoles

I have connected my PS3 to 
the TV via HDMI, but I am 
not receiving any pictures or 
sound on my Television

1) Ensure the TVs source is on HDMI
2) Check your settings on your PS3 are as per the PS3 instruction manual

Game Consoles

I have connected my 
Xbox 360 to the TV via 
Component Cables (Red, 
Green & Blue) but I am not 
receiving any sound

Component cables only provide HD Pictures. For the sound you will need 
to connect the Red & White audio cables on the Xbox to the Red & White 
phono inputs on the rear of the TV. Please refer to the ‘Connections’ 
pages.

USB Mode

I have inserted a USB 
Memory Key, but the TV 
does not recognise it

Ensure the USB Memory Key is formatted to type FAT32.

USB Mode

Can I use a USB portable 
hard drive with my TV?

If you wish to use a portable hard drive larger than 32GB, please note 
that it must be formatted to the FAT32 fi le system in order to operate on 
this TV. Windows XP/Vista computers are only capable of formatting up 
to 32GB, therefore, you will need a software programme/utility to format 
larger hard drives. Please refer to the web site for more information.

System Lock

I have changed the password 
on the television and now 
forgotten it

There is a master password of 4711, to gain access to the TV menu and 
reset the normal password

FREQUENTLY ASKED QUESTIONS

Содержание M40/57G-GB-FTCU-UK

Страница 1: ...M40 57G GB FTCU UK Full HD LCD TV with Freeview USB Media Player Model No User Guide ...

Страница 2: ...on top of the power cable as the weight of the television may damage the cable and cause a safety hazard Never place mobile phones speakers or any other device which may cause magnetic or radio interference with the television If interference is apparent move the device causing the interference away from the television To disconnect the apparatus from the mains please use the all pole mains switch...

Страница 3: ...tationary Moving or low contrast graphics are less likely to cause ageing of the screen Time Displays Teletext Do not view a stationary page for long period of time TV DVD Menus e g Listings of DVD disk content Pause Mode Do not leave the TV in pause mode for long periods of time e g When watching DVDs or videos Important Once shadow image screen burn occurs it will never disappear and is not repa...

Страница 4: ...u 12 Remote Control 13 Connections 14 15 TV Menu Operation 16 21 Channel Menu 16 Picture Menu 17 Sound Menu 18 Time Menu 19 Feature Menu 20 Setup Menu 21 PC Operation 22 23 7 Day TV Guide 24 USB Mode Media Player 25 General Information 26 30 Operating the TV with a universal or Sky BSKYB remote control 26 Frequently Asked Questions 27 Technical Specifications 28 Index 29 Digital Switchover 29 30 ...

Страница 5: ...to package your item in the event of warranty service repair is in it s original box packaging WHAT IS INCLUDED IN THE BOX Accessories Included with this TV are the following accessories 1 x User Guide 1 x Quick Start Guide 2 x AAA Batteries 1 x TV 1 x RF Cable 1 x Remote Control What is included in the box User Guide Quick Start Guide 1 x Blanking plate for use when wall mounting 1 x Stand plus s...

Страница 6: ...sure the notch is facing upwards into the hole in the stand c 2 Slot the stand c into the TV neck a with 66mm plastic ring b inside 3 Align 68mm plastic ring d making sure the notch is facing downwards with the hole at the bottom of the TV stand 4 Align the holes in metal plate e with the holes in the bottom of the TV stand 5 Secure the stand using 7 screws f ...

Страница 7: ... the picture below Important If wall mounting this TV only use the screws already provided in the wall mounting holes Using other screws which are longer could cause irreparable damage to internal parts Detaching the stand and wall mounting fig 2 For optimum viewing if wall mounting the TV higher than eye level the TV should be tilted downwards so that the TV s screen is face on See fig 1 and 2 TV T...

Страница 8: ...g the TV Fig A Fig B 4 Insert the batteries supplied into the Remote control and press the Standby button to power on the TV 3 Switch on the television using the power on off switch Power on off Tip If the TV finds some but not all of the Digital channels the TV is functioning correctly but the signal being received is not strong enough The signal strength needs to be above 85 you can see the signa...

Страница 9: ... 3 Press OK B Using the buttons on the Television 1 Press SOURCE 2 Scroll up down using CH CH buttons to the input source you require 3 Press Vol to change input source to the one selected TV Buttons and Source Menu Displays the input source menu Displays Menu OSD Volume up and menu right Volume down and menu left Programme Channel up and menu up Programme Channel down and menu down Standby Power ...

Страница 10: ...reen menus and adjust the system settings to your preference MENU To display OSD menu EXIT To exit all menus NUMBER BUTTONS 0 9 to select a TV channel directly To return to the previous channel viewed FAV To display favourites menu VOL To increase decrease the sound level SUBTITLE To switch the dialogue at the bottom of the screen on off ASPECT To switch the screen between the different picture fo...

Страница 11: ... COAX Audio Out Digital Coax output COMPONENT HD Component input YPbPr VIDEO Video input R L AUDIO Video Component audio input RF IN RF TV Aerial Input HEADPHONES 3 5mm Headphone output A B C D E F G H I J K N M Connecting a DVD Player Recorder Video Recorder or Cable Satellite Box TVs Input Source should be set to SCART Connections RF IN SCART TV Aerial Wall Socket SCART OUT RF IN RF OUT DVD or V...

Страница 12: ...d audio with minimal loss of quality TVs Input Source should be set to HDMI Option 2 via Component cable If you are supplied with a cable from the device which has RED GREEN BLUE RED WHITE connectors you must connect via Component for picture and by phono cable for sound TV Source should be set to Component Connections Component HD Component Green Blue Red Audio L R White Red Audio In L R Camera o...

Страница 13: ...digital signal Analogue Manual Tuning Allows you to manually tune your analogue signal Programme Edit Allows you to delete skip and add favourite channels To access this menu press MENU button on the remote control To enter a menu press OK If you wish to make changes to any of the default settings use the scroll buttons To confirm any settings press OK button To exit this menu at anytime press EXIT...

Страница 14: ...htness Increase or decrease the brightness of the picture Colour Increases the colour from black and white Tint Lets you increase or decrease the level of tint within the picture Sharpness Increase or decrease the sharpness of the picture Colour Temperature Choose from the following presets Normal Default settings Warm Increases red within the picture Cool Increases blue within the picture Noise R...

Страница 15: ...movies Personal Selects your personal sound settings Sports Emphasises sound for sports Digital Output This is the digital COAX Audio output Choose from the following options Off Off Auto Selects the best settings automatically PCM Select this option if you are connecting to a Stereo Hi fi via coax cable Pulse code modulation PCM is a digital representation of an analogue signal To access this menu...

Страница 16: ...ime Allows you to set a specific time for your TV to turn off On Time Allows you to set a specific time for your TV to turn on the channel it will then display the source it will be on and also the volume This function can then be toggled to repeat every day or a certain day Time Zone Change your current time zone Sleep Timer Lets you set the sleep timer so the television automatically switches off ...

Страница 17: ...ted into the COMMON INTERFACE PORT CI Card In System Lock Allows you to lock or unlock the menu You will be asked to enter a 4 digit password use the button to quit the password input Use the button to clear Default password is 0000 To access this menu press MENU button on the remote control To enter a menu press OK If you wish to make changes to any of the default settings use the scroll buttons ...

Страница 18: ...creen before disappearing Reset to default Reset Menu System This resets the menus to factory settings Reset TV Channels This clears all the TV channels from the television Software Update USB From time to time we may release new firmware to improve the operation of the television available to download This menu lets you install the new software firmware onto the television Further details of how to...

Страница 19: ...der 6 Left click on the drop down for Screen refresh rate and select 60 Hertz if you experience picture noise or flickering select 50 hertz or 70 hertz 7 Click on Apply then click Yes and the settings will be saved 8 Now switch off your computer and connect the television as shown 9 Switch on the TV select the input source to VGA PC and re start your PC Connecting a Laptop In addition to the above ...

Страница 20: ...the television to be used as a computer monitor H Offset Changes the horizontal position of the picture V Offset Changes the vertical position of the picture Size increase picture size Phase To adjust delay time of phase in order to reduce the noise of picture Position Reset Changes back to the original settings Tip If the computer is left in active for a period of time the television will switch ...

Страница 21: ...el You can view the start and end time of all programmes and on all channels for the next 7 days and set reminders 1 Press TV GUIDE The following 7 Day TV Guide will appear 2 Navigate through the menu using You can now Set a reminder by pressing GREEN View a previous day by pressing YELLOW View the next day by pressing BLUE 3 Press EXIT to exit the 7 day TV Guide ...

Страница 22: ...aved on your USB Memory Stick On switching to USB source the above menu screen will appear The content will be divided into Photo Music Movie and Text based on file type You can navigate through the menus using the scroll buttons To confirm the item you wish to play view press OK button USB Mode Media Player ...

Страница 23: ...tions At the point of manufacturer of this TV the latest Revision 9 remote controls are only available to purchase directly from Sky alternatively you can purchase our versions from the helpline website If your Sky remote control is a Revision 9 or later please follow the instructions below 1 Switch on the TV set 2 Press the TV button on the Sky Remote 3 Hold down the select and red buttons for 2 ...

Страница 24: ...eive a good enough digital signal it is not possible to use a portable indoor type aerial This may change once the analogue signal is switched off in 2012 and the Digital signal strength is increased TV I have re tuned my television but when I switch it off it is not storing the channels Complete a first time installation please refer to the set up menu section of the manual for how to do this VCR ...

Страница 25: ...deo 1 x Component YPbPr 1080i 3 x HDMI up to 1080p Sound Inputs 1 x 3 5mm jack for PC audio input 1 x pair RCA Audio input shared for Video and YPbPr component Sound Outputs 1 x Coax Audio output 1 x 3 5mm headphone jack Sound power watts RMS 2 x 8 Voltage and power consumption 110 240V 50 60Hz 220W in standby less than 1W Dimensions including stand mm 987W x 672H x 292D mm Net weight Kgs 18kg Gen...

Страница 26: ...ol press MENU followed by 8 8 8 8 so the number 8 button four times 2 The First Time Installation menu will appear Press OK and tuning will take place For help and support regarding the digital switchover please contact Digital UK Telephone 08456 50 50 50 calls charged at local call rate approx 3p per minute daytime or 1p per minute evenings from a BT landline Digital UK website www digitaluk co u...

Страница 27: ...30 ...

Страница 28: ...31 31 ...

Страница 29: ...M40 MAN 0001 ...

Отзывы: