um RENEGADE II COMMANDO Скачать руководство пользователя страница 3

Congratulations  on  choosing  your  New  UM 
Renegade  II.  By  purchasing  a  new  UM,  you 
become  a  part  of  worldwide  family  of  satisfied 
customers; 

people 

who 

appreciate 

UM's 

commitment for building quality into every product.

Your  Renegade  II  was  designed  as  a  street 
motorcycle.  before  riding,  take  time  to  get 
acquainted  with  you  motorcycle  and  how  it 

works. 

To  protect  your  investment,  we

  request  to  you

  to 

take responsibility for keeping your motorcycle well


maintained.Scheduled service is a must, of course.

But  it  i

s just importan  to observe  the

 brake-in 

guidelines,  and  perform  all  the pre


ride  and other 

periodic  checks  detailed  in  this manual.  The next 
1000  kms  are  the  most  important  for  the  life  of 
your  motorcycles  engine.  The  proper  usage 
during  the  first 

kilometers 

will  achieve 

maximum  life  and  maximum  performance  of 
your  motorcycle.  It  is  especially  important  that 
you  do  not  operate  the  motorcycle  in  a  manner 
that 

will 

cause 

engine 

over 

heating. 

We also  recommend  that  you  read  the owners 
manual  carefully  before  you  ride.  It  is  full  of facts, 
instructions, safety information, and helpful tips. 

INTRODUCTION

If  you  have  any  questions,  or  if  you  ever  need  a 
special  service  or  repairs,  remember  that  your  UM 
dealer  knows  your  motorcycle  best  and  is 
dedicated  to  your  complete  satisfaction.  Please 
report any change of address or ownership to your 
dealer so that we are  able to contact you.

This  manual  should  be  considered  a  permanent  part  of  the 
motorcycle and should remain with the motorcycle when it is 
resold

This  publication  includes  the  latest  production  information 

available  before  printing.  United  Motors  International 

reserves  the  right  to  make  changes  at  any  time  without 

notice and without incurring any obligation.

125 SERIES EFI

REGENADE II


3

Содержание RENEGADE II COMMANDO

Страница 1: ...II 125 SERIES EFI...

Страница 2: ...RENEGADE II SPORTS S RENEGADE II COMMANDO...

Страница 3: ...maximum life and maximum performance of your motorcycle It is especially important that you do not operate the motorcycle in a manner that will cause engine over heating We also recommend that you re...

Страница 4: ...ANGER if you don t follow instructions WARNING You will be killed or seriously hurt if you d follow instructions instructions RENEGADE II 125 SERIES EFI 4 To help you to get informed about safety deci...

Страница 5: ...L E U F KUI COMPONENT LOCATION FUNCTION INSTRUMENT PANEL READY TO RIDE G N I D I R D N A N O I T A R E P O C I S A B L I O E N I G N E S N O I T A C I F I C E P S L A C I N H C E T E C N A N E T N I...

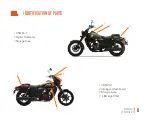
Страница 6: ...IDENTIFICATION OF PARTS 1 3 2 1 USB Port 2 Digital Odometer 3 Storage Area 1 USB Port 2 Intelligent Dashboard 3 Storage Area 4 LED Light 360 1 2 4 3 6 RENEGADE II 125 SERIES EFI...

Страница 7: ...DIMENSIONS 2257 mm 1545 mm 1140 mm 780 mm 2227 mm 1100 mm 780 mm 1545 mm REGENADE II 125 SERIES EFI 7...

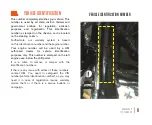
Страница 8: ...the engine number Your engine number will be used by a UM authorized dealer for vehicle identification purposes only This number is stamped on the left engine case below the shift pedal It is a crime...

Страница 9: ...VEGEAR Riding a motorcycle leaves the rider exposed Therefore wearing appropriate protective gear can prevent or diminish injuries from accidents Helmet The majority of serious motorcycle injuries and...

Страница 10: ...ays travel at a speed that is proper for the operating conditions your ability and experience use it to make sure it is in safe operating condition maintenance procedures described in this manual cond...

Страница 11: ...rtant that you do not install accessories that change the design and concept of the motorcycle Doing so could alter the safety of your motorcycle LOADING CARRYINGPASSENGERS You should avoid carrying p...

Страница 12: ...ere injury or even death to the motorcycle operator passenger or by stander To carry passengers safely you must instruct the passenger before you start to the engine the driver handles when the motorc...

Страница 13: ...ous system or the plastic parts flame as the exhaust fumes may cause loss of consciousness or death within a short time source Petrol in your eyes see a doctor immediately or go to the nearest hospita...

Страница 14: ...ng parts reduce ground clearance and do not interfere with the operating controls BREAK IN The long term wear and duration of your motorcycle depends of the way you treat it during the first days of o...

Страница 15: ...nomy but also to extend the usable life of your motorcycle and to achieve a smoother operation yield surprising fuel economy pressure Check pressure weekly according to the periodic service and mainte...

Страница 16: ...quipeed with combine brake system which when you use the rear brake the rear brake force is distribuited and helps to brake with the front brake too thus being softer an eficient the rear brake system...

Страница 17: ...ies EFI uses a Mikuni EFI electronic fuel injection system which adapts to the environment collect information and improve the fuel consume performance thus the gases emissions are less harmful to the...

Страница 18: ...COMPONENT LOCATION FUNCTION 2 5 1 4 3 4 2 3 1 5 LEFT CONTROL RIGHT CONTROL 1 Lever 2 Hi and Low 3 Horn 4 5 Light 1 2 Accelerator 3 4 Parking Lights Switch 5 RENEGADE II 125 SERIES EFI 18...

Страница 19: ...ates when engine is in neutral and there is no gear engaged 8 S RENEGADE II 125 SERIES EFI 19 Check Engine Light It is normal that it lighting when you turn on the ignition switch but once you turn on...

Страница 20: ...ted on Fuel tank This key STEERINGLOCK The steering lock is located on the side of the steering stem in Sports S KEY The same key will operate the ignition switch steering lock fuel cap STEERINGLOCK T...

Страница 21: ...CAUTION close the fuel cap press cap down and make sure it is latched Remove the key and fold the protecting tab down FUEL TANK CAP DANGER CAUTION Do not mix fuel with any type of oil RENEGADE II 125...

Страница 22: ...a it is lighting Check engine light lighting once it is turn on the start switch it is ing C C RENEGADE II 125 SERIES EFI 22...

Страница 23: ...ht hand side is used to slow down or stop the vehicle Take your time to learn some braking techniques learn how use appropriate the combined brake system The throttle controls engine rpm speed To incr...

Страница 24: ...is distribuited and helps to brake with the front brake too thus being softer and eficient the rear brake system GEARSHIFTLEVER The gear shift lever is used to select the next higher or lower gear in...

Страница 25: ...nd before riding CENTERSTAND The center stand should be used on level ground It will permit lifting the rear wheel off the ground To operate use your foot to lower the stand until it touches the groun...

Страница 26: ...EADY TO RIDE ISYOURMOTORCYCLEREADYTORIDE motorcycle and make sure any problem you find is corrected A pre ride inspection is a must because road conditions can be very harsh on your motorcycle and a p...

Страница 27: ...or wear and tight spots Check and adjust tension if necessary Lube chain as needed CABLES Check cables for wear or breaks NUTS BOLTS Check all accessible nuts and bolts and make sure they are tight TH...

Страница 28: ...yorevendeath BASIC OPERATION AND RIDING Sitonthemotorcycle Insert the key in the ignition switch and unlock the steering TurntheswitchON MakesuremotorcycleisinNEUTRAL MakesurethatfuelvalveisON PressCl...

Страница 29: ...on dip stick incorporated in cap Change engine oil every 3000 Km at an Authorised UM Service Center Recommended oil Renegade Ignitor SJ 10W40 ENGINE OIL MAX MIN I T T T With every oil change make sur...

Страница 30: ...re Rear Tyre 13 4 HP 9500 RPM 10 N m 8000 RPM 11 1 52 4 x 57 8 CDI Liquid cooled 5 speed Constant Mesh Two stage 520 O Ring Chain 1100 ml Renegade Ignitor 800 ml COOLELF AUTO SUPRA 370 C 41 mm Twin Hy...

Страница 31: ...2 Kg with 90 fuel oil 750 mm 1140 mm 2257 mm 780 mm 1545 mm 200 mm 18 Lit 2 Ltr Approx Alloy wheel Electric Start 172 Kg with 90 fuel oil 750 mm 1140 mm 2227 mm 780 mm 1545 mm 200 mm 18 Lit 2 Ltr Appr...

Страница 32: ...UM motorcycle to give an optimum performance trouble free service The vehicle must be serviced at every 3000 km or within 3 months whichever is earlier All activities are laid down for average riding...

Страница 33: ...I I I I I Apply petroleum jelly 16 Drive chain slackness wear 17 Drive chain sider condition 18 Front fork oil leakage I I I I I I I I I 19 Rear brake cam L L L L L L L L L 20 Steering ball races pla...

Страница 34: ...onth Km Description Whichever is Earlier 1st 1 1000 2nd 3 3000 3rd 6 6000 4th 9 9000 5th 12 12000 6th 15 15000 7th 18 18000 8th 21 21000 9th 24 24000 I All electrical functions Leakage from Brake hose...

Страница 35: ...ch and battery discharge POSSIBLE CAUSES ACTIONS TO BE TAKEN Switch on ignition Push stop switch to ON position Clean vent hole Replace HT Lead connect the lead firmly Tighten spark Plug If electrode...

Страница 36: ...Replace if necessary Fix cap lead firmly Clean reset gap or replace Ensure the all the connections POSSIBLE CAUSES ACTIONS TO BE TAKEN 3 Vehicle cranks but does not starts Engine Misfiring POSSIBLE CA...

Страница 37: ...se connection Wiring hareness defective Starter switch not working Starter relay is defective Keep ignition key In ON condition Keep Kill switch in ON condition It should be more than 12 4 v Charge if...

Страница 38: ...CAUSES ACTIONS TO BE TAKEN 9 Horn not working Horn sound not proper Ignition Key is OFF Battery discharge Loose connection Fuse Blown Incorrect screw adjustment Keep Ignition Key in ON condition It sh...

Страница 39: ...r output voltage 14V 2000RPM Confirm the magneto of coil resistances are within specifications repalce if required POSSIBLE CAUSES ACTIONS TO BE TAKEN 12 Engine Overheat Radiator Fan faulty Reverse di...

Страница 40: ...connection wiring harness defective Ensure all the connectors are firmly connected with wiring Check the continuity of lighting the circuit in wiring harness 15 Head Lamp illumination not proper Head...

Страница 41: ...TAKEN 18 Vehicle wobbles Wheel rim runout Loose broken spokes Tyres not fitted correctly Wheels misaligned Under inflated tyres Rectify Tighten Replace spokes Re fit tyres correctly Ensure proper ali...

Страница 42: ...l parts and avoid using high pressure washers recommendations very 3000 km and fuel pump spark plugs in poor condition adding too many electrical accessories in in fuel tank electrical system exhaust...

Страница 43: ...most of the cases described in the owners manual modifications modifying or repairing parts and the tempering of their controls engaged in renting or which are disassembled uncontrollable and or case...

Страница 44: ...__________________________ Frame No _____________________________________________________________ Model ___________________________________________________ Engine No __________________________________...

Страница 45: ...n 9 Safe riding advice 10 Battery maintenance 11 Tire pressure 12 engine light 13 Vehicle parking locking 14 Coolant level checking procedure 15 Cleaning Lubrication of drive chain INFORMATION TO CUST...

Страница 46: ...______ Frame No _____________________________________________________________ Model ___________________________________________________ Engine No ______________________________________________________...

Страница 47: ...t of the warranty as specified Place Date VEHICLE INSTALLATION AND DELIVERY CERTIFICATE Frame No _____________________________________________ Engine No _________________________________________ 1 War...

Страница 48: ..._________________________________________ Model ___________________________________________________ Engine No ______________________________________________________________Color ______________________...

Страница 49: ...he warranty as specified VEHICLE INSTALLATION AND DELIVERY CERTIFICATE Frame No ______________________________________________________ Engine No _____________________________________ 1 Warranty policy...

Отзывы: