background image

Troubleshooting

41

Rev A

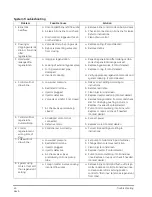
9. Intermittent or 

irregular 
regenerant draw.

a. Low water pressure.
b. Defective injector.

a. Set pump to maintain 20 psi at conditioner.
b. Replace injector. (Contact dealer.)

10. No conditioned 

water after 
regeneration.

a. No regenerant in regenerant 

tank.

b. Injector plugged.
c. Air check valve closes 

prematurely.

a. Add regenerant to regenerant tank.

b. Clean injector and screen.
c. Put control momentarily into brine/slow 

rinse. Replace or repair air check if needed.  
(Contact dealer.)

11. Backwashes or 

purges at 
excessively low 
or high rate.

a. Incorrect drain controller used.

b. Foreign matter affecting valve 

operation.

a. Replace with correct size controller. (Contact 

dealer.)

b. Remove drain controller and clean ball and 

seat.

12. No water flow 

display when 
water is flowing.

a. Bypass valve in bypass.
b. Meter probe disconnected or not 

fully connected to meter 
housing.

c. Restricted meter turbine rotation 

due to foreign material in meter.

a. Shift bypass valve to not-in-bypass position.
b. Fully insert probe into meter housing.

c. Remove meter housing, free up turbine and 

flush with clean water. Turbine should spin 
freely. If not, replace meter. (Contact dealer.)

13. Run out of 

conditioned 
water between 
regenerations.

a. Improper regeneration.

b. Incorrect regenerant setting.
c. Incorrect hardness or capacity 

settings.

d. Water hardness has increased.

e. Restricted meter turbine rotation 

due to foreign material in meter.

a. Repeat regeneration, making certain that 

correct regenerant dosage is used.

b. Set P6 to proper level. See salt setting chart. 
c. Set to correct values. See Programming 

section.

d. Set hardness to new value. See 

Programming section.

e. Remove meter housing, free up turbine and 

flush with clean water. Turbine should spin 
freely; if not, replace meter. (Contact dealer.)

14. Regenerant tank 

overflow.

a. Regenerant valve disc 1 being 

held open by foreign matter.

b. Valve disc 2 not closed during 

regenerant draw causing brine 
refill.

c. Air leak in regenerant line to air 

check.

d. Improper drain control for 

injector.

e. Drain control clogged with resin 

or other debris.

a. Manually operate valve stem to flush away 

obstruction.

b. Flush out foreign matter holding disc open 

by manually operating valve stem.

c. Check all connections in regenerant line for 

leaks. Refer to instructions.

d. Too small of a drain control with a larger 

injector will reduce draw rates.

e. Clean drain control.

Содержание 268 Co-Current Conditione

Страница 1: ...Models 268 Co Current Conditioner 263 Three Cycle Filter Operations Manual...

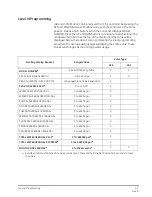
Страница 2: ...2 Drain Line 14 Regenerant Line Connection 15 Overflow Line Connection 16 Electrical Connection 18 Valve Camshaft 19 Disinfection Of Water Conditioners 20 Ultramax Controller 22 Display Icons 23 Keypa...

Страница 3: ...equipment should have Knowledge of water conditioning and how to determine proper control settings Basic plumbing skills The directional instructions left and right are determined by looking at the fr...

Страница 4: ...on connections that do not use an O ring seal Do not use pliers or pipe wrenches All plumbing must be completed according to local codes Soldering near the drain line should be done before connecting...

Страница 5: ...e acceptable working water pressure range is 20 to 100 psi 1 38 to 6 89 bar Use only regenerant salts designed for water softening Do not use ice melting block or rock salts Follow state and local cod...

Страница 6: ...njector and brine is drawn from the regenerant tank The brine is then directed down through the resin bed and up through the riser tube to the drain The hardness ions are displaced by sodium ions and...

Страница 7: ...System Operation Cycle Functions 7 Rev A Cycle Water Flows SERVICE BACKWASH BRINE SLOW RINSE FAST RINSE From Regenerant Tank To Regenerant Tank BRINE REFILL REPRESSURIZE...

Страница 8: ...nstallation Valve Layout Refill Controller Regenerant Tube Connection Injector and cap Valve Discs Outlet Drain Inlet Backwash Injector Screen Camshaft Drain Control Filter Control Module Mount One Pi...

Страница 9: ...N KG x100 LCD Display Manual Regen Button Down Button Set Button Up Button Lockout Connection Turbine Input or Dry Contact Signal Input Main Motor Optical Sensor Connection AC Adapter low voltage Inpu...

Страница 10: ...onditioning system is installed outdoors several items must be considered Moisture The valve and controller are rated for NEMA 3 locations Falling water should not affect performance The system is not...

Страница 11: ...oller and valve have been designed to keep all but the smallest insects out of the critical areas Any holes in the top plate can be covered with a metal foil ductwork tape The top cover should be inst...

Страница 12: ...s Figure 1 Autotrol Series 1265 bypass for use with Performa Figure 2 Typical Globe Valve Bypass System Normal Operation In Bypass B Y P A S S B Y P A S S B Y P A S S B Y P A S S Water Conditioner In...

Страница 13: ...sed only hand tighten the nuts WARNING Do not use petroleum grease on gaskets when connecting bypass plumbing Use only 100 silicone grease products when installing any Autotrol brand valve Non silicon...

Страница 14: ...tional 10 psi 69 bar of water pressure at the drain connector 4 Where the drain line is elevated but empties into a drain below the level of the control valve form a 7 inch 18 cm loop at the far end o...

Страница 15: ...in out and the conditioner will not draw regenerant from the tank This may also introduce air into the valve causing problems with valve operation Ensure that pipe sealant Teflon tape is applied to th...

Страница 16: ...ct the overflow line locate hole on side of tank Insert overflow fitting into tank and tighten with plastic thumb nut and gasket as shown Figure 5 Attach length of 1 2 inch 1 3 cm I D tubing not suppl...

Страница 17: ...Overflow Line Connection 17 Rev A Figure 6 Regenerant Tank Check Valve not used with 3 cycle filter system Furnished as an option from system manufacturer...

Страница 18: ...or attached to a flat surface Installations that do not provide easy access to the valve can have the controller mounted for remote operation A remote mount connection PN 1256257 is available for the...

Страница 19: ...ont End for 263 and 268 valve bodies The corresponding slot for the number is positioned at the optical sensor which is approximately 90 degrees out of phase Regeneration Cycle Indicators 0 Treated Wa...

Страница 20: ...e following methods Sodium or Calcium Hypochlorite Application These materials are satisfactory for use with polystyrene resins synthetic gel zeolite greensand and bentonites 5 25 Sodium Hypochlorite...

Страница 21: ...used directly without dissolving before use 1 Dosage A Two grains approximately 0 1 ounce 3 mL per cubic foot 2 Regenerant tank conditioners A Backwash the conditioner and add the required amount of...

Страница 22: ...ent power conditions Controller Memory Information entered or calculated by the controller is stored in two different ways A static memory will store Model number Regenerant setting Time of regenerati...

Страница 23: ...ts 4 When LBS is displayed the value entered is in pounds 5 When Kg is displayed the value entered is in kilograms or kilograins 6 Four digits used to display the time or program value Also used for e...

Страница 24: ...roller is programmed using the buttons on the keypad The programming instructions will be described two ways whenever a section has keypad input First a table shows simplified instructions Second text...

Страница 25: ...see the Level II Programming section The controller can be programmed to regenerate on specific days of the week See Level II Programming section If electrical power is not available the camshaft can...

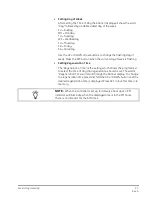
Страница 26: ...on They include Time of Day Day of Week Time of Regeneration Setting Time of Day Upon initial start up of the controller you will need to set the time of day The words Time of Day will scroll across t...

Страница 27: ...k is flashing Setting Regeneration Time The Regeneration Time is the setting which allows the programmer to select the time of day that regeneration should occur The words Regeneration Time will scrol...

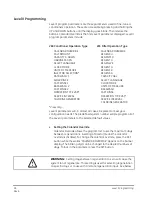
Страница 28: ...KWASH OPERATION TYPE 268 FAST RINSE SERVICE INTERVAL OPERATION TYPE 263 CHLORINE GENERATOR SERVICE INTERVAL CHLORINE GENERATOR View only Level II parameters will in almost all cases be preset to meet...

Страница 29: ...operate custom systems Contact your Ultramax Water Treatment Dealer before adjusting the capacity setting Default capacities are shown in Table 1 Filter Capacity Filter capacity is set in gallons or c...

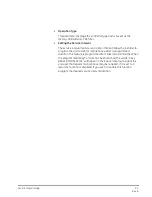
Страница 30: ...o operate in U S or Metric units Program the Units of Measure to 0 zero for U S units or 1 for Metric units Viewing the Injector Type Is selected by system model number and cannot be changed Adjusting...

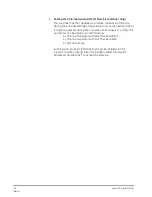
Страница 31: ...ler to program the unit to ask for maintenance after a programmed duration The feature is programmed from 0 zero to 99 months When the programmed length of time has been reached the words CALL DEALER...

Страница 32: ...ense if there is any brine present during the time when brine draw is occurring This parameter can be adjusted to the following 0 Chlorine Generator with Salt Check disabled 1 Chlorine Generator with...

Страница 33: ...8 263 MODEL NUMBERa See Salt Capacity Table X X DAYS SINCE REGENERATION 0 to 255 days X X PEAK FLOW RATE DAY AND TIME Language Clock Mode Dependant X PEAK FLOW RATE GPMa 0 to 47 GPM X WATER TREATED TO...

Страница 34: ...banner display indicating that the motor is running Additionally the display will show the total regeneration time remaining Pressing SET when the motor has stopped displays the cycle description and...

Страница 35: ...generant tank If the tank has a salt platform in the bottom of the tank add water until the water level is approximately 1 inch 25 mm above the platform WARNING If opened too rapidly or too far media...

Страница 36: ...m the regenerant tank A From the treated water position initiate a manual regeneration The controller will begin a manual regen and advance the control valve to the backwash cycle Press the SET and UP...

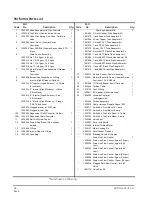
Страница 37: ...Performa Exploded View 37 Rev A Performa Exploded View 2 1 3 4 5 6 7 8 9 10A 11 12 13 14 16 17 18 15 19 10B 11 Warning Do not use the flow control ball with 10A 22 23 21 20...

Страница 38: ...s Controller 12 V 50 60 Hz 1035733 H Injector High Efficiency Lt Purple 19 1001986 13 16 inch Rubber Insert Optional 1 9 inch tank 20 1235446 Turbine Cable 1 1035734 J Injector High Efficiency Lt Blue...

Страница 39: ...connected Verify that motor wire harness is connected to motor and controller module Verify that optical sensor is connected and in place Verify that motor gear has engaged cam gear If everything is...

Страница 40: ...d a Make correct setting according to instructions b Remove restriction c Clean injector and screen d Replace injector and cap Contact dealer e Remove foreign matter from disc and check disc for closi...

Страница 41: ...lean water Turbine should spin freely If not replace meter Contact dealer 13 Run out of conditioned water between regenerations a Improper regeneration b Incorrect regenerant setting c Incorrect hardn...

Страница 42: ...42 Troubleshooting Rev A...

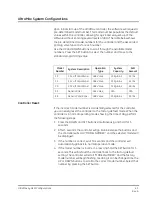
Страница 43: ...orm the following steps 1 Press the DOWN and SET buttons simultaneously and hold for 5 seconds 2 After 5 seconds the controller will go blank Release the buttons and the controller will scroll MODEL N...

Страница 44: ...Copyright 2005 General Electric Company Printed in USA P N 3002774 Rev A...

Отзывы: