


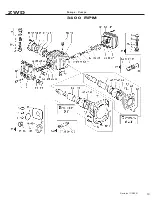

Mounting
This product can be installed in any orientation. Mount the motor to
a solid metal base plate that is mounted to a stable, rigid operating
surface. Use shock mounts to reduce noise and vibration. Install a
pressure regulator or simple shut-off valve to control motor.
Connection
Check the direction of the motor airflow. A single rotation motor
will operate properly only in one direction. Single rotation motors
require a sound absorber to be connected to the air port. Remove
the plastic shipping plugs from the ports. Save plugs for future use
during shutdown.
Install a 5-micron filter in the air line before the connection to the
motor. Next install an air pressure regulator to control motor speed
and torque.
For lubricated operation:
Air motors with an “LL” or “NLP”
designation in the model number can operate with or without
lubrication. For optimal service and life, lubrication is recommended.
An automatic air line lubricator should be installed in the air line as
close as possible and no more than 18 inches (1/2 meter) from the
air motor. Install the lubricator level with or above the air motor so
that the oil mist will blow directly into or fall down into the motor.
Fill the oil reservoir to the proper level with Gast #AD220 or SAE
10W high detergent or non-detergent motor oil. For food processing
applications, use an FDA-approved, food-grade lubricant. Adjust
lubricator to feed 1 drop of oil for every 50 CFM of air while the unit
is running, or 1 drop of oil per continuous minute of run time. Do
Not overfeed oil or exhaust air may become contaminated.
Clean the compressed air connection with low pressure air to
remove any dirt from the line before connecting to the ports.
Use the proper sized fasteners. For the most efficient output and
control of speed, use air lines that are the same size as the motor
inlet port if the connection is less than 7 feet (2 meters). For longer
connections, use the next pipe size larger than the motor intake
port. Connect lines to motor in the proper direction.
A reversible motor will work equally well in both directions. Connect
a 4-way valve with piping to both air ports of motor to make
reversing possible. Connect the sound absorber on the exhaust air
port or valve connection.
Do not add any thrust to the end or side of the shaft when
making connections.
Do not use a hammer on the shaft or connections.
Lubricating the drive shaft will make assembly
easier. Use a puller for removal of pulleys,
couplings and pinions on the motor shaft. Check
that the tension on the belt pulley matches the
manufacturer’s specifications. Do not exceed
the maximum radial and axial forces on the
shaft. If the motor shaft is connected to the part
to be driven without a coupling, check that the
radial offset and axial force effect will not cause
problems.
Use only belts with < 109 electrical leakage
resistance to prevent static electrical problems.
Ground the motor.
Accessories
A muffler is shipped with the air motor (except 16AM) but is not
installed. Consult your Gast Distributor/Representative for additional
filter recommendations. Install a moisture trap and 5 micron filter in
the air line ahead of motor.
Air consumption data at various speeds and pressures are available
from your Gast Distributor/Representative or the factory.
OPERATION
m
WARNING
Injury Hazard
Air stream from product may contain solid or liquid materi-
al that can result in eye or skin damage.
Do Not use cumbustible gases to drive this motor.
Wear hearing protection. Sound level from motor may
exceed 85 db(A).
Failure to follow these instructions can result in eye injury
or other serious injury.
Check all connections before starting motor. It is your
responsibility to operate this product at recommended
speeds, loads and room ambient temperatures. Do not run
the motor at high speeds with no load. This will result in
excessive internal heat that may cause motor damage.
The starting torque is less than the running torque. The starting
torque will vary depending upon the position of the vanes when
stopped in relation to the air intake port.
Use a pressure regulator and/or simple shut-off valve to regulate
the motor’s speed and torque. This will provide the required power
and will conserve air. Open the air supply valve to the motor. Set
the pressure or flow rate to the required speed or torque. Adjust the
lubricator to feed one drop of oil for every 50-75 CFM (1.5-2 M
3
per
minute) of air moving through motor. Check the oil level daily. The
gear reducer does not need lubrication.
Revision 11/3/2021
5


