background image

19

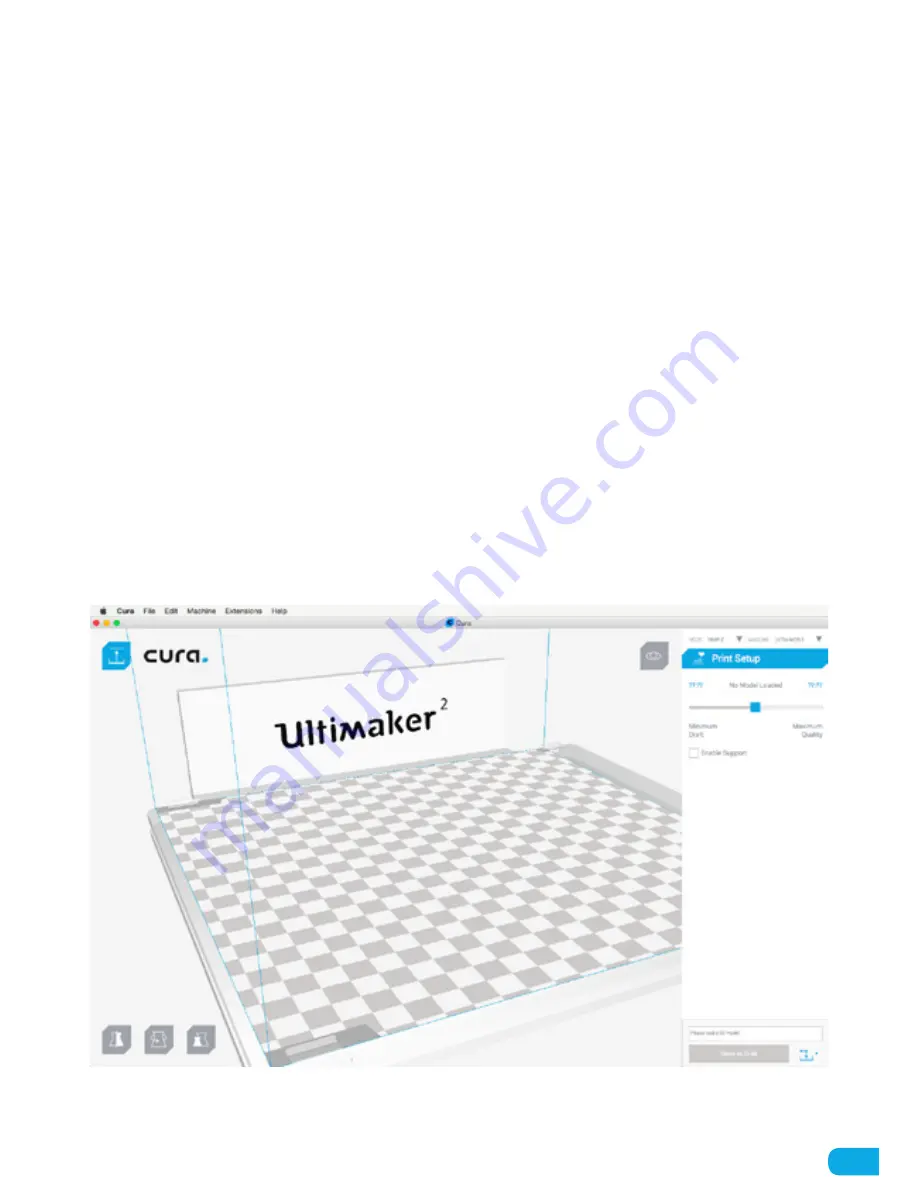
For the Ultimaker 2 we recommend to use our software Cura to prepare your 3D print files. Cura will help you 
converting 3D models into 3D print files within a couple of seconds and shows you a preview of the print in order to 
ensure everything is as you would like it to be.

Cura can be downloaded from our website: 

ultimaker.com/software

After downloading, open the installer and run the installation wizard to complete the installation. When you open 
up Cura for the first time, you will be asked to select the 3D printer that you have; select the Ultimaker 2. No other 
configuration is required and you can directly start using Cura.

The basic process of converting a 3D model to a print file in Cura is described below. 

1.  Load a 3D model (STL or OBJ file) into Cura via the “Load” button.
2.  Position the slider in the Print Setup screen to the desired position and wait for Cura to slice the model.
3.  After you have done the settings and Cura has converted the file, you can save the print file (G-code file) via the 

“Save” button in the bottom right corner.

When using Cura for the first time you will see the “Simple” mode in the Print Setup screen. This is perfect for 
beginners, but when you’re a more experienced user and want to have more control over the print settings you can 
also switch to the “Advanced” mode.

For more information on using Cura you can visit the Cura support pages: 

ultimaker.com/support/software

CURA

Содержание 2 Extended

Страница 1: ...Ultimaker2 THE EASY AND RELIABLE 3D PRINTER USER MANUAL R...

Страница 2: ...2...

Страница 3: ...UP THE ULTIMAKER 2 8 Unboxing 9 What s in the box 10 Ultimaker 2 at a glance 11 Installing accessories 12 3 GETTING STARTED 14 Configuration wizard 15 Start a print 17 4 ADVANCED PRINTING OPTIONS 18 C...

Страница 4: ...h the Ultimaker 2 Within these pages we want to show you how simple and easy it is to produce great quality prints You might be familiar with other types of Ultimakers or 3D printers It is however ess...

Страница 5: ...ng gears have been covered Still it is advised to only reach in the machine when it is turned off CAUTION Always unplug the printer before doing maintenance or modifications RISK OF BURNS There is a p...

Страница 6: ...s not purport to be all inclusive and shall be used only as a guide The conditions or methods used for assembling handling storage use or disposal of the device are beyond our control and may be beyon...

Страница 7: ...dimensions Desktop space 357 mm 342 mm 388 mm Shipping dimensions 400 mm 400 mm 550 mm Weight 11 2 kg Shipping weight 18 0 kg Temperature Ambient operation temperature 15 32 C Storage temperature 0 32...

Страница 8: ...G UP THE ULTIMAKER 2 Now your Ultimaker 2 has arrived you re ready to unpack it and set it up We recommend to carefully unpack your Ultimaker 2 and set it up according to the instructions on the next...

Страница 9: ...you can remove the cardboard accessories box from the top 2 Next take the complete foam packaging parts with the Ultimaker 2 out of the cardboard box The easiest way to do this is by holding the blue...

Страница 10: ...al accessories that come with the Ultimaker 2 This is everything you need to start printing 1 Power supply and cable 2 Spool holder 3 Glass plate 4 Filament 5 USB cable 6 Glue stick 7 Grease 8 Hex key...

Страница 11: ...Push and rotate button Build plate Build plate clamps Build plate screws Print head Bowden tube Print head cable Material feeder Spool holder Power socket USB socket Power switch 1 3 2 6 5 4 7 8 9 12...

Страница 12: ...holder down until it snaps into place GLASS PLATE The glass plate is the print surface for prints on your Ultimaker 2 We are going to install it the following way 1 Open up the two build plate clamps...

Страница 13: ...e turned on Before connecting it make sure the power switch is in the off position 1 Connect the power cable to the power brick 2 Plug the power cable in the wall socket and connect the cable at the o...

Страница 14: ...your Ultimaker 2 for the first time it will guide you through the configuration wizard This will help you preparing the Ultimaker 2 for its first use Make sure to follow these steps carefully in orde...

Страница 15: ...rigin point After this you can follow the steps below for leveling the build plate 1 The first step is to roughly level the build plate by rotating the button at the front of your Ultimaker 2 until th...

Страница 16: ...ed wheel has grabbed the filament it will slowly move it further into the bowden tube 3 Wait till the filament reaches the first black bowden tube clip and then press the button to continue The Ultima...

Страница 17: ...ng up the build plate and nozzle Please note that this can take up to 5 minutes While printing the display will show the progress of the print and the remaining time for completion When the print has...

Страница 18: ...er 2 offers more options You can use our open source software package Cura to prepare your own 3D print files and the Ultimaker 2 even gives you the possibility to fine tune settings during the printi...

Страница 19: ...n directly start using Cura The basic process of converting a 3D model to a print file in Cura is described below 1 Load a 3D model STL or OBJ file into Cura via the Load button 2 Position the slider...

Страница 20: ...f the print files on the SD card and will automatically start the print after that MATERIAL In the MATERIAL menu you can either change the filament on your Ultimaker 2 or change the settings of materi...

Страница 21: ...the top of the Ultimaker 2 Insert material Heats up the nozzle after which you can insert filament Move material Heats up the nozzle after which you can use the scroll wheel to forward the material Se...

Страница 22: ...a smoothly working Ultimaker 2 it is important to maintain it correctly In this chapter the most important maintenance tips are described It is recommended to read them carefully in order to achieve t...

Страница 23: ...nded to clean the glass plate once in a while When doing this always make sure that the Ultimaker 2 is turned off and build plate has cooled down 1 Before taking out the glass plate first manually mov...

Страница 24: ...this by blowing air on the knurled wheel or using a simple brush It is also recommended to clean the feeder when you notice grinding of the filament LUBRICATING THE AXES To maintain your Ultimaker 2...

Страница 25: ...ment is removed 1 Remove the filament from the Ultimaker 2 Go to MATERIAL CHANGE in order to remove the filament and instead of inserting new material select CANCEL Manually move the print head toward...

Страница 26: ...the color and shape of the tip of the filament the goal is to have a clean cone shaped tip Repeat step 3 and 4 until the filament comes out without any residue and has a cone like shape 5 Re assembly...

Страница 27: ...orks it is advised to take a closer look at the PTFE coupler A deformed PTFE coupler can be recognized by a small brim on the inside at the bottom Instructions for this can be found on the website CAN...

Страница 28: ...ers incorrect values and due to safety reasons it will prevent the heated bed from heating up The most likely reason for this is connection problem which could happen due to a bad connection on the he...

Страница 29: ...ing to solve issues on your own and getting more experienced with 3D printing We also have a very active online community with experienced users who are willing to share tips and solutions and can hel...

Страница 30: ...www ultimaker com R Ultimaker...

Отзывы: