14
15
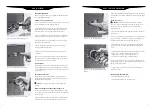
[Figure 3] - Turn gas control to “OFF”.
[Figure 6] - Turn gas control to “OFF”.
[Figure 4] - Connect supplied regulator
and do not over-tighten.
[Figure 5] - Attach quick-connect end of
regulator to the unit.
[Figure 7] - Press, hold and turn to low.
REGULATOR CONNECTIONS:
Your Ukiah Co gas fire pit is equipped with a specialized pressure
regulator, which is a device to control and maintain uniform gas
pressure as gas is released from the LP cylinder. This pressure
regulator is designed for vapor withdrawal.
WARNING
: Use only the original specially designed regulator
supplied with your unit. Using another regulator may be dangerous.
WARNING:
Use tanks that are marked “Propane Fuel” only.
WARNING
: Read carefully all instructions contained on the
information plate attached to the fire pit.
WARNING
: Do not transport your fire pit with LP Tank connected.
1. Place the fire pit in the desired location. Make sure that it is placed
outdoors in a well-ventilated area away from any flammable structures,
awnings, vegetation, etc.
2. Place your 20lb LP tank in a location that is not in a walkway or
where it can be easily knocked over. Maintain 60 inches between the
unit and tank. For safest operation use a commonly-available LP tank
holder.
3. Make sure the unit gas control knob is turned to “OFF” by pushing
it in and turning it clockwise to the off position. [Figure 3]
4. Make sure the propane cylinder valve is turned off by turning valve
clockwise.
5. While holding carrying handle closest to propane cylinder, connect
regulator to propane cylinder and turn clockwise until snug (DO NOT
OVER-TIGHTEN). Use only supplied regulator included with your unit.
[Figure 4]
6. Attach quick-connect on opposite end of regulator hose to your
unit. [Figure 5]
WARNING:
Do not over-tighten or use a wrench to tighten the
regulator connection. Over-tightening could damage the regulator
coupling and cause a leak.
LP TANK REMOVAL:
When the LP tank needs to be replaced, follow these instructions to
remove it.
1. Make sure gas control knob is turned “OFF” by pushing it in and
turning it clockwise to the off position.
2. While holding carrying handle closest to propane cylinder with one
hand, unscrew propane cylinder from regulator.
WARNING:
Before lighting, remove weather cover and remove lid
when applicable.
WARNING:
DO NOT stand with your head or arms over the fire pit
at any time.
1. Make sure control gas knob on unit is set to “OFF”, then turn on
the gas supply. Open the tank valve fully by slowly turning the handle
counterclockwise. [Figure 6] Purge the gas supply line of any trapped
air and check for leaks prior to the first lighting of the unit. See
“Lighting Safety” section for details.
2. To ignite, push and hold gas control knob on unit for 3 - 5 seconds
while turning to “LOW” and once ignited continuing to depress the
fuel control knob for an additional 5-10 seconds before releasing. The
flame should stay lit. This will actuate the thermal coupler. [Figure 7]
NOTE: The built in thermocouple safety device needs to warm up to
engage, ensuring the gas will be shut of in the event of the unit being
tipped over or blown out.
3. If igniter does not light burner, replace battery or use a long match
or long butane lighter.
4. Adjust flame to desired level with the fuel control knob on the unit.
5. After operation, turn all gas knobs to the “OFF” position and push
the ON/OFF switch to off. Remember to turn the valve on top of the
gas cylinder to the “OFF” position.
IF BURNER DOES NOT IGNITE:
If ignition is not immediate, push and turn the control knob
clockwise to “OFF”. The gas supply will automatically shut off after
approximately 10 seconds (+/- 3 seconds) if a flame does not start or
it is extinguished. If this happens, wait 5 minutes for gas fumes to clear
and re-try or refer to the troubleshooting section if the unit does not
re-start. If problem cannot be resolved, do not attempt to operate the
appliance; contact your dealer or approved service center.
SETUP INSTRUCTIONS
LIGHTING INSTRUCTIONS


