background image

UK Beauty Machine tattoo & hair removal laser

2

Chapter 1: Warning

1.1 respected user:

Thank you for choosing the instrument carefully designed by our company. In
order to better exert the effect of the product, we sincerely recommend:
1) Before using the instrument, please read this applicable manual carefully and
keep it in a safe place for future reference and inquiries;
2) Please install, use and operate correctly in accordance with the requirements
in the manual;
3) Do not disassemble or modify any parts of this level;
4) Unless authorized by authorized personnel of our company, it is strictly
forbidden to open the cover and disassemble the host.
5) It is strictly forbidden for non-professionals to carry out maintenance and
transformation without authorization;
6) If you encounter any problems during the operation, please take videos and
pictures and contact the seller in time;

2.2 Safety precautions

1

When the power plug is dirty, wipe it clean in time, and make sure that there

are no foreign objects before connecting to the socket.
2

Connecting to the 110V, 60HZ/220-230V, 50Hz three-plug high-power power

socket, and the power cord must be unplugged when moving the device.
3

Don't touch the power plug and pull the power cord after plugging in.

4

Don

t touch the power cord and plug with wet hands.

5

Don

t force the instrument or the parts around the power supply.

6

Don

t use the instrument at high temperatures, and do not place heating

equipment near the instrument.
7

After the instrument is started, do not open the power socket of the

instrument at will, which will cause failure.
8

If there is smoke or odor when using the instrument, please unplug the power

supply and consult after-sales service.
9

Don

t touch the lips and eyes when the handle is activated to avoid injury.

1.3 Operation precautions

Содержание HF007

Страница 1: ...UK Beauty Machine tattoo hair removal laser 1 Emsculpt machine HF007 user s manual...

Страница 2: ...he operation please take videos and pictures and contact the seller in time 2 2 Safety precautions 1 When the power plug is dirty wipe it clean in time and make sure that there are no foreign objects...

Страница 3: ...to prevent it from falling when the handle is in the accessory rack do not pull the connecting line forcefully 5 After using it each time you need to stand by for ten minutes before turning off the po...

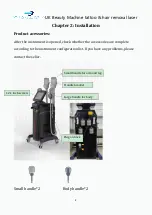
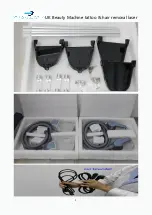
Страница 4: ...r the instrument is opened check whether the accessories are complete according to the instrument configuration list If you have any problems please contact the seller Small handle 2 Body handle 2 Sma...

Страница 5: ...UK Beauty Machine tattoo hair removal laser 5...

Страница 6: ...undergone cosmetic surgery 5 People with metal materials in their bodies 6 Those with immune system dysfunction 7 Those with skin inflammation and body swelling 8 People who feel numb and do not respo...

Страница 7: ...the doctor 14 If there is a wound on the skin avoid the wound or don t do it 15 Do not operate the abdomen when you are full at least one hour after meals 16 Trying avoid ribs when using 17 Before us...

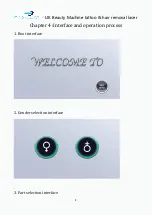
Страница 8: ...UK Beauty Machine tattoo hair removal laser 8 Chapter 4 Interface and operation process 1 Boot interface 2 Gender selection interface 3 Part selection interface...

Страница 9: ...UK Beauty Machine tattoo hair removal laser 9 4 Treatment interface...

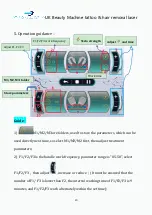
Страница 10: ...tment parameters 2 F1 F2 F3 is the handle work frequency parameter range is 05 50 select F1 F2 F3 then adjust increase or reduce It must be ensured that the number of F1 F3 is lower than F2 the interv...

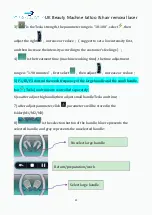
Страница 11: ...nge is 1 90 minutes first select then adjust increase or reduce 5 F1 F2 F3 control the work frequency of the large handle and the small handle but Tesla and time are controlled separately 6 so after a...

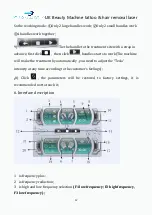
Страница 12: ...click handles starts to work The machine will make the treatment by automatically you need to adjust the Tesla intensity at any time according to the customer s feelings 10 Click the parameters will b...

Страница 13: ...button 19 is the smart mode setting area you can set three groups of smart modes M1 M2 M3 first select any group of M1 M2 M3 adjust F1 F2 F3 adjust low frequency and high frequency select energy adjus...

Страница 14: ...reatment area with a bandage Operating position The position of the operation should be the same as that of the interface selection Fixing the handle with the strap along the treatment site make sure...

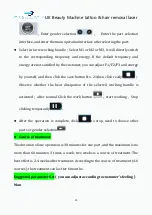
Страница 15: ...then click ready Observe whether the heat dissipation of the selected working handle is activated after normal Click the work button start working Stop clicking temporarily After the operation is comp...

Страница 16: ...8 6 20 35 30 45 Buttocks 12 30 15 40 60 30 50 Chapter 5 Maintenance and repair 5 1 Maintenance 5 1 1Daily inspection Managers must regularly inspect and control instruments and components Whether the...

Страница 17: ...expired please contact the manufacturer directly to provide professional after sales service To repair this machine you must contact the company s business department or dealer and do not repair it wi...

Страница 18: ...orrosive gases Transportation The instrument in the packaged condition is suitable for road railway aviation and waterway transportation During loading and unloading and transportation it should be pr...

Отзывы: