background image

MASC 

QUICK START GUIDE                                                        


Page 

8

 of 

19


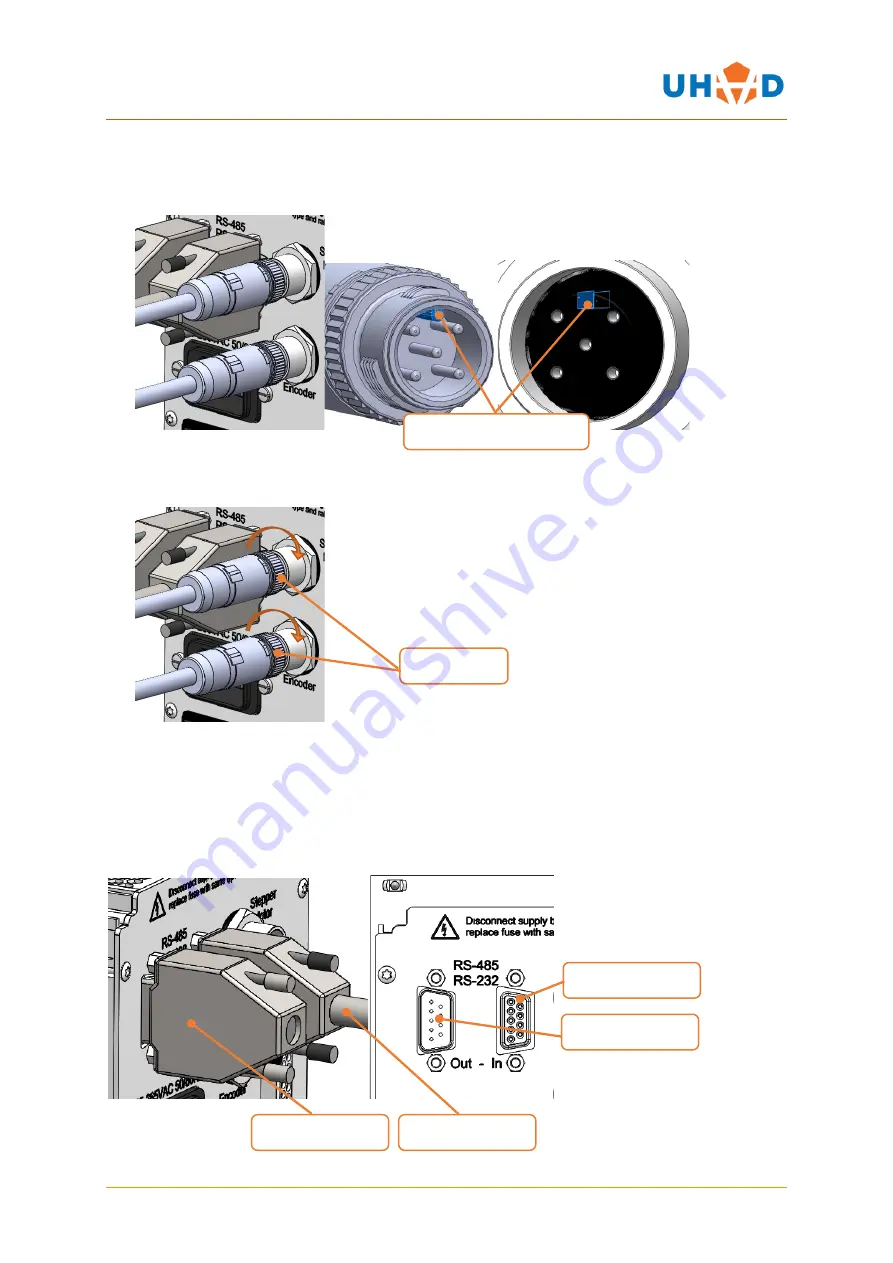
3.2.3  M12 Connectors 

1.


Push connector into socket. 

Note: socket will not engage unless key features are aligned


correctly.


2.  Turn knurled nut clockwise until finger tight to fully engage connector pins. 


3.2.4  Single Axis Systems 

When only one MASC is used: 

1.


Connect to a PC/laptop using MASC-JC-03 into the RS-485 In port 

2.


Plug the RS-485 termination plug, MASC-TP, into the RS-485 out port. 

Failure to use the 

MASC-TP can cause communication error.


Alignment key and slot 

Knurled Nut 

RS-485 Out Port 

MASC-TP 

RS-485 In Port 

MASC-JC-03 

Содержание MASC

Страница 1: ...MASC Revision 1 1 Author N Carapiet QUICK START GUIDE Product MASC Multi Axis Stepper Controller Product Description Stepper Motor Controller...

Страница 2: ...ST5 Q CONTROLLER BE FULLY UNDERSTOOD AND USED CORRECTLY 4 AS SUCH INSTALLATION MUST BE CARRIED OUT ONLY BY COMPETENT PERSONS WHO ARE FAMILIAR WITH ELECTRONIC CONTROL SYSTEMS 4 OVERVIEW 4 LAYOUT FRONT...

Страница 3: ...MASC QUICK START GUIDE Page 3 of 19 Q PROGRAMMER 19...

Страница 4: ...mpact rack mountable enclosure It is a versatile high performance microstepping packaged unit suitable for light industrial and scientific uses where precision and system level integration are require...

Страница 5: ...ge MASC stepper motor controller x 1 MASC TP RS485 232 terminator plug x 1 MASC JC 03 PC Jog Box connection lean x 1 Mains Power Input Mains Fuse RS 485 RS232 in from PC or Jog Box RS 485 RS232 out te...

Страница 6: ...ed when purchasing the device Cables may be packaged within the MASC packaging CONNECTIONS TO MASC A dedicated series of cables that allow connection between the MASC and any UHV Design stepper motori...

Страница 7: ...d 3 2 1 Power Connection 1 Choose appropriate power lead for region e g UK US 2 Push plug into IEC socket on rear of MASC 3 2 2 D Type Connectors 1 Push connector into socket 2 Rotate locking screws c...

Страница 8: ...se until finger tight to fully engage connector pins 3 2 4 Single Axis Systems When only one MASC is used 1 Connect to a PC laptop using MASC JC 03 into the RS 485 In port 2 Plug the RS 485 terminatio...

Страница 9: ...he next MASC s RS 485 In port 3 Repeat step 2 for as many MASC s that have been configured 4 Plug the MASC TP Into the last MASC s RS 485 out port Failure to use the MASC TP can cause communication er...

Страница 10: ...m the standard M12 connector to a UTO part number WD C 006 To attach M12 cables together see section 3 2 3 1 Push connector into socket Note socket will not engage unless key features are aligned corr...

Страница 11: ...er have a built in 500 line incremental rotary encoder The connector is sited next to the motor connector To connect the cable see section 3 3 1 Encoders have 8 pin connectors Motors with UTO connecto...

Страница 12: ...the device will need to be connected to a PC or laptop in order to perform basic functions 1 Plug all cables into the MASC and device as described above 2 If the PC laptop has a dedicated serial port...

Страница 13: ...MASC JB is turned off 2 Plug the MASC JC 03 into the MASC JB 3 Screw in the locking screws until finger tight CHECKS 1 Check that all connections have their relevant locking mechanisms in place to pre...

Страница 14: ...uld illuminate and the upper status LED should be either solid green or flashing green If not then a fault may be present Please refer to the troubleshooting section of this guide or contact your supp...

Страница 15: ...on is pressed Note rotary drives that have no limit switches will continuously rotate until the button is released 2 To alter the speed slide the speed select slider up or down until the desired speed...

Страница 16: ...ommended to zero each axis first and then save the positions See section Error Reference s ource not found for details 4 1 2 1 Saving a Position 1 Using the jog mode move the device to the desired pos...

Страница 17: ...d Position 1 Navigate to the position mode screen 2 Press the desired Select Axis button once 3 Select the sequence number that you wish to activate by pressing the Select button until the desired seq...

Страница 18: ...is performed is defined by the speed selection slider in the jog mode screen If you wish to stop the move before it is complete press the mode select button 4 If desired once the move is complete the...

Страница 19: ...ULATOR If the MASC is being run from a PC laptop then the Jog Emulator Application can be used to perform all functions as described in section with the exception of saving positions 4 1 Q PROGRAMMER...

Отзывы: