background image

M

iCrophone

 B

ooM

The noise canceling Microphone Boom provides clear 

communications in noisy environments with 360 degrees of 

rotation and disconnects for easy replacement or upgrade.

Basic Positioning of the Noise Canceling Microphone

Basic Positioning of the Noise Canceling Microphone

The  Microphone  Boom  should  be  placed  between  the  corner 

and center of the mouth.  If placed directly in front of the mouth, 

wind noise from the mouth and nostrils may occur.  Too far away, 

and the microphone output will lose volume.  Proper placement 

requires  a  little  trial  and  error  to  find  the  “sweet  spot”  of  high 

output volume with low noise.

For best performance:

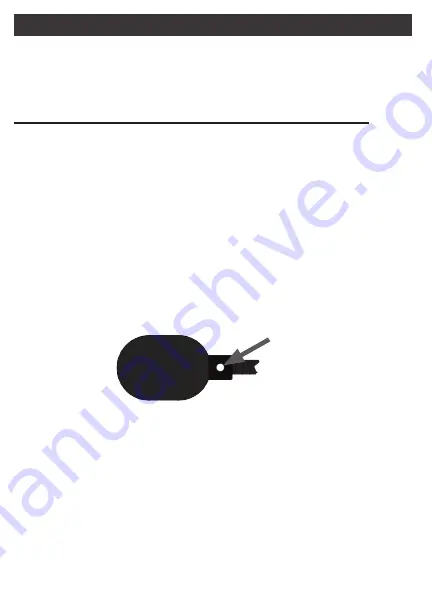
1.  Position the microphone so that the ‘Talk’ side 

(marked with a 

solid white dot)

 is pointed directly toward your mouth.  If the 

‘Talk’ side of the microphone points up or down, it will begin to 

cancel your voice resulting in weak transmissions.

2.  Position  the  microphone  so  that  the  windscreen  barely 

touches your lips when pursed.  Moving the microphone 

farther from the mouth will reduce wind noise from breathing, 

but will also lower output volume and increase environmental 

noise.    Louder  noise  environments  may  require  positioning 

the microphone closer to the mouth to acheive proper output 

volume.    Proper  placement  should  balance  between  loud 

output volume and low environmental noise and wind noise.

t

alk

4

Содержание Harmony

Страница 1: ...Harmony User s Guide...

Страница 2: ...one Cable Pro only 6 Connecting Disconnecting 6 In line Controller 7 Aviation Application 8 Controls Jacks 8 Basic Settings 9 Auxiliary Jack 10 Troubleshooting 11 Smart Phone Application 12 USB Comput...

Страница 3: ...devices The modular design of HARMONY Pro makes it the most versatile upgradeable and user repairable headset available Versatility A single component can be added to the HARMONY PRO headset to make...

Страница 4: ...the sweet spot of high output volume with low noise For best performance 1 Position the microphone so that the Talk side marked with a solid white dot is pointed directly toward your mouth If the Talk...

Страница 5: ...nnecting the Microphone Boom to the Headphone Cable When attaching the Microphone Boom to the Headphone Cable care must be taken to ensure the components are correctly aligned to avoid parts being dam...

Страница 6: ...securely into place with a click Caution Do not attach the Headphone Cable to anything other than a Harmony Application Cable or insert anything into the open end of the LEMO plug damage can occur Di...

Страница 7: ...asic commands recognized by most phones For a full list of commands see the Smart Phone Application Cable section on page 12 O This setting is intended for push to talk systems compatible with externa...

Страница 8: ...n Application 1 Headphone Cable Jack Pro Only 2 Auxiliary Jack 3 Aviation Auxiliary Audio Microphone Routing Switch 1 2 3 4 5 6 7 8 4 Left Ear Volume 5 Right Ear Volume 6 Microphone Gain 7 Mono Stereo...

Страница 9: ...the Microphone Gain to balance between loud microphone transmission volume and low background noise Setting the Mono Stereo Switch Setting the Mono Stereo Switch The Mono Stereo Switch splits a singl...

Страница 10: ...ne Routing Selecting Microphone Routing The microphone cannot be output to both the aircraft radio and an attached device simultaneously Use the Microphone Routing Switch to direct the microphone outp...

Страница 11: ...Microphone Boom is positioned properly page 4 Increase the Microphone Gain Verify the Microphone Routing Switch is in the position page 10 Verify the l O switch on the In line Controller is in the l...

Страница 12: ...ctive Double Fast Press Double Fast Press Skip to Next Track Double Fast Press Double Fast Press Hold Second Press Hold Second Press Fast Forward Current Track Triple Fast Press Triple Fast Press Skip...

Страница 13: ...e Sound section 4 Select the Output tab and select USB Audio Codec Use the slider to adjust the output volume 5 Select the Input tab and select USB Audio Codec Use the slider to adjust the input volum...

Страница 14: ...nally guaranteed Storage Storage Store the HARMONY headset in a cool dry location inside the headphone case The pocket in the lid of the case is made to hold the assembled HARMONY Do not store HARMONY...

Страница 15: ...15...

Страница 16: ...UFlyMike HARMONY are trademarks of UFlyMike LLC 14455 Roller Coaster Rd Colorado Springs CO 80921 All Rights Reserved Rev 012420A...

Отзывы: