IMP117-10
www.ueonline.com
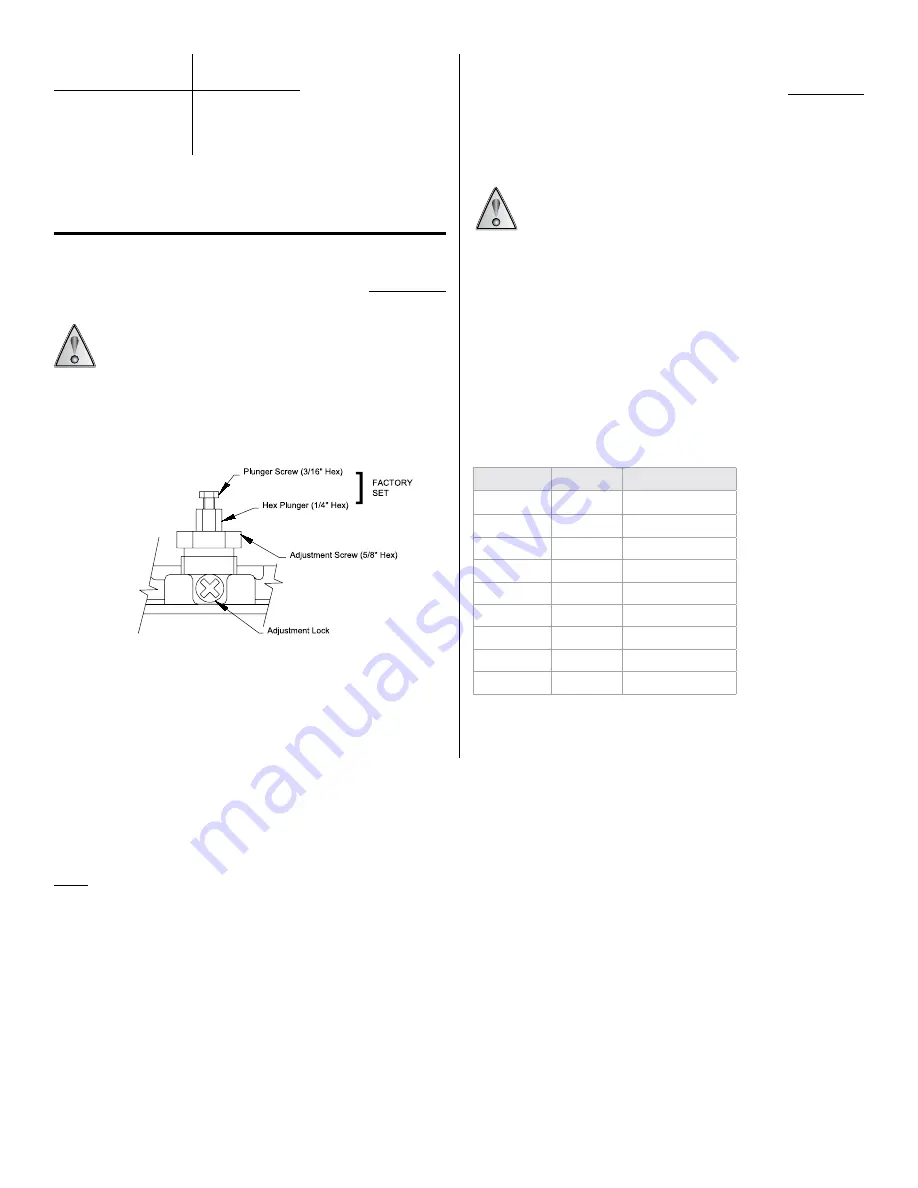
RE-GAPPING PRoCEDuRE (Refer to Figure 1)
Tools Needed
5/8” Open End Wrench
3/16” Open End Wrench
1/4” Open End Wrench
GAPPING IS FACTORY-SET AND CRITICAL TO THE FuNCTION OF THE
SWITCH. THIS PROCEDuRE SHOuLD ONLY BE PERFORMED IF THE
PLuNGER HAS ACCIDENTALLY BEEN ADjuSTED.
1. Loosen adjustment lock.
2. Turn 5/8” hex adjustment screw clockwise (left), to approximately mid
range. This puts a load on the sensor and exposes the plunger flats.
3. using a 1/4” wrench on the plunger and a 3/16” wrench on the plunger
hex screw, turn hex screw counter clockwise (right) from plunger until
switch actuates. If switch is already actuated, turn plunger hex screw
clockwise (left), until switch deactuates. Turn hex screw clockwise (left)
from this point. (see chart below for Flats and approximate Gap.)
4. Check set point according to Part II Adjustments.
5. Connect wires and replace cover securely.
Models
Flats
Approx. Gap
171-174
2-2 1/2
.0085 to .0105”
183-194
1-1 1/2
.004 to .006”
483-494
1-1 1/2
.004 to .006”
358-376
5-6
.020 to .025”
700-706
3 1/2 - 4
.014 to .017”
521-525
2-2 1/2
.0085 to .0105”
531-535
2-2 1/2
.0085 to .0105”
540-548
2-2 1/2
.0085 to .0105”
560-567
1-1 1/2
.004 to .006”
Part II - Adjustments
Tools Needed
5/8” Open End Wrench
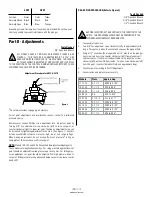
ALL MODELS HAVE A TWO-PIECE ADjuSTABLE PLuNGER (SEE
FIGuRE 1). THIS FEATuRE IS CHARACTERIZED BY A 3/16” HEx
HEAD SCREW INSTALLED IN THE 1/4” HEx PLuNGER. THE LENGTH
OF THIS ASSEMBLY IS ADjuSTED AT OuR FACTORY AND IS CRITICAL
TO THE FuNCTION OF THE CONTROL DuRING NORMAL ADjuSTMENT, THESE
COMPONENTS SHOuLD NOT BE DISTuRBED.
†
Do not adjust unless re-gapping is necessary.
For set point adjustments and recalibration, connect control to a calibrated
pressure source.
Remove cover. Loosen Phillips screw adjustment lock. Adjust set point by
turning 5/8” hex adjustment screw clockwise (left) to raise set point, or
counter clockwise (right) to lower set point. Tension on adjustment screw can
be increased by tightening adjustment lock onto it. (See Figure 1). Controls
include uncalibrated reference scales for high, low or mid range settings.
When making adjustments, do not exceed the proof pressure* rating on
nameplate as this may cause a shift in set point.
NoTE:
Models 190-194 and 490-494 (welded stainless steel diaphragms).
These models are application sensitive. For rising pressure applications, set
point should be adjusted from low pressure up to set point. For falling pres-
sure applications set point should be adjusted from high pressure down to
set point. Wide pressure cycling above and below set point can cause control
band shift.
Adjustment Procedure for H117, H117K
Figure 1
†
SPDT
DPDT
Circuit 1 Circuit 2
Common
Violet
Violet
Yellow
Normally Closed Black
Black
Red
Normally Open Blue
Blue
Orange
Grounding screw and clamp (cast in symbol) are provided. Keep the wire as
short as possible to prevent interference with the plunger.

