
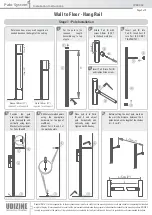

Palo System
Installation Instructions
General Note:
It is the responsibility of the purchaser and/or installer to verify that the mounting surface is solid and capable of supporting the intended
weight of display. It is recommended to consult with a professional and determine the appropriate fastener/anchor needed for the mounting surface. UDIZINE
is solely responsible for the quality of its products and not accountable for faulty installation and ill use of its products beyond recommended limitations.
IPSK002
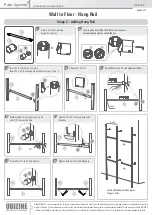
H
H1
Attach Part
H
at required
height on one side
Lock in place by turning the Allen screw to secure
horizontally and tighten with Allen key
Insert Part G into H on first pole.
Insert Part H1 to second pole as shown in steps 1 and 2
Slide H2 to Part G
Attach Part H2 to H1 and adjust until level.
While holding Part G, separate part H1
from H2 from second Pole
1
3
4
5
6
2
Stage 2 : Adding Hang Rail
G
G
G
G
G
G
G
Wall to Floor - Hang Rail
G
H
H
H
H2
H2
H2
H1
H1
Fixed
H2
H2
H1
H1
Tighten Part H1 to second pole with
Allen key
7
H
H
H2
H1
Tighten both Parts H with Allen key
8
G
Attach Part H2 to H1 and tighten
7
To add additional sections repeat
Stages 1 and 2
Page 3 of 3
H1
Fixed


