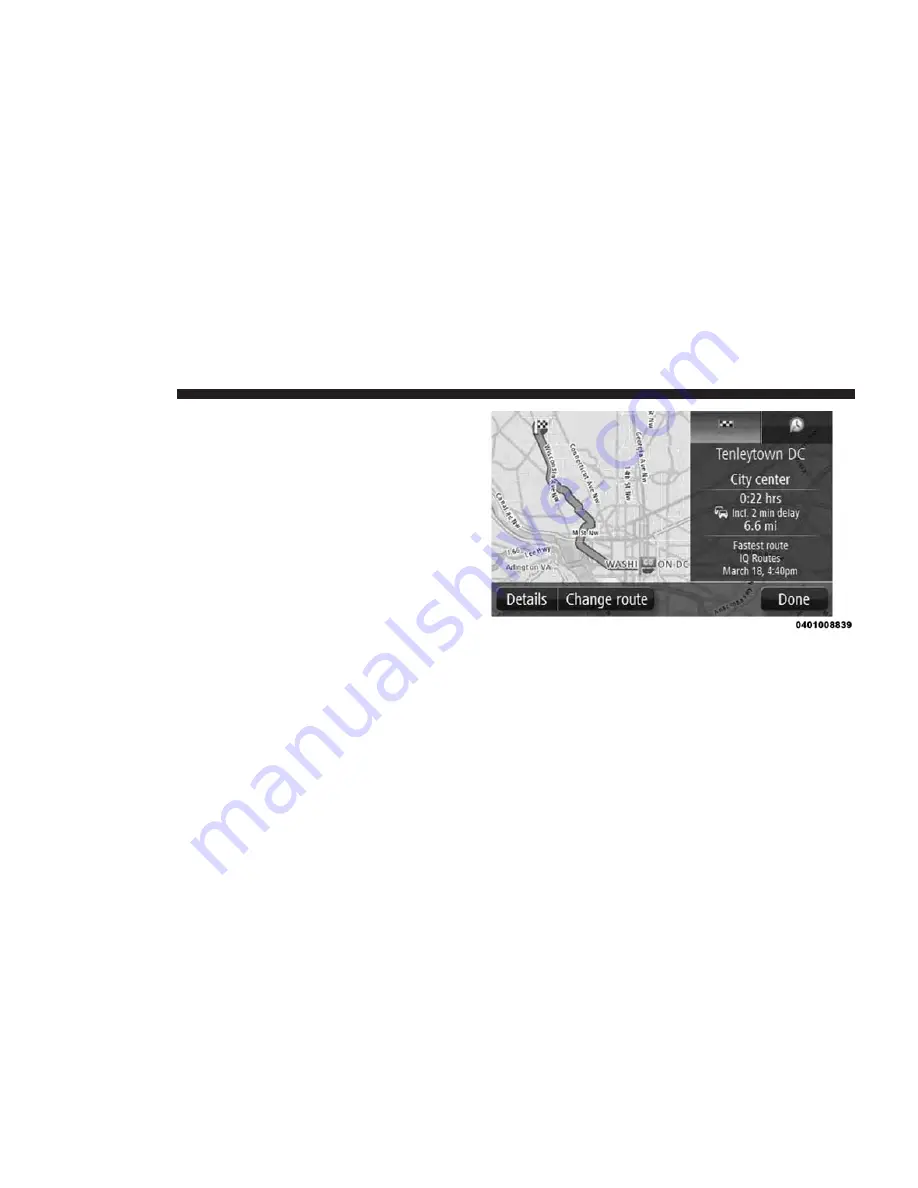
Uconnect 5.0 Скачать руководство пользователя страница 61

Route Summary

The route summary shows an overview of your route, the

remaining distance to your destination and the remain-

ing estimated journey time.
To view the route summary, push the right-hand panel on

the status bar in the Driving view or press the “View

route” button in the Main Menu and then press the

“Show route summary” button.

Selecting A Route Type

Every time you plan a route, you can choose to be asked

about the type of route you want to plan.
To do this, push the “Settings” button followed by the

“Route planning,” then “Route types.” Press “Ask me

every time I plan.”

60 NAVIGATION

Содержание 5.0

Страница 1: ...Owner s Manual Supplement Uconnect 5 0 5 0N...

Страница 2: ...ENTS SECTION PAGE 1 SAFETY GUIDELINES 3 2 INTRODUCTION 9 3 RADIO MODE 17 4 MEDIA MODE 27 5 UCONNECT PHONE 35 6 MORE MAIN MENU 43 7 NAVIGATION 53 8 UCONNECT 5 0 5 0N VOICE RECOGNITION QUICK TIPS 129 1...

Страница 3: ......

Страница 4: ...SAFETY GUIDELINES CONTENTS SAFETY GUIDELINES 4 Safe Usage Of The Uconnect System 5 Touchscreen 5 Disc Drive 6 FCC Declaration 6 Safety Information 7 1...

Страница 5: ...tains instructions on how to use the system in a safe and effective manner Please read and follow these safety precautions Failure to do so may result in injury or property damage Glance at screen onl...

Страница 6: ...speed depen dent For your own safety it is not possible to use some of the touchscreen features while the vehicle is in motion Touchscreen Do NOT attach any object to the touchscreen doing so can res...

Страница 7: ...for a Class B digital device pursuant to Part 15 of the FCC Rules These limits are designed to provide reasonable protection against harmful interference in a residential installation This equipment...

Страница 8: ...frequency safety standards and recom mendations which reflect the consensus of the scientific community The radio manufacturer believes the internal wireless radio is safe for use by consumers The le...

Страница 9: ......

Страница 10: ...INTRODUCTION CONTENTS Uconnect 5 0 SYSTEM 10 Uconnect 5 0N SYSTEM 13 2...

Страница 11: ...Uconnect 5 0 SYSTEM 10 INTRODUCTION...

Страница 12: ...n the screen Rotate the TUNE SCROLL rotary knob to scroll through a list or tune a radio station 5 MORE Push the MORE button located on the faceplate to access additional options such as ECODrive Trip...

Страница 13: ...can be selected by pushing the corresponding buttons in the Radio Mode 10 ON VOLUME Rotate the rotary knob to adjust the Volume Push the ON VOLUME button to turn on the system Push the ON VOLUME butt...

Страница 14: ...Uconnect 5 0N SYSTEM 2 INTRODUCTION 13...

Страница 15: ...selection on the screen Rotate the TUNE SCROLL rotary knob to scroll through a list or tune a radio station 5 MORE Push the MORE button located on the faceplate to access additional options such as EC...

Страница 16: ...can be selected by pushing the corresponding buttons in the Radio Mode 10 ON VOLUME Rotate the rotary knob to adjust the Volume Push the ON VOLUME button to turn on the system Push the ON VOLUME butto...

Страница 17: ......

Страница 18: ...E CONTENTS RADIO MODE 18 Volume Mute 18 Enter Browse Tune Scroll Control 18 Seek Functions 19 Direct Tune 20 Setting Presets 21 SiriusXM Satellite Radio Mode 21 SiriusXM Premier 22 Audio 23 Clock Sett...

Страница 19: ...olume Mute Rotate the rotary knob to adjust the Volume When the audio system is turned on the sound will be set at the same volume level as last played Push the MUTE button to mute the system Push the...

Страница 20: ...ster rate the radio stops at the next available station or channel when the button is released Seek Down Press and release the Seek Down button to tune the radio to the next listenable station or chan...

Страница 21: ...has been entered any numbers that are no longer possible stations that cannot be reached will become deactivated grayed out If you accidently entered the wrong station number Press the CLR button to...

Страница 22: ...wo seconds or until you hear a confirmation beep The Radio stores up to 12 presets in each of the Radio modes Four presets are visible at the top of the radio screen Pressing the All button on the rad...

Страница 23: ...panish language programming SiriusXM services require subscriptions sold separately after the 12 month trial included with the new vehicle purchase If you decide to continue your service at the end of...

Страница 24: ...tellite radio the vehicle needs to be outside with a clear view to the sky If the screen shows Acquiring Signal you might have to change the vehicle s position in order to receive a signal In most cas...

Страница 25: ...right and left side speakers Press the Center C button to reset the balance and fade to the factory setting Press the Done button when done Speed Adjustable Press the Speed Adjusted Volume button to...

Страница 26: ...button on the right side of the display press the Time button and then press the Set button Push the MORE button on the right side of the display press the Settings button then Clock and Date button a...

Страница 27: ......

Страница 28: ...MEDIA MODE CONTENTS MEDIA MODE 28 Common Media Functions 29 Disc Mode 30 USB iPod Mode 31 AUX Mode 32 Bluetooth Mode 33 4...

Страница 29: ...t involv ing serious injury or death Media Mode is entered by pushing the MEDIA button located on the faceplate Once in MEDIA mode press the Source button and the desired mode button Disc USB AUX and...

Страница 30: ...utton and the desired mode will begin to fast forward through the current track until the button is released Seek Down Press and release the Seek Down button on the touchscreen to tune the radio to th...

Страница 31: ...g a CD Disc into the Disc player above the display or by pushing the MEDIA button located on the side of the display Once in MEDIA mode press the Source button and select Disc Inserting Compact Disc G...

Страница 32: ...e into the USB port or by pushing the MEDIA button located left of the display Once in MEDIA mode press the Source button and select USB iPod Inserting USB iPod Device Gently insert the USB iPod devic...

Страница 33: ...AUX mode and begin to play when you insert the device cable Controlling The Auxiliary Device The control of the auxiliary device e g selecting play lists play fast forward etc cannot be provided by t...

Страница 34: ...tem Before proceeding the Bluetooth device needs to be paired through Uconnect Phone to communicate with the Uconnect System NOTE See the pairing procedure in this manual for further details Once the...

Страница 35: ......

Страница 36: ...Phonebook Transfer From Mobile Phone 38 Making A Phone Call 39 Receiving A Call Accept And End 39 Mute Or Unmute Microphone During Call 39 Transfer Ongoing Call Between Handset And Vehicle 39 SMS Mess...

Страница 37: ...one number with your mobile phone using simple voice commands NOTE The Uconnect requires a mobile phone equipped with the Bluetooth Hands Free Profile Version 1 0 or higher For Uconnect customer suppo...

Страница 38: ...een you can always pair a mobile phone by pushing the Settings button then press the Add Device button and proceed as described above 7 During the pairing stage a screen is displayed indi cating the p...

Страница 39: ...onebook data download process Specific Bluetooth Phones with Phone Book Access Profile may support this feature See UconnectPhone com for supported phones Download and update if supported begins as so...

Страница 40: ...ush the Phone Pick up button on the steering wheel After the BEEP say dial a number or call a name Receiving A Call Accept And End When an incoming call rings or is announced on Uconnect push the Phon...

Страница 41: ...e the list displays a maximum of 60 messages received SMS Message Reader Activation Deactivation The SMS message automatic reading function can be activated deactivated by pressing the corresponding b...

Страница 42: ...en an SMS is received the system also allows the message itself to be forwarded Changing The Volume During a phone call use the radio VOLUME rotary knob to adjust the volume to a comfortable level whi...

Страница 43: ......

Страница 44: ...Settings 44 Display 44 Clock Date 45 Safety Assistance If Equipped 46 Lights If Equipped 47 Doors Locks 47 Audio 47 Phone Bluetooth 47 Radio 47 Restore Default Settings 47 eco Drive 48 Trip Computer 5...

Страница 45: ...t the display brightness with the headlights on or off the setting not corresponding to the active headlight condition is greyed out Display Mode Press the Display Mode button to set the display brigh...

Страница 46: ...p Length Press the Relevant button to set the detail level of the voice messages supplied by the system and the sugges tions displayed Touchscreen Beep Press the Relevant button to activate deactivate...

Страница 47: ...Clock menu Show Time Status can be selected to activate deactivate the displaying of the clock at the top of the display if equipped Date Setting To set the date proceed as for the time setting select...

Страница 48: ...Locks Use this function to activate deactivate the automatic door locking when the car is moving Autoclose func tion Audio See the Audio section for more information Phone Bluetooth See the descriptio...

Страница 49: ...h Acceleration Deceleration Avoid abrupt acceleration deceleration favouring gradual increases decreases in speed Gearbox Use the gear most suited to the road conditions to optimize fuel consumption o...

Страница 50: ...showing the four indices previously described These indexes are grey until the system has sufficient data to evaluate the driving style or in the event of long stops Once sufficient data are available...

Страница 51: ...ve messages may appear on the display to guide the user correctly through the operation These messages are only displayed with the ignition key in the OFF position and system off delay longer than 0 m...

Страница 52: ...ed Trip A and Trip B for monitoring the car s complete journey in a recipro cally independent manner Both functions can be reset reset start of a new journey to reset the desired Trip hold down the Tr...

Страница 53: ......

Страница 54: ...g A Route 55 Voice Control 70 The Driving View 72 Advanced Lane Guidance 74 Changing Your Route 75 View Map 83 Sounds And Voices 84 Settings 85 Points Of Interest 102 Help 107 Favorites 112 Map Update...

Страница 55: ...much faster usually within a few seconds Large objects such as tall buildings can sometimes inter fere with GPS reception The Update Portal The Update Portal will be used for updating the content of...

Страница 56: ...ARNING ALWAYS drive safely and obey all applicable laws You should only use Uconnect features when it is safe to do so Failure to do so may result in an accident involving serious injury or death To p...

Страница 57: ...ner of the screen 4 Enter the town or city name or the ZIP code Towns with similar names are shown in the list while you type NOTE Press the Arrow button to the right of the list to expand the list of...

Страница 58: ...type When the correct street name appears in the list press the name to select the destination 6 Enter the house number then press the OK button 7 The location is shown on the map Press the Select bu...

Страница 59: ...al destination 8 When the new route is shown press the Done button For more information about the route press the De tails buttons To change your route for example to travel via a particular location...

Страница 60: ...t can be used safely when driving The main menu in Safety mode is displayed In Safety mode you can enter a destination without the use of typewriter see below go into map display and toggle three sett...

Страница 61: ...hand panel on the status bar in the Driving view or press the View route button in the Main Menu and then press the Show route summary button Selecting A Route Type Every time you plan a route you can...

Страница 62: ...be the quickest route especially if the shortest route is through a town or city Avoid motorways Route which avoids motorways Using Arrival Times You can set your navigation system to ask you if you n...

Страница 63: ...rival time is constantly recalculated during your journey The status bar shows whether you will arrive on time or if you are going to be late as shown below You will arrive 55 minutes before the arriv...

Страница 64: ...ation in many ways not just by entering the address The other options are listed below Home Press this button to navigate to your Home location You will probably use this button more than any other Fa...

Страница 65: ...dress Press this button to enter an address as your destination Recent Destination Press this button to select your destination from a list of places you have recently used as destinations 64 NAVIGATI...

Страница 66: ...Point Of Interest Press this button to navigate to a Point of Interest POI Latitude Longitude Press this button to enter a destination using latitude and longitude values 7 NAVIGATION 65...

Страница 67: ...in advance Find out how long a journey is going to take before you start You can also compare journey times for the same route at different times of the day or on different days of the week Navigatio...

Страница 68: ...te which takes the least time Eco route Most fuel efficient route for your journey Shortest route Shortest distance between the loca tions you set This may not be the quickest route especially if the...

Страница 69: ...ails button on the route summary screen You can then select from the following options Show Instructions Press this button for a list of all the turn instructions on the route This is very useful if y...

Страница 70: ...oute Demo Press this button to watch a demo of the journey You can interrupt the demo at any time by pressing the screen Show Route Summary Press this button to open the route summary screen 7 NAVIGAT...

Страница 71: ...igation system you can use your voice to control navigation For example to switch to 2D view you can say 2D view To view a list of available commands press the Help button in the Main menu and then pr...

Страница 72: ...can say Navigate home For some phrases you are asked for confirmation NOTE For the best recognition of what you say speak normally without trying to articulate words in an un natural way If there is...

Страница 73: ...ing View along with de tailed information about your current position Press the center of the touchscreen at any time to open the Main Menu The Driving View 1 Zoom button Press the magnifying glass to...

Страница 74: ...ettings Press this part of the status bar to switch between a 3D map and a 2D map 6 Name of the street you are on 7 Navigation instruction for the road ahead and the distance to next instruction If th...

Страница 75: ...its and junctions by showing the correct driving lane for your planned route As you approach an exit or junction the lane you need is shown on the screen Using Lane Guidance There are two types of lan...

Страница 76: ...e is shown in the status bar and all lanes are highlighted you can use any lane Changing Your Route Making Changes To Your Route After you plan a route you may want to change the route or even the des...

Страница 77: ...change the current route press the Change route button in the Main menu Change Route Press this button to change the current route This button is only shown while there is a planned route 76 NAVIGATI...

Страница 78: ...he destination you are shown the same options and asked to enter the new address in the same way as when you plan a new route Avoid Roadblock Press this button while driving on a planned route to avoi...

Страница 79: ...te so that you can select the route you want to use Travel Via Press this button to change your route by selecting a location you want to travel past maybe so you can meet someone on the way When you...

Страница 80: ...right to select one of the routes and then press Done If you do not want to use either of the routes shown in the route summary press Change route to find another way to change your route CAUTION When...

Страница 81: ...to bring up the Main menu 2 Press the Change route button 3 Press the Travel via button NOTE You can also use Voice control to add Waypoints 4 Choose the location for your waypoint from a choice of Ho...

Страница 82: ...message tells you where in the list of waypoints the new one has been inserted 6 Press the Done button On the route summary screen a message confirms that the route is being recalculated to include y...

Страница 83: ...owing 1 Press the touchscreen to bring up the Main Menu 2 Press the Change route button 3 Press the Travel via button 4 Press the waypoint you want to delete You will see a touchscreen with the name o...

Страница 84: ...s you might look at a traditional paper map The map shows your current location and many other locations such as Favorites and POIs To view the map in this way press View map or View route then Show m...

Страница 85: ...he map Press Choose POIs to choose which POI categories are shown on the map Favorites Select this option to show your Favorites on the map Sounds And Voices About Sounds And Voices Your TomTom naviga...

Страница 86: ...then press Turn on off voice guidance Settings About Settings You can change the way your navigation system looks and behaves Most of the settings on your system can be accessed by pressing the Settin...

Страница 87: ...ff Voice Guidance Press this button to switch off voice guidance You will no longer hear spoken route instructions but you will still hear information such as traffic information and warnings Voice gu...

Страница 88: ...is button to switch on voice guidance and hear spoken route instructions Voice Settings Press this button to set the type of spoken directions and other route instructions that your navigation system...

Страница 89: ...u have three or more buttons in your menu then a single button is shown in the Driving view which opens your menu when pressed Favorites Press this button to add rename or delete Favorites Favorites p...

Страница 90: ...en enter the location address in the same way that you enter an address when you plan a route To view or change an existing Favorite press one of the items in the list To see more Favorites on the map...

Страница 91: ...a route to an important location For most people your Home location will be your home address However you might prefer to set the location to another regular destination such as your workplace Route...

Страница 92: ...e not present in every country To travel on these lanes you may need to have more than one person in the car for example or the car may need to use environmentally friendly fuel Route Summary Set whet...

Страница 93: ...w Maximum speed Remaining distance The distance to your destination Leeway Tour navigation system shows how late or early you will arrive com pared with your preferred arrival time that was set when y...

Страница 94: ...e safety features you want applied to your navigation Map Colors Press this button to select the color schemes for day and night map colors for 2D and 3D mode Press the Search button to search for a c...

Страница 95: ...imensional view of the map as though viewed from above The 3D view shows a three dimensional view of the map as though you are driving through the landscape The following buttons are available In 2D v...

Страница 96: ...region simply press this button Show POI On Map Press this button to select the types of Point of Interest POI you want to see on the map Press the Show POI button on the map in the Settings menu Sel...

Страница 97: ...s You can for example create a new POI category called Friends You could then add all your friends addresses as POIs in this new category Press the following buttons to create and maintain your own PO...

Страница 98: ...planning Keyboard Press this button to select the keyboards that will be available for your use and the layout of the Latin keyboard You use the keyboard to enter names and addresses such as when you...

Страница 99: ...GPS Status Press this button to see the current status of GPS reception on your navigation system 98 NAVIGATION...

Страница 100: ...n the map in the Driving View Show next street name When this setting is selected the name of the next street on your route is shown at the top of the Driving view Show current street name on map When...

Страница 101: ...h lane you need when you approach a junction or motorway exit This feature is not available for all roads Show tips This setting switches tips on and off Me And My Navigation Press this button to find...

Страница 102: ...s all your personal settings If you want to keep your personal information and settings you should perform a full back up before you reset the navigation system You can then restore all your personal...

Страница 103: ...device for map updates This is further explained in the chapter Map updates Points Of Interest About Points Of Interest Points of Interest or POIs are useful places on the map Here are some examples...

Страница 104: ...to POI categories you have created For more information on creating POI categories read Managing POIs 5 Press the Add POI button 6 Select the POI category you want to use for the new POI 7 Press a but...

Страница 105: ...est to the city center is shown at the top of the list 8 The following list explains the distances shown next to each POI How the distance is measured varies de pending on how you initially searched f...

Страница 106: ...on the map Setting Warnings For POIs You can set a warning sound to be played when you approach a selected type of POI such as a gas station The following example will show how to set a warning sound...

Страница 107: ...und when you are 500 yards from a gas station on your route Manage POIs Press the Manage POIs button to manage your POI categories and locations You can set your navigation system to let you know when...

Страница 108: ...s this button to edit one of your own POIs Add POI category Press this button to create a new POI category Delete POI category Press this button to delete one of your own POI categories Help About Get...

Страница 109: ...f service you require for example Nearest hospital 5 Select a center from the list the nearest is shown at the top of the list Your navigation system shows your position on the map along with a descri...

Страница 110: ...s information may not be avail able for all services Call For Help Press this button to find the contact details and location of a service center Drive To Help Press this button to plan a driving rout...

Страница 111: ...Where Am I Press this button to see your current location on the map What Can I Say Press this button to see a list of commands you can say when using voice control 110 NAVIGATION...

Страница 112: ...urs Press this button to view a selection of guided tours relating to your navigation system Safety And Other Guides Press this button to read a selection of guides including a First Aid guide 7 NAVIG...

Страница 113: ...e list Your navigation system calculates the route for you 5 When the route is calculated press the Done button Your navigation system immediately starts guiding you to your destination with spoken in...

Страница 114: ...deletion 7 Press the Done button Map Update Updating The Map On Your Uconnect Radio Nav System There are two ways you can get an update for a map Latest Map Guarantee If a new map for your system is a...

Страница 115: ...and files can be saved on the device NOTE We recommend using a memory stick and do not recommend using mass storage devices like mobile phones or media players To prepare a USB device do the following...

Страница 116: ...2 Select Navigation updates in the Settings menu You are asked if you want to prepare a USB device to download updates 3 Select Yes 7 NAVIGATION 115...

Страница 117: ...you connect more than one USB device the system asks you to remove devices so that only the device you want to prepare is connected If there is not enough free space on the USB device the system asks...

Страница 118: ...arts to prepare the USB device When the USB device is ready the message below is shown 5 Remove the USB device and connect it to your com puter You can now download the new map to your USB device 7 NA...

Страница 119: ...nd create a MyTomTom account do the following 1 Download and install the TomTom HOME application on your computer On your computer go to tomtom com getstarted Select Download TomTom HOME then follow t...

Страница 120: ...ner of TomTom HOME 4 Select Create account then enter your details to create a MyTomTom account To receive map updates you must have a MyTomTom account After you create your account you are asked if y...

Страница 121: ...a new version of the map on your system To check if a map is available or to buy a map make sure you have prepared a USB device and installed TomTom HOME on your computer Then connect your USB device...

Страница 122: ...map is downloaded and copied to your USB device Select Done when the process is finished NOTE While the map is being downloaded and copied to your USB device do not disconnect the USB device from you...

Страница 123: ...vigation software if this is required by the new map You are asked if you want to update the system 2 Select Start If the USB device contains new software the Uconnect system first updates the navigat...

Страница 124: ...Before the system starts to update the map you are warned that the update takes some time Select OK 3 The system starts to update the map 7 NAVIGATION 123...

Страница 125: ...update is complete The system cannot be used until the update is completed successfully If the update is interrupted start updating the system again When the map has been updated the message below is...

Страница 126: ...nd Warnings Global Positioning System The Global Positioning System GPS is a satellite based system that provides location and timing information around the globe GPS is operated and controlled under...

Страница 127: ...hout prior written consent from TomTom N V Copyright Notices 2014 TomTom All rights reserved TomTom and the two hands logo are registered trademarks of TomTom N V or one of its subsidiaries Please see...

Страница 128: ...ore information visit http www tomtom com en_gb gpl or contact your local TomTom customer support team via us support tomtom com app answers list Upon re quest we will send you a CD with the correspon...

Страница 129: ......

Страница 130: ...N VOICE RECOGNITION QUICK TIPS CONTENTS Uconnect VOICE RECOGNITION 130 Introducing Uconnect 130 Get Started 131 Basic Voice Commands 132 Radio 133 Media 134 Phone 135 Voice Text Reply 136 Additional I...

Страница 131: ...ul quick tips It provides the key Voice Commands and tips you need to know to control your Uconnect 5 0 system Key Features Five inch Color Touchscreen Display with AM FM USB Bluetooth Bluetooth with...

Страница 132: ...iver 4 Each time you give a Voice Command you must first push either the VR or PHONE button wait until after the beep then say your Voice Command 5 You can interrupt the help message or system prompts...

Страница 133: ...button After the beep say Cancel to stop a current voice session Help to hear a list of suggested Voice Commands Repeat to listen to the system prompts again Notice the visual cues that inform you of...

Страница 134: ...te Radio trial re quired Push the VR button After the beep say Tune to ninety five point five FM Tune to Satellite Channel Hits 1 TIP At any time if you are not sure of what to say or want to learn a...

Страница 135: ...and follow the prompts to switch your media source or choose an artist Change source to Bluetooth Change source to iPod Change source to USB Play artist Beethoven Play album Greatest Hits Play song Mo...

Страница 136: ...r the beep say one of the following commands Call John Smith Dial 123 456 7890 and follow the system prompts Redial call previous outgoing phone number Call back call previous incoming phone number TI...

Страница 137: ...VOICE TEXT REPLY RESPONSES Yes Stuck in Traffic See you later No Start without me I ll be Late Okay Where are you I will be num ber minutes late Call me Are you there yet I ll call you later I need d...

Страница 138: ...lated marks and logos are trademarks of SiriusXM Radio Inc Yelp Yelp logo Yelp burst and related marks are registered trademarks of Yelp DriveUconnect com Uconnect System Support 1 877 855 8400 Mon Fr...

Страница 139: ......

Страница 140: ...Second Edition Uconnect 5 0 5 0N Chrysler Group LLC Printed in the USA 15UC5N 526 AB...

Отзывы: