background image

12

Cocoon 951 Twin

Cocoon 951 Twin

6.4

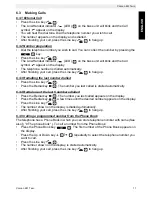
Receiving a Call

During internal or external incoming call, the handset will start to ring. You can temporarily 
disable the handset ringing by pressing the option key ‘

Quiet

’ .

All subscribed handsets will ring when you receive a call.

The Call symbol 

blinks on the display.

The telephone number of the caller appears on the display if you have Caller ID service 
(CLIP). Consult your telephone company. The name of the caller also appears on the 
display if:

the number is programmed into the Phone Book with name

the network sends the name together with the telephone number 

Press the Line key 


 to accept the external call.

OR

Lift the handset off its base (if the Auto answer option is active, See § “6.20 Auto 
answer”)

During the conversation the 

symbol appear on the display and the call timer starts to 

run.

After finishing your call, press the Line key 


 to hang up or put the handset back 

on the base unit.

6.5

Redial list options

When scrolling through the redial list (see §“6.3.4 Redial one of the last 5 numbers dialled”) 
you have the following options:
When the desired number is shown on the display press ‘

Option

and select with the up 

and down keys 


/

the following options:

Delete Call

: to delete an entry in the redail list. Press 


 to confirm.

Save number

: to store the number into the phone book memory. Press 


 to 

confirm. Entera name (See §“9.1 Adding a number and a name to the phone book” ) and 
press ‘

Save

’ 

. Edit the number and press ‘

Save

again.

Delete all calls

: to delete all entries in the redial list. Press 


 to confirm.

6.6

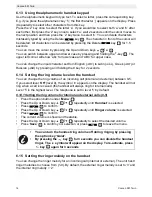
Activate/deactivate handsfree function

This function allows you to communicate without having to pick up the handset. When you 
are talking, press the Handsfree key   

 to activate the handsfree function.

Press the   

 button again to deactivate the handsfree function.

13

2

2

13

3

10

13

13

13

13

13

11

11

When you use the handsfree function for a long time, the batteries will 
drain quickly !

When you are calling in handsfree mode and you want to change the 
volume, press Up or Down key 

/

 repeatedly.

3

10

Содержание COCOON 951 TWIN

Страница 1: ...s constituting a telephone system which Operates up to 4 handsets at one base unit Allows an intercom between 2 handsets Allows the operation of a handset at up to 4 base units Caller ID is a network provider service After subscribing to Caller ID this phone will display the caller s phone number Important To use Caller ID display caller this service has to be activated on your phone line Normally...

Страница 2: ......

Страница 3: ...Pause key 13 6 12 Locating a misplaced handset paging 13 6 13 Using the alphanumeric handset keypad 14 6 14 Setting the ring volume level on the handset 14 6 15 Setting the ringer melody on the handset 14 6 16 Locking the key pad 15 6 17 Turning key click ON OFF 15 6 18 Display contrast 15 6 19 Changing the handset name 16 6 20 Auto answer 16 7 Default handset settings Handset reset 16 8 Setting t...

Страница 4: ...hine 25 15 1 Setting the internal voice prompt language 25 15 2 LED Display 25 15 3 Answering Machine Key Functions 25 15 4 Outgoing Messages 26 15 5 Turning Answering Machine On Off 26 15 6 Setting Number of Rings 27 15 7 Checking Number of Rings 27 15 8 Setting Day and Time 27 15 9 Checking Day Time 28 15 10 Programming the VIP Code 28 15 11 Operation 28 15 12 Recording a Memo 29 15 13 Playback ...

Страница 5: ...nsatisfactory repairs can lead to considerable danger for the user Children frequently underestimate the dangers associated with electrical equipment Therefore you must never leave children unsupervised in the vicinity of electrical equipment The equipment is not to be used in a damp room e g bathrooms or rooms where there is a lot of dust Equipment connected to the mains during a thunderstorm can...

Страница 6: ...cycle you should not throw this product into the nor mal household garbage but bring the product to a collection point for the recy cling of electrical and electronic equipments The symbol on the product user guide and or box indicate this Some of the product materials can be re used if you bring them to a recycling point By re using some parts or raw materials from used products you make an impor...

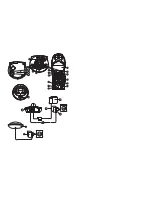
Страница 7: ... E Back view of charger F Power cable 4 3 Installing the batteries Open the battery compartment see below Insert the batteries respecting the and polarity Close the battery compartment Leave the handset on the base unit for 16 hours The Line Handset indicator LED on the base unit will light up A B C D E F 14 Rechargeable Batteries Back view of handset Cover ...

Страница 8: ...icrophone 8 Flash Escape VIP Key 9 Ringer volume Off 10 Down Key 11 Handsfree Key 12 Internal Key INT 13 Option Softmenu Keys Base Charger 14 Line Handset in base indicator LED 15 Paging key 16 Answering machine Keys 17 Speaker 18 Voice promt select switch 19 Numbers of ring Setting Key 20 VIP Code Key 1 2 3 4 5 6 13 12 11 10 9 8 7 Cocoon 951 X F U L L Cocoon 951 17 14 15 16 18 19 20 14 ...

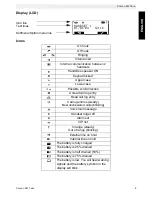
Страница 9: ...n Unread call log entry Read call log entry Call log entries steady New unanswered calls blinking Voice mail message Handset ringer off Alarm set VIP list In range steady Out of range blinking External line on hold Internal line on hold The battery is fully charged The battery is 25 drained The battery is half drained 50 The battery is 75 drained The battery is low You will hear warning signals an...

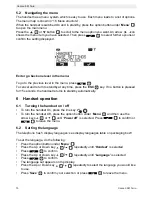
Страница 10: ...et returns to standby automatically 6 Handset operation 6 1 Turning the handset on off To turn the handset On press the line key To turn the handset Off press the option button under Menu and then use the arrow keys or until Power off is selected Press to confirm or to leave the menu 6 2 Setting the language The telephone has 5 display languages see display languages table on packaging box To set ...

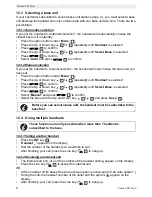
Страница 11: ...ess the Line key Press the Redial key The number you last called is dialled automatically 6 3 4 Redial one of the last 5 numbers dialled Press the Redial key The number you last called appears on the display Press the Redial key a few times until the desired number appears on the display Press the Line key The number shown on the display is dialled automatically After finishing your call press the...

Страница 12: ... on the base unit 6 5 Redial list options When scrolling through the redial list see 6 3 4 Redial one of the last 5 numbers dialled you have the following options When the desired number is shown on the display press Option and select with the up and down keys the following options Delete Call to delete an entry in the redail list Press to confirm Save number to store the number into the phone boo...

Страница 13: ...ins visible on the display for 5 seconds after each call 6 10 Turning off the microphone mute To turn off the microphone during a call press the option key Mute Now you can speak freely without the caller being able to hear you To activate the microphone again press the option key Off 6 11 Pause key If you dial a telephone number and you would like to add a pause to this number press the Pause key...

Страница 14: ...level on the handset You can change the ring volume of an incoming call internal and external between 0 5 If you select level Off level 0 the symbol appears on the display The handset will not ring when a call is received the handset will always ring for internal calls Level 5 is the highest level The telephone is set to level 5 by default 6 14 1 Setting the ring volume for Internal and external c...

Страница 15: ... will appear on the display Press Unlock followed by Key to unlock the keypad again 6 17 Turning key click ON OFF You can set the handset to make a beep whenever you press a key Press the option button under Menu Press the Up or Down key repeatedly until Handset is selected Press to confirm Press the Up or Down key repeatedly until Keypad Beep is selected Press to confirm Select ON turn on key cli...

Страница 16: ...tion button under Menu Press the Up or Down key repeatedly until Handset is selected Press to confirm Press the Up or Down key repeatedly until Autotalk is selected Press to confirm Select On or Off and press Save to confirm 7 Default handset settings Handset reset You can restore all handset settings back to default and erase all phonebook call log VIP list and redial entries The default settings...

Страница 17: ...ly at the handset not at the base or any other handset If one of the alarms is set the alarm set icon appears in standby mode on the display 8 3 1 Set the alarm Press the option button under Menu Press the Up or Down key repeatedly until Alarm Clock is selected Press to confirm Press the Up or Down key repeatedly until Set Alarm is selected Press to confirm Press the Up or Down key repeatedly and ...

Страница 18: ...ther numbers in the Phone Book If the desired number appears on the display the number will be automatically dialled once the Line key is pressed 9 3 Changing a name or number in the phone book Press the phonebook option key Enter the first letter of the desired name The first name in the list with this letter appears on the display Press the Up or Down key to browse and select the entry in the Ph...

Страница 19: ...entry Press the VIP key Press the Up or Down key until the desired entry is shown Press Option and select Ringtone and then The current melody number is shown Use the Up or Down key to select another melody 1 9 and press to confirm 10 3 Deleting an entry from the VIP list Once the desired number appears on the display press Option Press the Up or Down key and select Delete entry Press when Delete ...

Страница 20: ...efault PIN code setting is 0000 If you would like to change the default PIN code and set your own secret code do the following Press the option button under Menu Press the Up or Down key repeatedly until Base Settings is selected Press to confirm Press the Up or Down key repeatedly until System Pin is selected Press and enter the old pin code Press Save If the wrong pin code is entered Incorrect p...

Страница 21: ...ase and register when found The standby screen will appear when succesfully registered and handset name and number will be shown 12 2 Removing a handset It is possible to cancel subscription of a handset to a base You should do this if a handset is damaged and has to be replaced by a new one Press the option button under Menu Press the Up or Down key repeatedly until Registration is selected Press...

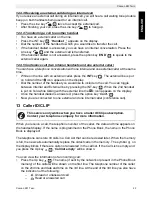
Страница 22: ...lected Press to confirm Press the Up or Down key repeatedly until Select Base is selected Press to confirm Select Manual and press to confirm Select the base with the Up and Down key and press Save 12 4 Using multiple handsets 12 4 1 Calling another handset Press the INT key Handset _ appears on the display Dial the number of the handset you would like to call After finishing your call press the L...

Страница 23: ...oggle between Internal and External line by pressing the INT key When the 2nd handset is put on hold while talking with the external line the icon appears on the display Once the handset dialled is answered press the option key Conf Now you are connected to one external and one internal caller conference call 13 Caller ID CLIP When you receive a call the telephone number of the caller the date and...

Страница 24: ...was send by the network You can edit or add a name before saving Press Save to go to the telephone number Edit the number if needed and press Save again to store the entry into the phonebook The telephone returns to the call list 13 4 Deleting numbers from the Call List 13 4 1 Deleting one number Press the Up key to go to the Call List Press the Up key to look up the desired number Press Option Pr...

Страница 25: ... settings such as VIP code ringer tones The languages of the internal voice is stated on the packaging 15 1 Setting the internal voice prompt language There are 3 voice prompt languages which can be selected by the switch at the bottom of the base Please set the switch at the desired language and press the play key to confirm the language setting 15 2 LED Display The new message LED will flash if ...

Страница 26: ...t message will be played Please call later Erase the outgoing message as follows Select the desired outgoing message by pressing the key Press the key to play the outgoing message Keep the key pressed down when the OGM is played back 15 5 Turning Answering Machine On Off If the answering machine is on the LED will light up and the machine will automatically pick up the line after a number of rings...

Страница 27: ...y The internal voice will state the number of rings set 15 8 Setting Day and Time The day and time setting of the answering machine is independent of the telephone component The day and time of each call is registered and announced during play back The format of the hour depends on the language of the internal voice e g English is in 12 hour format and German is in 24 hour format Programming the d...

Страница 28: ... times on or keys to set the second digit of the VIP code Press the key to confirm the second number The internal voice says the current set 3rd digit of the VIP code Press a few times on or keys to set the third digit of the VIP code Press the key to confirm the VIP code You will hear a long beep The internal voice says the new VIP code for confirmation Note If you do not press any keys for 8 sec...

Страница 29: ...g the Pause key Press the Pause key again to restart playback go to the next message by pressing the key 15 14 Erasing Messages 15 14 1 Erasing Messages One at a Time during Playback Start message playback as explained above When the message to be erased starts playing press the delete key for 2 secs During erase the internal voice will tell you that the message is being erased The machine will st...

Страница 30: ... Old Messages After listening to all messages press 0 to erase all messages c Playing Outgoing Message Press 4 to play the current outgoing message d Recording Outgoing Message Press 9 to select OGM 1 or OGM 2 Press 5 to start recording A beep will indicate that you can start recording Say your message Press 6 to stop recording Note Recording will be automatically interrupted after 2 minutes e Tur...

Страница 31: ...Cocoon 951 Twin 31 Cocoon 951 Twin ENGLISH 16 Menu structure ...

Страница 32: ...ange Bring the handset closer to the base The base has no power supply Check the mains connection to the base The handset is not registered to the base Register the handset to the base Base or handset do not ring The ringing volume is zero or low Adjust the ringing volume Tone is good but there is no communication The dialling mode is wrong Adjust the dialling mode pulse tone Telephone does not re...

Страница 33: ...nge 300 m in open space 50 m maximum inhouse Base power supply In 230 VAC 50 Hz Out 6VDC 400mA Handset Batteries 2 rechargeable batteries AAA NiMh Handset standby time 110 hours in standby Handset talk time 12 hours Charging time 16 hours Normal conditions of use 5 C to 45 C Dialling mode Pulse Tone Flash time 100 or 250 ms Measurements Base 128 x 140 x 58 mm Handset 140 x 53 x 31 mm Charger 80 x ...

Страница 34: ... original purchased unit The initial purchase date shall determine the start of the warranty period The warranty period is not extended if the unit is exchanged or repaired by Ucom or its appointed service centres 19 3 Warranty exclusions Damage or defects caused by incorrect treatment or operation and damage resulting from use of non original parts or accessories not recommended by Ucom are not c...

Страница 35: ......

Страница 36: ...Cocoon 951 visit our website www ucom be U8006649VegaXs ...

Отзывы: