background image

UBI EasyCoder 501 – User's Manual

10

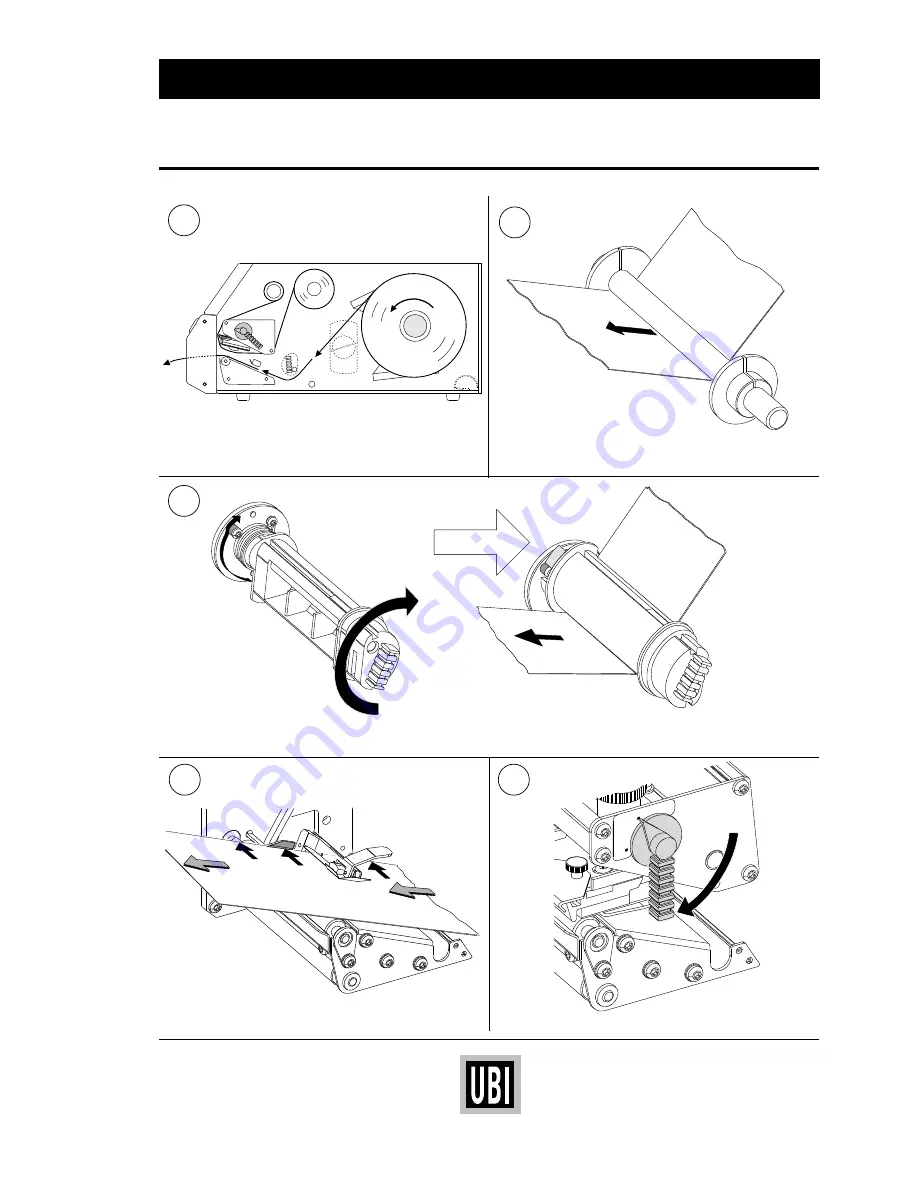
PAPER LOAD – CUT OFF, cont'd.

This diagram shows the path of the paper web.

7b

8

9

Turn the printhead lift knob to “Print” position.

Push the paper inwards as far as it will go.

Load

Print

6

In case of an EasyCoder 501 E or 501 SA, rotate the label slack absorber 180˚ clockwise to open position (snap-lock).

Then thread the paper underneath the slack absorber and under the guide plate of the label stop sensor.

7a

In case of an EasyCoder 501, thread the paper under-

neath the guide shaft behind the print mechanism.

Содержание EasyCoder 501 SA

Страница 1: ...ompartment 5 Paper Load Tear Off 6 Cut Off 9 Peel Off 12 Rewind 15 External Supply 19 Ribbon Load Loading without using a Ribbon Cassette 20 Loading using a Ribbon Cassette 22 Maintenance Printhead Cl...

Страница 2: ...designed to provide reasonable protection against such interference when operated in a commercial environment Operation of this equipment in a residential area is likely to cause interference in whic...

Страница 3: ...nizedbyits22 key membrane keyboard EasyCoder501SAisjustasquickandflexibleasthe EasyCoder501Emodel butisfittedwithaspecial Stand Alone software whichallowstheprinterto be operated independently without...

Страница 4: ...Interface Connector Memory Card Adapter option Front Door The front door can be swung open and removed from the hinges It can also be replaced by an optional paper cutter unit Continued Voltage Switch...

Страница 5: ...ock compartment becomes accessible when the right handandfrontdoorsareswungopen Althoughtheprinter is operable when the doors are left opened or completely removed you are strongly recommended to keep...

Страница 6: ...a 76 2 mm 3 inches core first fit the adapter on the paper supply spool Fit a new paper roll on the paper supply spool and push the roll inwards as far as it will go 1 3 4b 5a 4a 2 F5 F4 F3 F2 F1 C 0...

Страница 7: ...sition snap lock Then thread the paper underneath the slack absorber and under the guide plate of the label stop sensor Push the paper inwards as far as it will go This diagram shows the path of the p...

Страница 8: ...an EasyCoder 501 E or 501 SA release the slack absorber 1 Adjust the green guide ring so the paper is guided with a minimum of play 2 2 1 F5 F4 F3 F2 F1 C 0 Enter 3 2 1 Feed 6 5 4 SetUp 9 8 7 Pause Pr...

Страница 9: ...oad position 1 3 5a 5b 4 2 Remove the empty paper core if any Turn off the power using the switch on the rear plate Fit a new paper roll on the paper supply spool and push the roll inwards as far as i...

Страница 10: ...paper inwards as far as it will go Load Print 6 In case of an EasyCoder 501 E or 501 SA rotate the label slack absorber 180 clockwise to open position snap lock Then thread the paper underneath the s...

Страница 11: ...hile pulling at the end of the paper Close the right hand door Feed out and cut two blank copies by pressing the Print key twice Load Print 2 1 2x 11 12 13 14 In case of an EasyCoder 501 E or 501 SA r...

Страница 12: ...green clip 1 on the backing paper take up and dispose of all wound up backing paper 2 In case of label roll with a 76 2 mm 3 inches core first fit the adapter on the paper supply spool Fit a new label...

Страница 13: ...e to open position snap lock Then thread the label web underneath the slack absorber and under the guide plate of the label stop sensor This diagram shows the path of the label web and the backing pap...

Страница 14: ...just the green guide ring so the paper is guided with a minimum of play 2 Thread the backing paper around the print roller and dispenser edge and rearwards under the print unit 1 2 Load Print Load Pri...

Страница 15: ...abel roll on the paper supply spool and push the roll inwards as far as it will go F5 F4 F3 F2 F1 C 0 Enter 3 2 1 Feed 6 5 4 SetUp 9 8 7 Pause Print Power Ready Error Load Print 38 40 mm 1 5 Using the...

Страница 16: ...an EasyCoder 501 thread the paper under neath the guide shaft behind the print mechanism In case of an EasyCoder 501 E or 501 SA rotate the label slack absorber 180 clockwise to open position snap lo...

Страница 17: ...ad the labels around the rewind guide and back under the print mechanism towards the rewind unit Turn the printhead lift knob to Print position IM PO The use of an the pri nth ead The quality of for t...

Страница 18: ...PAPER LOAD REWIND cont d 15 16 Close the right hand door but keep the front door open Feed two blank copies by pressing the Print key twice IM P The use of an the print heas p The quality for the q p...

Страница 19: ...ferred when the supply is placed lower than the printer As an option the printer can be fitted with a set of fan fold guides in either intake slot The fan fold guide can be supplemented with an additi...

Страница 20: ...t unit Pull out approx 20 cm 8 of ribbon 2 Be careful to thread the ribbon above the handle of the label stop sensor The ribbon must be fitted so the spools rotate counter clockwise as illustrated abo...

Страница 21: ...ibbon onto the take up spool Turn the printhead lift knob to Print position Close the front and side doors Turn the printhead lift knob to Load position Wind up the ribbon until all of the transparent...

Страница 22: ...device that speeds up and facilitates ribbon reloads Prepare by keeping a loaded cassette ready Press the spools of the ribbon onto the sockets of the cassette as indicated by the stamped out arrows...

Страница 23: ...ribbon cassette with the ribbon unwind and rewind spools on the printer and press the cassette inwards as far as it will go Turn the printhead lift knob to Print position Close the front and side doo...

Страница 24: ...r m al pr in th ea d an d in se rt E as yC od er C le an in g C ar d L ow er pr in th ea d an d pr es s FE E D or PR IN T If pr in te r re tu rn s an er ro r m es sa ge re pe at th e pr oc ed ur e bu...

Страница 25: ...ning card under the printhead 1 Turn the printhead lift knob to Print position 2 Pull out the cleaning card 1 and turn the printhead lift knob to Load position 2 Insert the cleaning card under the pri...

Страница 26: ...60 Hz EXTERNAL CLEANING 1 3 4 2 Always remove the power cord before cleaning Wipe external surfaces with a soft cloth moistened with water and if necessary a mild detergent Never spray the printer Pro...

Страница 27: ...only Connect the two cables to the printhead Fit the replacement printhead assy back into the bracket so the guide screw fits into its slot and the rear end of the assy is held by thetwolugs Youcansw...

Страница 28: ...label stop sensor Reload ribbon User s Manual Wrong Paper Type setup Change setup Technical Manual Ribbon unwind unit stuck Adjust Call Service Bad energy control Check CPU board Call Service White p...

Отзывы: