


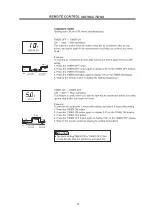

OPERATING INSTRUCTIONS
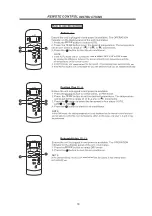
When the unit is on, press the Timer button to start the Auto-off program. The
indicator light illuminates. Press the UP or DOWN button to select the desired time.
Press the TIMER button again within 5 seconds, the Auto-on program is initiated and the
indicator light illuminates. Press the UP or DOWN button to select the desired
Auto-on start time. When both timer settings have been made, both the and indicator
- When the unit is off, press the Timer button to initiate the Auto-on program, then the
indicator light illuminates. Press the UP or DOWN button to select the desired Auto-on start
time. Press it again within five seconds to start the Auto-off program, then the indicator light
illuminates. Press the UP or DOWN button to select the desired Auto-off time. When both
both the and indicator light
will be on.
- Press or hold the UP or DOWN button to change the Auto time in 0.5 hour increments,up to
then in 1 hour increments up to 24 hours. The control panel will count down the time
- The system will automatically revert back to display the previous temperature setting if there
is no operation after 5 seconds.
- Turning the unit ON or OFF at any time or adjusting the timer setting to 0.0 will cancel the Auto
Start/ Stop timed program.
- When a malfunction (E1 , E2 or E4,) occurs, the Auto Start/Stop timed program will also be
cancelled.
-
7
Fig.4
A djust
manually
Other featur es
If the unit turns off unexpectedly due to a power
outage or interruption, it will restart automatically
with its previous settings when the power resumes.
A uto-Res t ar t
After the unit has stopped, it ca not be restarted
in t he fir st 3 minut es. This is to pr otect the unit.
Operation will automatically start after 3 minutes.
Wait 3 m inut es befo re r esu m ing o perat io n
The louver can be set to the desired position
manually.
Do not place any heavy objects or ot her loads
on t he louver, doing so will damage the unit.
(Fi g.4):
Ens ur e t he lo uv er is fu lly opened in the heat
K eep t he lo uv er fu lly o pened du rin g
o perat io n.
Air flow direc t ion adj ust m en t
to
lights will be on.
10 hours,
remaining until start.
mode.
timer settings have been made,
n
To adjust th e air flo w di recti on m an uall y
Содержание MPS2-10CRN1-BH9
Страница 1: ...87795040 MPS2 10CRN1 BH9...
Страница 2: ......
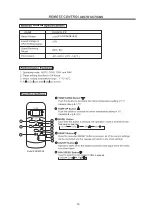
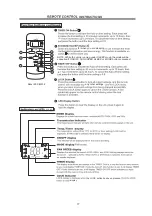
Страница 21: ...INSTRUCTIONS 19 When this button is pressed in the first 30 control sends control displays control sends...
Страница 23: ...h On Stop Set setting 3 home Example Start Example Off Stop Start h Set CAUTION INSTRUCTIONS 21...