background image

Ubee Interactive — www.ubeeinteractive.com 


  Ubee DVW32CB – Safety and Installation Product Insert v1.0 

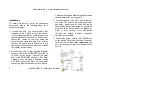
Wall-Mount Installation   

You can mount the device on a wall using the 2 
mounting brackets on the bottom of the device. 
We recommend that you use two round or pan 
head screws. 

1.  Install two screws horizontally apart on a wall 

using the measurement shown to the right. 
The screws should protrude from the wall so 
that you can fit the device between the head 
of the screw and the wall. If you install the 
screws in drywall, use hollow wall anchors to 
ensure that the unit does not pull away from 
the wall due to prolonged strain from the cable 
and power connectors. 

2.  Remove the device from the product package.


3.  Mount the device on the wall. 

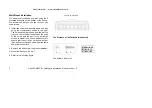
4.  Refer to the following figure. 


The Distance of the Pothook (Horizontal) 


The Screw’s Size (mm) 

163mm (6.4 inches)

A

B

C

A 6.65+/-0.35 
B 1.9+/-0.15 
C 19.0+/1.20 

Содержание DVW32CB

Страница 1: ...e will not occur in a particular installation If this equipment does cause harmful interference to radio or television reception which can be determined by turning the equipment off and on the user is encouraged to try to correct the interference by one of the following measures Reorient or relocate the receiving antenna Increase the separation between the equipment and receiver Connect the equipm...

Страница 2: ...ice complies with FCC radiation exposure limits set forth for an uncontrolled environment This device should be installed and operated at a minimum distance of 25cm between itself and your body This device and it s antennas s must not be co located or operating in conjunction with any other antenna or transmitter except in accordance with FCC multi transmitter product procedures Safety Notices Rea...

Страница 3: ...tage at 90 132VAC 8 Disconnecting the Device If the device becomes damaged or encounters some other abnormality disconnect the power plug from the AC wall outlet immediately 9 The device should be installed in a location not to exceed the maximum temperature of 40 degrees Celsius 104 degrees Fahrenheit 10 When this device is placed upright with the aid of the stand the stand must be fixed at a 90 ...

Страница 4: ...et cable to one of the ETHERNET ports ETH1 to ETH4 on the device Connect the other end to the ETHERNET port on a PC Note Category 5e or Category 6 Ethernet cables with RJ 45 connectors must be used when connecting Ethernet devices to the LAN ports This ensures Gigabit Ethernet speeds unless the computer does not support it 3 Connect one end of an RJ 11 phone cable to one of the TEL ports on the de...

Страница 5: ...ment shown to the right The screws should protrude from the wall so that you can fit the device between the head of the screw and the wall If you install the screws in drywall use hollow wall anchors to ensure that the unit does not pull away from the wall due to prolonged strain from the cable and power connectors 2 Remove the device from the product package 3 Mount the device on the wall 4 Refer...

Страница 6: ...button is used for the Wi Fi Protected Setup WPS method to connect a Wi Fi device to the DEVICE Refer to the User Manual for more information LEDs and Other Device Indicators See the following diagram and descriptions of the device s LED behavior and the behavior of the back panel Ethernet indicators LED Indicators Color Blue When On Power If On indicates that the device has successfully completed...

Страница 7: ... MoCA network traffic the LED is flash Battery LED is On when the battery is installed and charged LED is Off if no battery is installed If the battery is at low power level 30mins left the battery LED will flash Back Panel Ethernet Indicators Color Orange or Green When an Ethernet device such as a computer is connected to the device the LED is Orange when connected at 10 100 Mbps speeds When an E...

Отзывы: