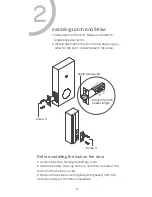
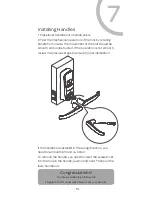
U-tec Ultraloq UL3 Скачать руководство пользователя страница 11

Installing Handles

- 10 -

1. Press lever handles onto handle posts.
2. Test the mechanical operation of the lock by rotating 
handle from inside. The movement of the bolt should be 
smooth and unobstructed. If the operation is not smooth, 
review the previous steps to ensure proper installation.

If the handles are installed in the wrong direction, you 
need to remove them and re-install.
To remove the handle, you need to insert the screwdriver 
into the hole in the handle, push in and hold. Then pull the 
lever handle out.

Congratulations!

 You have installed the Ultraloq UL3

Fingerprint and Touchscreen Smart Lock successfully.

7

Содержание Ultraloq UL3

Страница 1: ...Ultraloq UL3 Fingerprint and Touchscreen Smart Lock Installation Instructions V1 3 Welcome...

Страница 2: ...a Factory Default Reset FIRST See the User Guide for more information This lock is designed for the following operating tempera tures Outside Lock Body exterior mounted 31 F 35 C to 158 F 70 C Inside...

Страница 3: ...ed in the box Exterior Assembly Latch Strike Screw A Screw B Screw C Screw D Screw E Backup Keys Interior Assembly Interior Mounting Plate Spindle Handle Drill Screwdriver AA alkaline AA Batteries 2 S...

Страница 4: ...Check the door s dimensions Drill a hole in the door Use the Drill Template provided in the box 3 23 4 23 8 70 mm 35 mm 44mm OR 60 mm 21 8 53 mm Hole 1 25 mm Door Edge Preparing Door 13 8 13 4...

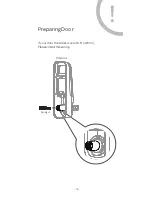
Страница 5: ...If your door thickness is over 16 5 42mm Please install this spring 4 Preparing Door Interior Spring 1...

Страница 6: ...e sure the latch angle faces door jamb 2 Install the strike on the door frame ensuring you allow for the bolt to be centered in the strike 1 Loosen the screw holding the battery cover 2 Slide the batt...

Страница 7: ...6 1 Install the exterior assembly Route the cable under bolt and through hole stated below Installing Exterior Assembly 3...

Страница 8: ...Route wire over the hole Plug in the spindle 7 Screw B 1 Install interior mounting plate Secure it to the exterior assembly using screws 2 Plug in the spindle 4 Installing Interior Mounting Plate 3...

Страница 9: ...ble 8 5 1 Attach the cable to the interior assembly printed circuit board PCB by lining up notches on the cable connector to slots on the PCB connector Press the connector in firmly using thumbs until...

Страница 10: ...Installing Batteries AA alkaline 9 1 Insert 3 AA alkaline batteries 2 Install battery cover and tighten the screw 6 Screw E...

Страница 11: ...ration is not smooth review the previous steps to ensure proper installation If the handles are installed in the wrong direction you need to remove them and re install To remove the handle you need to...

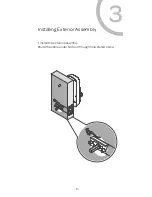
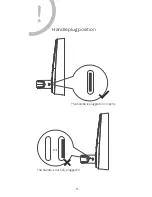
Страница 12: ...7 Handle plug position 11 The handle is not fully plugged in The handle is plugged in correctly or...

Страница 13: ...Note Date...

Страница 14: ...Note Date...

Страница 15: ...Note Date...

Страница 16: ...and Ultraloq brands and products are trademarked and protected under law in the United States Unauthorized use is prohibited 2016 U tec Group Inc All Rights Reserved Ultraloq is sub brand of U tec Gro...

Отзывы: