background image

For questions or concerns, email: [email protected]

16

Preparation

1. Place ultrasonic cleaner on a flat, stable surface.

2.

Put items to be cleaned inside the basket and

gently place the basket inside the tank. DO NOT
PLACE THE ITEMS directly on the bottom of the tank.

3. Add solution according to the object to be cleaned.
Ensure that the volume of thxe solution is over 2/3
when the heating is on.

It is forbidden to heat if you

use flammable liquids because prolonged vibration
will increase fluid temperature, which may lead to a
fire.

4. Plug the cleaner into a grounded outlet. Click the
power switch at the back. "O" is off, and "-" is on.

IX. Operation of Mechanical Ultrasonic Cleaner

Содержание USS-UC01

Страница 1: ...aximum durability of this U S SOLID LLC hereafter U S SOLID or The Company product read and follow all instructions carefully Failure to do so may lead to serious bodily injury and catastrophic damage...

Страница 2: ...of Digital Ultrasonic Cleaner 6 V Product Structure of Digital Ultrasonic Cleaner 8 VI Operation of Digital Ultrasonic Cleaner 10 Mechanical Ultrasonic Cleaner VII Specification of Mechanical Ultrason...

Страница 3: ...generate intense high frequency sound through the solution in the tank inducing cavitation in liquid As the cavitation bubbles collapse high shearing energies work in all directions attacking every su...

Страница 4: ...arranty from the date of the sale and we are responsible for any replacement parts caused by quality issues within the warranty window If you want to return a defective item please contact our custome...

Страница 5: ...cord in water or other liquid DO NOT touch the unit if the machine has fallen into the water during operation Remove the power plug from the socket first Do NOT handle electric appliances with wet han...

Страница 6: ...min Running the cleaner for an extended time will cause temperature increases and damage the tank and transducers Do keep the lid on during and after use which will prevent splashing and reduce evapor...

Страница 7: ...For questions or concerns email service ussolid com 5 Digital Ultrasonic Cleaner...

Страница 8: ...26 16 5 22 5 cm 10 4 6 5 8 7 37 5 18 27 5 cm 12 8 7 1 11 Unit Weight 2 22 kg 4 89 lb 3 31 kg 7 30 lb 5 5 kg 12 13 lb Heating Power 100 W 100 W 200 W Ultrasonic Power 80 W 120 W 180 W Working Time 0 30...

Страница 9: ...10 8 40 3 32 5 27 3cm 15 9 12 8 10 7 57 5 32 3 33 cm 22 6 12 7 13 Unit Weight 7 4 kg 16 31 lbs 8 8 kg 19 40 lbs 13 4 kg 29 54 lbs Heating Power 200 W 300 W 500 W Ultrasonic Power 240 W 360 W 600 W Wor...

Страница 10: ...For questions or concerns email service ussolid com 8 USS UC01 USS UC02 V Product Structure of Digital Ultrasonic Cleaner...

Страница 11: ...For questions or concerns email service ussolid com 9 USS UC03 USS UC04 USS UC05 USS UC06 V Product Structure of Digital Ultrasonic Cleaner...

Страница 12: ...ctly on the bottom of the tank 3 Add solution according to the object to be cleaned Ensure that the volume of the solution is over 2 3 when the heating is on It is forbidden to heat if you use flammab...

Страница 13: ...omatically stop working when the time reaches 00 00 2 Once the cleaner is turned on the indicator shows room temperature press TEMP TEMP to increase decrease temperature The temperature indicator show...

Страница 14: ...For questions or concerns email service ussolid com 12 Mechanical Ultrasonic Cleaner...

Страница 15: ...26 16 5 22 5 cm 10 4 6 5 8 7 37 5 20 27 5cm 14 7 7 8 10 8 Unit Weight 2 4 kg 5 29 lb 3 6 kg 7 94 lb 5 5 kg 12 13 lb Heating Power 100 W 100 W 200 W Ultrasonic Power 80 W 120 W 180 W Working Time 0 30...

Страница 16: ...8 40 3 32 5 27 3cm 15 9 12 8 10 7 57 5 32 3 33 cm 22 6 12 7 13 Unit Weight 7 4 kg 16 31 lbs 8 8 kg 19 40 lbs 13 4 kg 29 54 lbs Heating Power 200 W 300 W 500 W Ultrasonic Power 240 W 360 W 600 W Worki...

Страница 17: ...For questions or concerns email service ussolid com 15 VIII Product Structure of Mechanical Ultrasonic Cleaner...

Страница 18: ...ly on the bottom of the tank 3 Add solution according to the object to be cleaned Ensure that the volume of thxe solution is over 2 3 when the heating is on It is forbidden to heat if you use flammabl...

Страница 19: ...ts working The cleaner will automatically stop working when the knob reaches OFF 6 Heating is an optional function of the machine Rotate the left knob clockwise anticlockwise to increase decrease the...

Страница 20: ...areas or industries The list below are the most common industries using an ultrasonic cleaner to clean objects Semiconductors Electrical and electronic machines Precision machines Optical devices Hard...

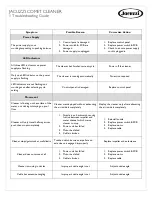
Страница 21: ...ansducer short circuit E PCB board is broken F Other reasons Solutions A Connect the machine to a power supply B Change the fuse C Connect the fitted cable or replace a new one D E F Contact us for he...

Страница 22: ...of control E Other reasons Solutions A Reconnect the plug B Change the fuse C D E Contact us for help Problem Temperature control failure Possible Causes A Thermostat is loosened B Thermostat tube is...

Страница 23: ...able for the object D Other reasons Solutions A Adjust the liquid volume B Adjust temperature to optimum one C Stop the working process and unplug the machine Replace the solution D Contact us for hel...

Отзывы: