background image

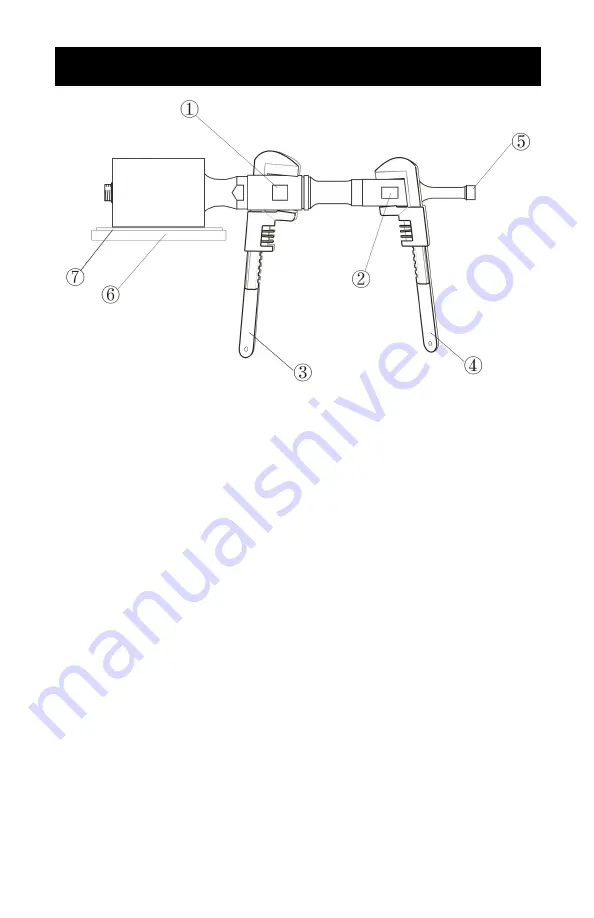
3. Wrench 1

1. Buckle 1

2. Buckle 2

6. Workbench

4. Wrench 2

7. Cushion

X

II

.


Install

ing

 Amplitude

5.

Amplitude

1.

Screw

 amplitude manually.

2.

Place energy converter on the bench covered by soft materials (e.g.
towels).

3.

Put wrench1 on buckle2 and wrench2 on buckle2.

4.

Facing the horn with wrench

1

 in 

the 

left hand and wrench

2

 in 

the

right hand,


tighten by turning downwards with two hands at the

same time.

For questions or concerns, e-mail [email protected], visit www.ussolid.com, 

or call (800) 243-5428

Содержание USS-FX

Страница 1: ...instructions Failure to do so can lead to serious injury or catastrophic damage to the user machine supplies or surrounding areas All safety suggestions must be followed closely and extreme precaution must be taken to assure proper use of the equipment by only qualified personnel who have read this guide For questions or concerns e mail service ussolid com visit www ussolid com or call 800 243 542...

Страница 2: ...ng II Product Features III Common Applications IV Technical Parameters V Appearance Display VI Energy Converter Transducer VII Installation VIII Warnings and Notes X Removing Amplitude XI Installing Amplitude XII Packing List XIII Operation IX ...

Страница 3: ...upply converts the input single phase electricity of 110 VAC 60 Hz into an alternating electrical signal of 20 25 kHz The circuitry consists of a power rectifier power switcher a frequency conversion system power amplifier phase locked frequency automatic tracking device power regulator power detector power protector device and microcomputer controller Driven by the appropriate impedance and power...

Страница 4: ...5 Automatic amplitude compensation 6 Power emitted display for accuracy and repeatability variable power output 7 Integrated soundproof box to reduce cavitation sound emitted during processing 8 7 inch color industrial touch screen applied and all functions integrated display IV Common Applications 9 Mixing blending emulsifying and homogenizing solutions 10 Reducing the particle size of suspension...

Страница 5: ...For questions or concerns e mail service ussolid com visit www ussolid com or call 800 243 5428 V Technical Parameters ...

Страница 6: ...V Technical Parameters ...

Страница 7: ...rvice ussolid com visit www ussolid com or call 800 243 5428 VI Appearance Display 2 Touch Screen 3 Handle 1 Host 4 Ultrasonic Probe 5 Sample Observation Window 6 Power Button 8 Temperature Probe Connecting Button 7 Power Cable Connector ...

Страница 8: ...ted into the sample liquid surface and in the center of the container The probe should get into the liquid 5 mm to 10 mm beneath the liquid surface For large sample volumes the distance between the probe tip and the container s bottom should be bigger than 30 mm The ultrasonic probe tip can be as close as 10 mm from the bottom of the container when processing a small sample size or when using a lo...

Страница 9: ... by pressing the Up button Down Button You can decrease power by pressing the Down button Press the ON OFF button to start or pause the working process For questions or concerns e mail service ussolid com visit www ussolid com or call 800 243 5428 ...

Страница 10: ...IX Operation By pressing the Settings button you will move to below interface 1 Press User to set user code in the machine ...

Страница 11: ...ll stop working when it reaches the set temperature Save Save the settings Back Go back to the previous interface There are three modes 1 Continuity Mode It will not stop working if you do not stop the machine 2 Time Mode The working process will stop when it reaches the set time 3 Pulse Mode Machine works when the pulse is on and pauses when the pulse is off For questions or concerns e mail servi...

Страница 12: ...es for different cells It is suggested that the user adopt multiple short time crushing not longer than 5s each time and ice bath cooling 7 It is practice proven that multiple short ime operations working time 1 2s and interval time 1 2s have better effects than continuous long time operations The long interval time can be set to avoid the heating of liquid Additionally continuous long time operat...

Страница 13: ...ve to heat or free radical damage To avoid excessive cavitation leading to overload when using smaller ultrasonic probes of 2 3 and 6 mm tip diameter the ultrasonic power wheel should be rotated to a lower power setting 11 If the liquid volume containing the sample is less than 5 ml choose an ultrasonic probe with a tip diameter of 2 to 3 mm Smaller probes are inserted into liquid at a depth about...

Страница 14: ...left and the small wrench towards the right Facing the horn with the big wrench in your left hand and the small wrench in your right hand loosen by turning downwards with two hands at the same time When changing the horn if the M10 screw is attached to the horn manually unscrew the screw from the lever and screw the screw 1 2 way into the energy converter Then screw on the required horn If the scr...

Страница 15: ...y converter on the bench covered by soft materials e g towels 3 Put wrench1 on buckle2 and wrench2 on buckle2 4 Facing the horn with wrench1 in the left hand and wrench2 in the right hand tighten by turning downwards with two hands at the same time For questions or concerns e mail service ussolid com visit www ussolid com or call 800 243 5428 ...

Страница 16: ...XIII Packing List ...

Отзывы: