background image

P.6

11

12

13

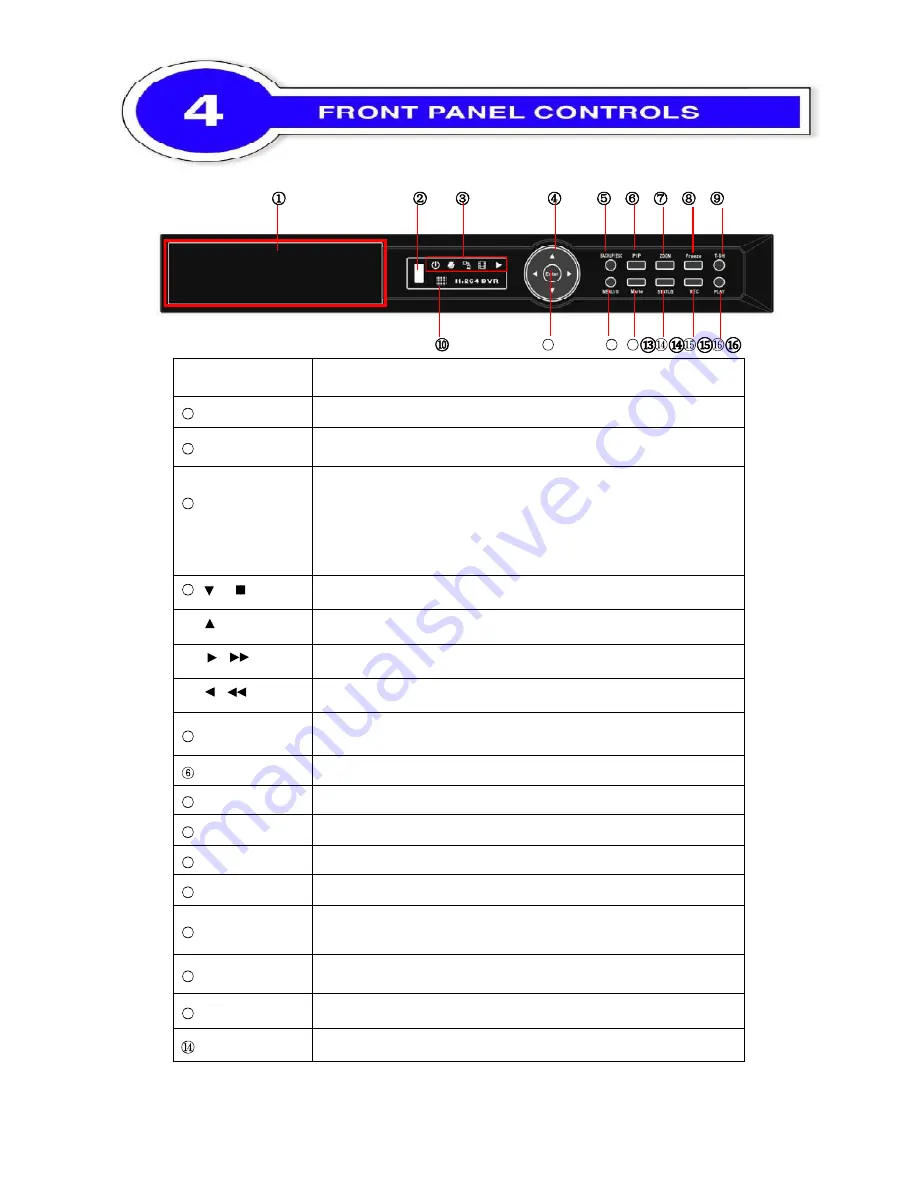
Control Keys

Description

1

DVD Writer

Optional DVD-RW backup device.

2

USB 2.0 Port

Port for USB  external  devices (USB  flash  drive  devices use,  the  mouse
behind the back of the USB ports installed)..

3

LED Display

(From left to right)

Power

:

Power is on.

HDD

:

Hard disk is in use.

LAN

:

Connected to the internet

(in red)

: Remote user logged in.

REC

:

Recording.

PLAY

:

Playing back.

4

/

In SETUP mode, press to move cursor down. In PLAYBACK mode, press
to stop playing back.

/

SLOW

In SETUP mode, press to move cursor up. In PLAYBACK mode, press to
slow down.

/

In  SETUP  mode,  press  to  increase  value.  In  PLAYBACK  mode  press  to
play forwards.

/

In  SETUP  mode,  press  to  reduce  value.  In  PLAYBACK  mode,  press  to
play rewind.

5

BACKUP/ESC

In  LIVE  mode,  press  to  display  the  BACKUP  menu.  In  SETUP  mode,
press to return to previous page.

PIP

In LIVE mode, display with picture in picture format.

7

ZOOM

In LIVE or PLAYBACK mode, enlarge the display of a channel.

8

FREEZE

In LIVE mode, display can be FREEZE.

9

T-SH

Display the search menu.

10

IR Sensor

Input sensor for the remote control.

11

ENTER / MODE

In  SETUP  mode,  press  to  enter  values.  In  PLAYBACK  mode,  switch
between full, quad, 9-channel, 16-channel display in order.

12

MENU / II

In LIVE mode, press to display menu. In PLAYBACK mode, press to pause
playback.

13

MUTE

Enable / Disable Key Tone.

STATUS

Show DVR Status.

Содержание QS-X31ZAN

Страница 1: ...on P 3 3 DVD RW Installation P 4 4 Front Panel Controls P 6 5 Rear Panel Connectors P 8 I Phone Android IWatch DVR 2 Default Username is Admin Default Admin Lock password is 123456 Note Please see CD included for complete User manual quick start guide CMS software and ...

Страница 2: ...R 2 Quick Start 3 IR Remote Control Pressed DVR1 Button before use 4 Battery 5 CD 6 Hard Disk Mount 7 Screws 8 IDE to SATA Power Cord 9 Power Cord 10 SATA Cord Note Standard shipping products do not include HDD ...

Страница 3: ...ount with the screws as indicated Step 2 Place the HDD on the HDD plate and screw it as indicated Step 3 Connect the power and the SATA cables as indicated Note After installation please initialize Hard Disk before starting to record ...

Страница 4: ...P 4 Standard shipping products do not include HDD and DVD RW Step 1 Remove the front cover from DVR Step 2 Put the DVD RW into the unit as indicated ...

Страница 5: ...P 5 Step 3 Put DVR bottom up screw to fix the DVD RW as indicated Step 4 Connect the power and the flat cables as indicated ...

Страница 6: ...ss to increase value In PLAYBACK mode press to play forwards In SETUP mode press to reduce value In PLAYBACK mode press to play rewind 5 BACKUP ESC In LIVE mode press to display the BACKUP menu In SETUP mode press to return to previous page PIP In LIVE mode display with picture in picture format 7 ZOOM In LIVE or PLAYBACK mode enlarge the display of a channel 8 FREEZE In LIVE mode display can be F...

Страница 7: ...P 7 REC Start or stop recording PLAY Play back in normal speed ...

Страница 8: ... port to display full screen image of all installed cameras in sequence depends on model AUDIO IN RCA input port for audio signal 4 ports available for 4CH 8CH 16 ports available for 16CH VGA1 VGA port USB 2 0 port USB port Device USB Mouse LAN Network port IR JACK IR extension cable jack HDMI HDMI port ON OFF Power Switch DC 12V Socket for a DC 12V input e SATA External SATA hard disks port for e...

Отзывы: