1
20VAC GROUNDING INSTRUCTIONS
This machine must be grounded. If it should electrically malfunction, grounding provides a path of least
resistance for electric current to reduce the risk of electric shock. This appliance is equipped with a cord
having an equipment-grounding conductor and grounding plug. The plug must be plugged into an appropriate
outlet that is properly installed and grounded in accordance with all local codes and ordinances.
DANGER!
Improper connection of the equipment-grounding conductor can result in a risk of electric shock. Check with a
qualified electrician or service person if you are in doubt as to whether the outlet is properly grounded. Do not modify
the plug provided with the appliance. If it will not fit the outlet, have a proper outlet installed by a qualified electrician.
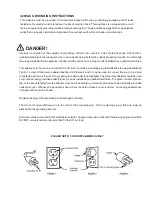
This appliance is for use on a nominal 120-volt circuit, and has a grounding plug that looks like the plug illustrated in
Figure 1 below. A temporary adapter illustrated in Figures 2 and 3 may be used to connect this plug to a 2-pole
receptacle as shown in Figure 2 if a properly grounded outlet is not available. The temporary adapter should be used
only until a properly grounded outlet (Figure 1) can be installed by a qualified electrician. The green-colored rigid ear,
tab, or the like extending from the adapter must be connected to a permanent ground such as a properly grounded
outlet box cover. Whenever the adapter is used, it must be held in place by a metal screw. Grounding adapters are
not approved for use in Canada.
Replace the plug if the grounding pin is damaged or broken.
The Green (or Green/Yellow) wire in the cord is the grounding wire. When replacing a plug, this wire must be
attached to the grounding pin only.
Extension cords connected to this machine should be 12 gauge, three-wire cords with three-prong plugs and outlets.
DO NOT use extension cords more than 50 feet (15 m) long.
PLEASE NOTE: FOR NORTH AMERICA ONLY


