background image

24

15.  Fill boiler to normal water line. Follow Operating  

Instructions to place boiler in operation. See Figure 

21.

16.  Operate boiler for at least 30 minutes after    

condensate begins to run hot. Follow instructions  

TO TURN OFF GAS TO APPLIANCE. See Figure 

21.

17.  Close all radiator valves. Remove all supply main  

air valves. Plug openings in supply main.

18.  Drain approximately 5 gallons of boiler water into  

container. Mix in recommended boil-out  


compound.

19.  Remove safety valve. Pour recommended compound 

into boiler through safety valve opening. Reinstall 

safety valve in Tapping "E" with spindle in vertical 

position.

20.  Follow Operating Instructions to place boiler in  

operation. See Figure 21. Slowly feed water to  

boiler. Water will rise slowly into supply main and 

back through return main. Adjust flow to maintain  

approximately 180°F water from return main hose.  

Continue until water runs clear from hose for at  

least 30 minutes.

21.  Turn off water to boiler. Continue to operate until 

excess water is removed from boiler and system (by 

steaming) and boiler water reaches normal 

waterline.

22.  Follow instructions TO TURN OFF GAS TO 

APPLIANCE. See Figure 21. Open all radiator 

valves. Reinstall all supply main air valves. Open 

gate valve in Hartford Loop.

23.  Allow boiler to cool until crown sheet is no longer 

too hot to touch. Close drain valves at boiler and in 

return main. Fill boiler slowly to normal waterline.

24.  Follow Operating Instructions to place boiler in 

operation. See Figure 21.  Allow boiler to steam for 

10 minutes. Drain one quart of water from lower 

Gauge Glass fitting.

25.  Drain second quart sample from lower Gauge Glass 

fitting. If sample is not clear, repeat cycle of draining 

boiler and return main and refilling boiler until 

sample is clear.

26.  If after normal operation boiler water becomes dirty 

from additional system piping sediment returning to 

boiler.

a.  Complete steps 12 through 25.
b.  Complete steps 1 through 11.

P.

  Add Boiler Water Treatment

1.  Remove safety valve.
2.  Pour recommended compound into boiler through 

safety valve opening.

3.  Reinstall safety valve in Tapping "E" with spindle in 

vertical position.

4.  Follow Operating Instructions to place boiler in 

operation. See Figure 21.

5.  Boil water or heat water to 180°F.
6.  Test the pH of the water in the system. This can 

easily be done by drawing a small sample of boiler 

water and testing with Hydrion paper which is used 

in the same manner as litmus paper, except it gives 

specific readings. A color chart on the side of the 

small Hydrion dispenser gives the reading in pH. 

Hydrion paper is inexpensive and obtainable from 

any chemical supply house or through your local 

druggist. The pH should be higher than 7 but lower 

than 11. Add recommended water treatment 

chemicals, if necessary, to bring the pH within the 

specified range. With this lower level of protection, 

care must be exercised to eliminate all of the free 

oxygen in the system. 

7.  Boiler is now ready to be put into service.

Q.

  Review User's Information Manual 

and system 

operation with owner or operator.

VII. System Start-up (continued)

Содержание INDEPENDENCE IN3PV

Страница 1: ...E P E D N I V P R E L I O B D E R I F S A G For service or repairs to boiler call hour heating contractor When seeking information on boiler provide Boiler Model Number and Serial Number as shown on...

Страница 2: ...tuation which if not avoided could result in death serious injury or substantial property damage CAUTION Indicates a potentially hazardous situation which if not avoided may result in moderate or mino...

Страница 3: ...stem is necessary to allow noxious fumes that could cause injury or loss of life to vent safely and will contribute toward maintaining the boiler s efficiency This boiler is supplied with safety devic...

Страница 4: ...and combustible material in accordance with local fire ordinance Refer to Table 1 for minimum listed clearance from combustible material Recommended service clearance is 24 inches from left side righ...

Страница 5: ...onfined space Size each opening for minimum free area of 1 square inch per 1 000 Btu per hour input of all equipment in spaces but not less than 100 square inches 7 Ventilation Duct Louvers and Grille...

Страница 6: ...stall zone circulator and strainer in supply piping Install check valve to prevent gravity circulation of boiler water 2 Limit Install temperature limit control Honeywell L4006A or equal in Tapping P...

Страница 7: ...7 Figure 4 Steam Piping IN3PV Figure 3 Trim Installation III Steam Piping and Trim continued...

Страница 8: ...ing natural gas Table 5 lists equivalent pipe length for standard fittings 4 Specific gravity of gas Corrections for the specific gravity of natural gas can be found in Table 6 For materials or condit...

Страница 9: ...e For all testing over psig boiler and its individual shutoff valve must be disconnected from gas supply piping For testing at psig or less isolate boiler from gas supply piping by closing boiler s in...

Страница 10: ...omponents and are approved for use with this product Heat Fab Saf T Vent 800 772 0739 Flex L International Star 34 800 561 1980 Protech Systems Inc FasNSeal 800 766 3473 and Z Flex U S Inc Z Vent 800...

Страница 11: ...use 7 Any improper operation of the common venting system should be corrected so the installation conforms with the National Fuel Gas Code NFPA 54 ANSI Z223 1 When resizing any portion of the common v...

Страница 12: ...d end only female bell end accepts next fitting or pipe NOTICE Cut must be square with pipe and filed or sanded smooth before joining Carefully ensure roundness of cut pipe by hand with gloves before...

Страница 13: ...pipes in horizontal runs at top to avoid condensate from lying on the seams Figure 9 Horizontal Vent Installation V Venting continued CAUTION Moisture and ice may form on surfaces around vent terminal...

Страница 14: ...ces above the boiler with materials having a fire resistance rating at least equal to the rating of adjoining floor or ceiling Maintain minimum clearance to combustible materials Note For one or two f...

Страница 15: ...8 12 to 20 12 7 ft 6 in Over 20 12 to 18 12 8 ft d Install storm collar on vent pipe immediately above flashing Apply sealant between vent pipe and storm collar e Attach Vent Terminal 7 Install conden...

Страница 16: ...ower to thermostat Connect circuit to brown wire to control boiler operation Set thermostat heat anticipator to 0 4 amps See Figure 15 D Alliance SL Indirect Water Heater if used See Figure 15 Ladder...

Страница 17: ...ect manometer to gas manifold Use 1 8 NPT tapping provided 4 Temporarily turn off all other gas fired appliances D Follow Operating Instructions to place boiler in operation See Figure 21 E Sequence o...

Страница 18: ...ts within 10 seconds control returns to normal sequence If flame out of sequence remains longer than 10 seconds control will resume normal opera tion 1 hour after error is corrected Check for pilot fl...

Страница 19: ...er sensor cracked ceramic insulator replace if needed Figure 17B Measuring Pilot Flame Current with Micro ammeter v Check the pilot flame It must be blue steady and envelop the flame sensing rod 3 8 t...

Страница 20: ...SARY TO RECYCLE THE CALL FOR HEAT MORE THAN ONCE TO CLEAR THE PILOT SUPPLY TUBES OF AIR NOTE IF CONTROL GOES INTO LOCKOUT OR RETRY DELAY RESET THE CALL FOR HEAT CHECK CONTINUITY OF IGNITION CABLE AND...

Страница 21: ...below observed pressure Main burners and pilot burner should extinguish and blower stop 3 Adjust limit to setting above observed pressure Ignition sequence should begin 4 Adjust thermostat to lowest...

Страница 22: ...y No 4D iii Reinstall gas orifices and main burners Measure input rate 6 Recheck Main Burner Flame 7 Return other gas fired appliances to previous conditions of use M Clean Heating System Oil from new...

Страница 23: ...triction 2 Fill boiler to top of gauge glass 3 Remove safety valve 4 Pour recommended boil out compound into boiler through safety valve opening 5 Reinstall safety valve in Tapping E with spindle in v...

Страница 24: ...ructions to place boiler in operation See Figure 21 Allow boiler to steam for 10 minutes Drain one quart of water from lower Gauge Glass fitting 25 Drain second quart sample from lower Gauge Glass fit...

Страница 25: ...reens securely in place 2 Vent terminal and wall thimble if used must be weather tight 3 Vent pipe must be full round shape and show no damage from impact or excessive temperature 4 Vent pipe must be...

Страница 26: ...original location See Table 14 b Main burners must be properly secured in burner tray slot at rear of firebox and over gas orifice See Figure 23 c Pilot gas supply igniter sensor cable and ground wire...

Страница 27: ...Figure 25 L404F Pressuretrol Boiler Model Minimum Vacuum IN3PV 0 40 inches w c IN4PV 0 40 inches w c IN5PV 0 70 inches w c IN6PV 0 70 inches w c VIII Service Instructions continued 4 Stop boiler remo...

Страница 28: ...Long sleeved loose fitting clothing 3 Gloves 4 Eye Protection Take steps to assure adequate ventilation Wash all exposed body areas gently with soap and water after contact Wash work clothes separatel...

Страница 29: ...29 SERVICE RECORD DATE SERVICE PERFORMED...

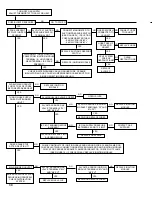
Страница 30: ...ECONDS BEFORE SPARK BEGAN NO REPLACE IGNITION MODULE YES TURN ON GAS SUPPLY DOES PILOT BURNER LIGHT YES 24 VOLTS ACROSS GAS VALVE TERMINALS PV AND MV PV YES NO NO YES NO OPEN VALVES ALL MANUAL GAS VAL...

Страница 31: ...NC NO 24 VOLTS AT BOTH L W C O TERMINALS B B YES NO REFER TO L W C O MANUFACTURER S TROUBLESHOOTING INSTRUCTIONS NO FILL BOILER TO NORMAL WATERLINE NO GAUGE PRESSURE LESS THAN LIMIT CUT IN SETTING ALL...

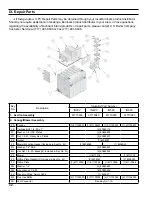
Страница 32: ...2J Blower 1 6111714 1 6111715 2K Orifice Plate Gasket 2 Included in Key No 2J 2 8206042 2 8206035 2L Orifice Plate 1 61110036 1 61110046 1 61110056 1 61110066 2M Washer 1 4 4 80860603 2N Hex Locknut...

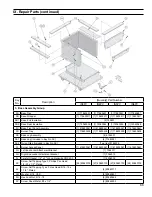
Страница 33: ...sembly 4 6186001 3E1 Base Leg Included in Key No 3E 4 71860021 3E2 Nylon Glide Included in Key No 3E 1 per leg 8186006 3F Burner Access Panel 1 618600361 1 618600461 1 618600561 1 618600661 3G Left En...

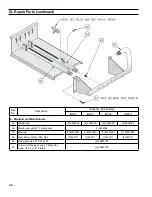
Страница 34: ...8236099 8 8236099 4B Main burner with 60 Pilot Bracket 1 8236098 4C Manifold 1 82260033 1 82260043 1 82260053 1 82260063 4D Main Burner Orifice 45 Pink 3 822711 5 822711 7 822711 9 822711 4E Screw Mac...

Страница 35: ...B1206 1 103704 01 5B Pilot Orifice Natural Gas Honeywell 388146NE Included with Key No 5A 5C Compression Nut Fitting 1 8 OD x 1 4 NPT Included with Key No 5A and 5E 5D Pilot Tubing 1 8 OD x 40 1 82361...

Страница 36: ...4100440 1 604100540 1 604100640 6E Blower Access Panel 1 604100371 1 604100471 1 604100571 1 604100671 6F Rear Panel 1 604100350 1 604100450 1 604100550 1 604100650 6G Front Top Panel 1 604100360 1 60...

Страница 37: ...Steam Gauge 0 30 psi 2 1 2 Dia 1 100325 01 9B Drain Valve Conbraco 31 612 02 1 806603012 9C Bushing Hex 2 NPT x 3 4 NPT 1 806600515 9D Gauge Glass Set 9 Glass Conbraco 21 104 10 1 8056128 9E Limit Ho...

Страница 38: ...Bracket 1 7186018 10D1 Screw Sheet Metal 8 x 1 2 1 80860019 10E Suction Pressure Switch Red 1 60160876 Suction Pressure Switch Lt Blue 1 60160877 10F Silicone Tubing 1 8 O D x 20 1 7016020 10G Transf...

Страница 39: ...ription Quantity Part Number IN3PV IN4PV IN5PV IN6PV 11 Gasketed Vent Accessory Carton Includes 11A 11B 61110128 61110129 11A Vent Connector 1 8116306 1 8116307 11B Vent Terminal 1 8116310 IX Repair P...

Страница 40: ...nd Gasketed Male Vent Joint Detail Figure 9 13 Horizontal Vent Installation Figure 10 14 Horizontal Vent Terminal Figure 11 14 Vertical Vent Installation Figure 12 15 Vertical Vent Tee Installation Fi...

Страница 41: ...Lengths Table 6 9 Specific Gravity Correction Factors for Natural Gas Section V Venting Table 7 10 Maximum Equivalent Vent Length Table 8 11 Vent System Components Table 9 15 Minimum Vent Height Abov...

Страница 42: ...42 SERVICE RECORD DATE SERVICE PERFORMED...

Страница 43: ...43 SERVICE RECORD DATE SERVICE PERFORMED...

Страница 44: ...44 U S Boiler Company Inc P O Box 3020 Lancaster PA 17604 1 888 432 8887 www usboiler net...

Отзывы: