U-Line U2224BEVINT00B Скачать руководство пользователя страница 10

QUICK START GUIDE

7

u-line.com

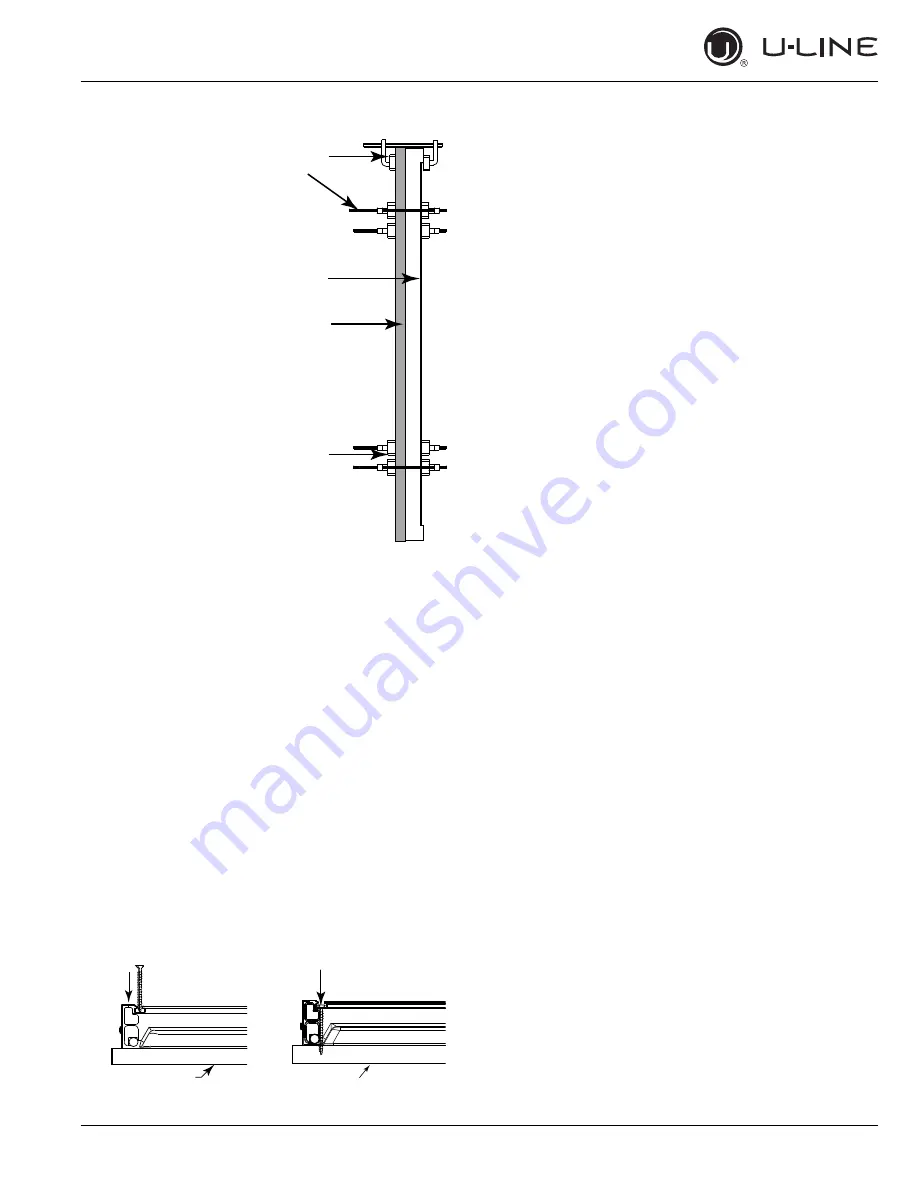
6. Secure integrated 

panel to door using 
clamps. A robust 
tape may also be 
used. U-Line 
recommends the 
use of bar clamps 
to secure the panel 
to the door. If using 
tape, be certain the 
tape will not 
damage panel finish 
upon removal.

7. Using a 7/64" 

(3 mm) drill bit, drill 
6 pilot holes into 
the wood panel 1/2" 
(12 mm) deep using 
the holes in the 
door frame as a 
guide.

NOTICE

It is important to ensure that all drilled holes are 
drilled to the correct depth in order to avoid 
splits in the wood when hardwood is installed.

8. Locate 6 of the #6x 1-1/2" (38 mm) screws provided 

with your unit.

9. Using a Phillips screwdriver, place one screw into each 

of the 6 pilot holes and screw down. Do not overtighten 
screws.

10.Ensure the screws sit flush against the bottom of the 

channel.

11.Remove clamps from door.

NOTICE

If panel requires additional adjustment after 
removing clamps, slightly loosen each screw and 
adjust panel as necessary. Tighten screws upon 
completion.

12.Starting at the corners, re-install the gasket into the 

gasket channel in the frame. Make sure the gasket is 
fully seated.

Wood

Panel

Door/Drawer

Bar 

Clamp

Bar 

Clamp

Integrated Panel

Integrated Panel

Содержание U2224BEVINT00B

Страница 1: ...QUICK START GUIDE 2000 Series 115 V 60 Hz...

Страница 2: ...to you PRODUCT INFORMATION Looking for additional information on your product User Guides Quick Reference Guides CAD Drawings Compliance Documentation and Product Warranty information are all availab...

Страница 3: ...ine com Contents 1 Model List 3 Safety and Warning 4 Environmental Requirements 4 Electrical 5 Door Swing 6 General Installation 6 Integrated Panel Installation 8 Control Operation 10 First Use 10 Sab...

Страница 4: ...information Visit u line com to view detailed User Guides for all U Line products Wine Captain Models U 2218WCS 00B U 2218WCINT 00B U 2224ZWCS 00B U 2224ZWCS 13B U 2224ZWCS 15B U 2224ZWCINT 00B U 222...

Страница 5: ...B U 2218RGLINT 00B U 2224RGLS 00B U 2224RGLS 13B U 2224RGLS 15B U 2224RGLINT 00B Solid Door Refrigerators U 2218RS 00B U 2218RINT 00B U 2224RS 00B U 2224RINT 00B Visit http www u line com product lite...

Страница 6: ...ilure to follow this safety statement could result in serious personal injury or death CAUTION Caution means that failure to follow this safety statement may result in minor or moderate personal injur...

Страница 7: ...er attempt to repair or perform maintenance on the unit until the electricity has been disconnected Never remove the round grounding prong from the plug and never use a two prong grounding adapter Alt...

Страница 8: ...itional space for any knobs or pulls installed on the integrated panel frame Stainless Steel models that are installed adjacent to a wall require 2 1 4 57 mm door clearance on hinge side to allow for...

Страница 9: ...ower electrical cord 2 Gently push the unit into position Be careful not to entangle the cord 3 Re check the leveling from front to back and side to side Make any necessary adjustments The unit s top...

Страница 10: ...o avoid splits in the wood when hardwood is installed 8 Locate 6 of the 6x 1 1 2 38 mm screws provided with your unit 9 Using a Phillips screwdriver place one screw into each of the 6 pilot holes and...

Страница 11: ...OL FUNCTION GUIDE FUNCTION COMMAND DISPLAY OPTIONS ON OFF Press and release Unit will immediately turn ON or OFF Toggle lights Press and release to leave interior light on for 3 hours Glass door wine...

Страница 12: ...urned on top zone first Press to adjust set point temperature Display will show the set temperature Press to change zones Light will switch from top zone to the bottom zone Press to adjust set point t...

Страница 13: ...de disables system responses to user initiated activities and all external functions including lighting display and audible alarms The unit will still maintain internal temperatures and set points Vie...

Страница 14: ...to the original purchaser of the U Line product The Product Registration Card included with the product should be promptly completed by you and mailed back to U Line or you can register on line at ww...

Страница 15: ...ne year after the applicable warranty period 8 THIS LIMITED WARRANTY IS IN LIEU OF ANY AND ALL OTHER WARRANTIES EXPRESS OR IMPLIED INCLUDING ANY IMPLIED WARRANTY OF MERCHANTABILITY OR IMPLIED WARRANTY...

Отзывы: