background image

PAGE 2 OF 9 

0521 IH-2661

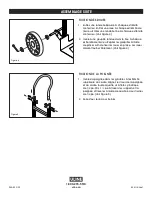
ATTACH NOSE PLATE, WHEEL BRACKETS AND AXLE

1.  Position side channel reinforcements against bottom 

frame rail. (See Figure 1a) Slide nose plate into 

channel on side channel reinforcement, keeping 

bolt holes aligned. (See Figure 1)

2.  Insert four 5/16"-18 x 2⁄" - hex head bolts through the 

nose plate, side channel reinforcements and frame. 

(See Figure 1)

3.  Slide the right hand wheel bracket over the bolts on 

the outside of the frame leg and secure with two 

5/16" locknuts but DO NOT tighten. (See Figure 1)

4.  Lay hand truck on front so nose plate faces 

downwards. (See Figure 2)

5.  Use a hammer to tap in first roll pin into the axle.

6.  Insert the axle (the end with the roll pin in place) 

through the lower axle hole in the wheel bracket. 

(See Figure 2a) Rotate axle until roll pin "locks" into 

position in the wheel bracket.

7.  Position and attach the left hand wheel bracket 

sliding it over the axle to the outside of the frame 

leg and secure with two 5/16" locknuts but DO NOT 

tighten. (See Figure 2)

8.  Use a hammer to tap in second roll pin into the axle.

ATTACH STAIR CLIMBERS

1.  Assemble stair climber on each side. (See Figure 3)

2.  Align lower hole (A) of stair climber with top hole (B) 

of wheel bracket.

3.  Insert one 5/16"-18 x 1⁄" - hex head bolt through 

the outside of the wheel bracket and stair climber. 

Secure with one 5/16" locknut but DO NOT tighten.

4.  Push stair climber towards hand truck frame until 

the open end of the stair climber fits over the frame. 

(See Figure 3a)

5.  Insert one 1/4"-20 x 1⁄" - pan head bolt through side 

of the stair climber and frame. Use a hammer to 

pierce 1/4"-20 x 1⁄" - pan head bolt through frame. 

Secure with one 1/4" locknut and tighten.

ASSEMBLY

Roll Pin

Axle

Figure 2


Hole "B" 

Hole "A" 

Figure 3

Frame

Side Channel

Reinforcements

Figure 1

Figure 1a

Figure 2a

Figure 3a

Содержание Magliner H-2661

Страница 1: ...el 8 2 Thick Washer 9 2 Pin Coil Spring Roll Pin 10 1 Axle 11 1 Right Hand RH Wheel Bracket 12 1 Left Hand LH Wheel Bracket 13 6 5 16 Locknut 14 2 Side Channel Reinforcement 15 4 5 16 18 x 2 Hex Head Bolt 16 1 Nose Plate 17 2 Stair Climber 18 2 1 4 20 x 1 Pan Head Bolt 19 2 5 16 18 x 1 Hex Head Bolt Includes additional hardware not required for assembly TOOLS NEEDED 1 2 Combination Wrench or Socke...

Страница 2: ...into position in the wheel bracket 7 Position and attach the left hand wheel bracket sliding it over the axle to the outside of the frame leg and secure with two 5 16 locknuts but DO NOT tighten See Figure 2 8 Use a hammer to tap in second roll pin into the axle ATTACH STAIR CLIMBERS 1 Assemble stair climber on each side See Figure 3 2 Align lower hole A of stair climber with top hole B of wheel b...

Страница 3: ...rt a cotter pin through the holes in each end of the axle Bend cotter pins using pliers to secure wheels Wheels should spin freely See Figure 4 ATTACH HANDLE 1 Slide handle into the top rails of frame Align holes in handle and frame Insert four 1 4 20 x 1 pan head bolts through the frame and handle and secure with four 1 4 locknuts See Figure 5 2 Tighten all locknuts Figure 4 Figure 5 1 800 295 55...

Страница 4: ... Rondana Gruesa 9 2 Clavija tipo Resorte Clavija del Rodillo 10 1 Eje 11 1 Soporte de la Llanta Derecho mano derecha 12 1 Soporte de la Llanta Izquierdo mano izquierda 13 6 5 16 Tuerca de Seguridad 14 2 Refuerzo del Canal Lateral 15 4 5 16 18 x 2 Perno de Cabeza Hexagonal 16 1 Placa Delantera 17 2 Aditamento para Escaleras 18 2 1 4 20 x 1 Perno de Cabeza Alomada 19 2 5 16 18 x 1 Perno de Cabeza He...

Страница 5: ...en el soporte de la llanta 7 Coloque y fije el soporte de la llanta izquierdo deslizándolo por encima del eje hasta el exterior de la pata del marco y fíjelo con dos tuercas de seguridad de 5 16 pero NO las apriete Vea Diagrama 2 8 Use un martillo para introducir la segunda clavija del rodillo en el eje FIJE EL ELEVADOR DE ESCALERAS 1 Ensamble cada uno de los lados del elevador de escaleras Vea Di...

Страница 6: ...os en cada extremo del eje Doble los pasadores de chaveta usando unas pinzas para asegurar las llantas Las llantas deben girar libremente Vea Diagrama 4 COLOCACIÓN DEL ASA 1 Deslice el asa hacia los rieles superiores del marco Alinee los orificios en el asa y el marco Inserte cuatro pernos de cabeza alomada de 1 4 20 x 1 a través de los soportes y el asa y fíjelos con cuatro tuercas de seguridad d...

Страница 7: ... Rondelle fine 7 2 Roue 8 2 Rondelle épaisse 9 2 Goupille cylindrique Ressort hélicoïdal 10 1 Essieu 11 1 Support de roue droit 12 1 Support de roue gauche 13 6 Écrou freiné de 5 16 po 14 2 Renfort de rainure latéral 15 4 Boulon à tête hexagonale de 5 16 po 18 x 2 po 16 1 Bavette 17 2 Escaladeur 18 2 Vis à tête cylindrique de 1 4 po 20 x 1 po 19 2 Boulon à tête hexagonale de 5 16 po 18 x 1 po Comp...

Страница 8: ...s enclenche dans le support de roue 7 Positionnez et fixez le support de roue gauche en le faisant glisser sur l essieu à l extérieur de la patte du cadre et fixez le à l aide de deux écrous freinés de 5 16 po mais NE serrez PAS Voir Figure 2 8 Utilisez un marteau pour planter la deuxième goupille cylindrique dans l essieu FIXATION DES ESCALADEURS 1 Installez un escaladeur de chaque côté Voir Figu...

Страница 9: ...ssieu Repliez les goupilles à l aide de pinces afin de fixer les roues en place Les roues doivent tourner librement Voir Figure 4 FIXATION DE LA POIGNÉE 1 Insérez la poignée dans les glissières à l extrémité supérieure du cadre Alignez les trous de la poignée et du cadre Insérez quatre vis à tête cylindrique de 1 4 po 20 x 1 po à travers les supports et la poignée et fixez les à l aide de quatre é...

Отзывы: