U-Line H-9235 Скачать руководство пользователя страница 7

PAGE 7 OF 24 

0721 IH-9235

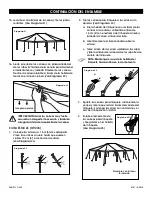
1.  Loosen ratchet strap assemblies and remove straps 

from stakes or barrels. 

NOTE: If using barrels, drain them. Lift every leg 
and remove pin from barrel, setting legs on 
ground not back on barrel. Move the barrels 
away from tent to make room for lowering tent.

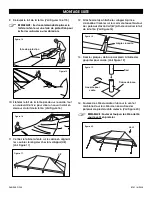
2.  Remove two center legs on long side and two 

adjacent side legs. (See Figure 33)

3.  Unfasten all alligator straps except the two at each 

corner (one at each side of corner). (See Figure 34)

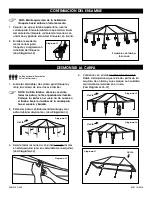
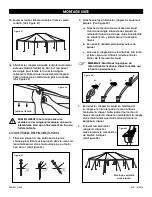
4.  Start with upwind side. Have another person remove 

two corner legs from one side and carefully set tent 

frame on the ground. (See Figures 35-37)

NOTE: Keep ratchet buckle handle facing up  
at all times.

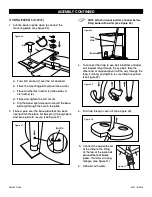
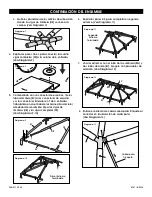
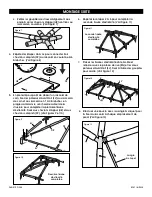
7.  After barrel is full, tighten ratchet straps by pulling 

all slack through ratchet reel, holding strap with one 

hand while cranking ratchet handle with the other.

8.  Roll excess ratchet straps 

and secure into the ratchet 

buckle. (See Figure 32)

ASSEMBLY CONTINUED

Completed Assembly 

with Barrels

Figure 32

TAKING DOWN TENT 

Figure 34

Figure 35

Figure 36

Figure 37

Figure 33

4

1

2

3

Wind

Wind

Wind

Wind

Three Person Takedown 

Recommended

Содержание H-9235

Страница 1: ...e or store fireworks underneath or near canopy Do not use bleach to clean cover Do not dry clean cover Do not wash cover in washing machine or dry in dryer Hand wash with mild soap and water only Do n...

Страница 2: ...rusion on crown has two holes The alignment hole is closer to the center the placement hole is further down the protrusion See Figure 2 b Place a pin in each alignment hole Pin prevents rafter from mo...

Страница 3: ...around the assembly to complete the first end bay Attach to hip rafters HR and full rafters FR See Figures 9 10 6 Repeat steps 2 5 to complete second end bay See Figure 11 7 Move end bays together an...

Страница 4: ...hip rafters HR See Figure 17 12 Loosely fasten the alligator straps and attach to canopy top at each side of the corners around eave poles EV to secure tent top See Figure 18 13 Attach base plates to...

Страница 5: ...tach ratchet straps to the stakes loosely See Figure 24 a Attach ratchet buckle with loop strap to stakes by turning the 6 loop at the end of the ratchet inside out and pulling strap through the loop...

Страница 6: ...and base plate to secure See Figure 27 NOTE Attach strap at bottom of barrel before filling barrel with water See Figure 28 3 To connect the strap to eye bolt in bottom of barrel pull looped strap thr...

Страница 7: ...ner See Figure 34 4 Start with upwind side Have another person remove two corner legs from one side and carefully set tent frame on the ground See Figures 35 37 NOTE Keep ratchet buckle handle facing...

Страница 8: ...d for best results NOTE For longevity of the tent do not stand or walk on top of the tent top It is recommended to dry and wipe the tent top fabric clean before folding for storage 9 Disassemble all c...

Страница 9: ...lamables por debajo o cerca de la carpa No encienda o almacene fuegos pirot cnicos por debajo o cerca de la carpa No use blanqueador para limpiar la carpa No lave en seco la carpa No lave la carpa en...

Страница 10: ...El orificio de alineaci n est m s cerca del centro el de colocaci n est m s abajo del saliente Vea Diagrama 2 b Coloque un pasador en cada orificio de alineaci n El pasador evita que la viga se mueva...

Страница 11: ...corona de 6 entradas Vea Diagrama 8 5 Comenzando con un conector de esquinas fije los tubos del alero EV a los conectores de esquina y a los conectores laterales en T de 4 entradas trabajando en el s...

Страница 12: ...e aire debajo de la cubierta Vea Diagrama 16 11 Centre la cubierta de la carpa sobre el armaz n alineando las costuras con las vigas de limatesa HR Vea Diagrama 17 12 Para asegurar la parte superior d...

Страница 13: ...Clave las estacas al suelo hasta que queden visibles 15 cm 6 o menos de la estaca Vea Diagrama 23 2 Fije las correas para trinquete a las estacas sin apretar Vea Diagrama 24 a Fije la hebilla del trin...

Страница 14: ...illete 7 por el poste y la placa de base para fijarlos Vea Diagrama 27 NOTA Fije la correa en la parte inferior del tambo antes de llenarlo con agua Vea Diagrama 28 3 Para conectar la correa a la arme...

Страница 15: ...s de las estacas o tambos NOTA Si utiliza tambos dr nelos Levante todas las patas y retire el pasador del tambo Coloque las patas en el suelo no de nuevo en el tambo Aleje los tambos de la carpa para...

Страница 16: ...arpa lo m s ajustado posible Doble en abanico o en Z para mejores resultados NOTA Para la durabilidad de la carpa no se pare o camine sobre la cubierta de esta Se recomienda secar y limpiar la tela de...

Страница 17: ...dessous ou proximit de l auvent N utilisez pas et n entreposez pas de feux d artifice en dessous ou proximit de l auvent N utilisez pas de javellisant pour nettoyer la b che N effectuez pas de nettoya...

Страница 18: ...Le trou d alignement est plus proche du centre le trou de positionnement est situ plus bas le long de la branche Voir Figure 2 b Placez une goupille dans chaque trou d alignement Cette goupille emp ch...

Страница 19: ...prenant pour point de d part un raccord de coin fixez les poteaux d avant toit EV aux raccords de coin et aux raccords en T 4 branches en progressant dans le sens horaire autour de la structure pour...

Страница 20: ...cr er un coussin d air en dessous du toit de la tente Voir Figure 16 11 Centrez le toit de la tente sur le cadre en alignant les coutures le long des chevrons d appui HR Voir Figure 17 12 Attachez de...

Страница 21: ...issant d passer d une hauteur de 6 po ou moins hors du sol Voir Figure 23 2 Attachez de fa on l che les sangles cliquet aux piquets Voir Figure 24 a Attachez le m canisme de fixation cliquet muni d un...

Страница 22: ...que Ins rez l trier 7 travers le poteau et la plaque de base pour fixer le tout Voir Figure 27 REMARQUE Attachez la sangle au fond du baril avant de remplir le baril d eau Voir Figure 28 3 Pour connec...

Страница 23: ...odile hormis les deux situ es dans chacun des coins une sangle de chaque c t du raccord en coin Voir Figure 34 4 Commencez du c t au vent Faites vous aider par une autre personne pour retirer les deux...

Страница 24: ...r sultats REMARQUE Pour une meilleure long vit de la tente ne marchez pas et ne vous tenez pas debout sur le toit de la tente Il est recommand de s cher et d essuyer le toit en tissu de la tente avan...

Отзывы: