U-Line 29R Скачать руководство пользователя страница 8

www.U-LineService.com

8

02/2005

29R Refrigerator

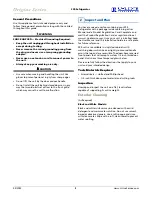
Electrical Specifications

CAUTION

Electrical installation must observe all state and local 
codes. This unit requires connection to a grounded (three-
prong), polarized receptacle that has been placed by a 
qualified electrician.

The unit requires a grounded and polarized 115 VAC, 
60 Hz, 15A power supply (normal household current). 
An individual, properly grounded branch circuit or circuit 
breaker is recommended. GFCI (ground fault circuit 
interrupter) is usually not required for fixed location 
appliances and is not recommended for your unit because 
a GFCI could be prone to nuisance tripping. However, be 
sure to consult your local codes.

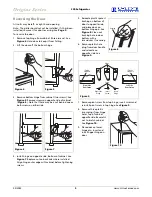
See 

Figure 16

 for recommended receptacle location. 

WARNING

SHOCK HAZARD — Electrical Grounding Required. 

• Never remove the round grounding prong from 

the plug and never use a two-prong grounding 
adapter.

• Never use an extension cord to connect power to 

the unit.

Go on to 

7 Level the Unit

.

Leveling Information

Note: 

It is recommended that the unit is level. 

Use a level to check the 
levelness of the unit from 
front to back and from side 
to side. Level should be 
placed along top edge and 
side edge as shown (see 

Figure 17

). Go on to 

8 Install the Unit

.

6 Prepare Power Supply

23"

Minimum

1-1/2"

7"

Figure 16

7 Level the Unit

Check

Level

Figure 17

Содержание 29R

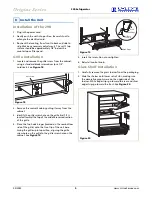
Страница 1: ...LineService com Phone 414 354 0300 FAX 414 354 7905 Service Parts Tech Lines Phone 800 779 2547 FAX 414 354 5696 OnlineService U Line com 2005 U Line Corporation 02 2005 29R Refrigerator Installation...

Страница 2: ...re attempting to install or operate the unit This unit requires connection to a grounded three prong polarized receptacle that has been placed by a qualified electrician in accordance with applicable...

Страница 3: ...nd a Product Registration Card Complete and mail the Product Registration Card or register online at www U LineService com Once your unit is installed keep the User Manual and this Installation Guide...

Страница 4: ...stallations The unit is 23 deep including the door and handle see Figure 2 Note It is recommended that the unit is level Product Dimensions Door Swing Clearances Information Units have a zero clearanc...

Страница 5: ...talled Align hinge outer edge with cabinet before tightening screws 5 Relocate plastic spacer bushing on bottom of door to opposite side and place door on bottom hinge pin See Figure 8 Clean out bushi...

Страница 6: ...with or accent the surrounding decor If this treatment is not included in this installation go on to 5 Adjust Door Custom 1 4 Thick Door Panel Insert Door Panel Preparation A custom door panel can be...

Страница 7: ...or Alignment The unit s door is aligned at the factory before shipment However its alignment could have been disturbed during shipment or during door panel installation IMPORTANT Properly aligned the...

Страница 8: ...t recommended for your unit because a GFCI could be prone to nuisance tripping However be sure to consult your local codes See Figure 16 for recommended receptacle location WARNING SHOCK HAZARD Electr...

Страница 9: ...the grille itself It is located toward the top of the middle recessed section of the grille 4 Place the two hook hinges located on the rear bottom side of the grille onto the front lip of the unit ba...

Страница 10: ...this time For information about Adjusting the Temperature Control see the User Manual Start Up Troubleshooting Problem Q Unit does not appear to turn on when plugged in Solution A Make sure outlet ha...

Отзывы: