


4
5
ENGLISH
ENGLISH
• Before using for the first time, remove any protective films or stickers from the sole plate and the
cabinet. Then clean the sole plate with a soft cloth.
• When using the iron for the first time, test it on an old piece of fabric to ensure that the sole plate
and water tank are completely clean.
IRONING
Important: Have you read the section “Important Safeguards”?
CHOICE OF WATER
If the water in your area is particularly hard, it is advisable to use distilled or demineralized water. Do
not use chemically descaled water or any other liquids for refilling.
Do not use chemical additives, scented substances or decalcifiers. Failure to comply with the above-
mentioned regulations leads to the loss of guarantee.
HOW TO FILL IN WATER
• Set the steam control knob to “ ” and the temperature control dial to “MIN”.
• Unplug the iron from the wall outlet, and wait for the iron to cool down.
• Pour water into the water inlet:
- Fill up to the maximum level “MAX” of the water tank.
Important: Empty the watertank after use.
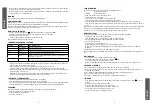
TEMPERATURE CONTROL SETTING
SETTING
FABRIC
RECOMMENDATION
•
Acetete/Nylon
Dry iron on reverse side
••
Silk/Nylon
Dry iron on reverse side
min
Rayon
Check garment label and follow manufacturer’s instructions
••
Wool/Polyester
Steam iron on wrong side or use pressing cloth
•••
Cottons
Steam iron or dry iron while fabric is damp until dry. Iron dark fabrics on
wrong side to avoid shine
•••
Linen
Steam iron or dry iron while fabric is damp until dry. Iron dark fabrics on
wrong side to avoid shine. Iron table linens on right side
• Always check first to see whether a label with ironing instructions is attached to the article to be
ironed. Follow these instruction in all cases.
• If the ironing instruction are missing, then the table below may help you.
• First you should sort the laundry: Wool with wool, Cotton with cotton etc. Start ironing the
fabrics requiring the lowest temperature and progress to the higher ones because the iron heats
up quicker than it cools down.
• If the fabric consist of various kinds of fibres (e.g. cotton with polyester) you must always select
the lowest ironing temperature of the composition of those fibres.
SETTING THE TEMPERATURE
• Insert the plug in the wall socket and stand the iron upright.
• Turn the temperature control knob to the correct temperature.
• The correct temperature will be reached when the pilot light has turned off. The pilot light will be
on and off from time to time indicating that the selected temperature is being maintained.
SPRAYING
This function can be used any time and it does not affect the ironing temperature.
• Fill water into the iron as described above.
• Aim the nozzle to the garment.
• Press the spray knob.
STEAM IRONING
This function can be used only at higher ironing temperature.
••
for moderate steam
•••
or MAX
for maximum steam
• Fill water into the iron as described above.
• Stand the iron on its rear side.
• Connect the iron to a suitable mains supply outlet.
• Turn the temperature control to appropriate fabric setting.
• The pilot light turns off when the required temperature is reached. The iron is ready for use.
• Turn the steam knob to the required position, steam starts coming out from the holes in the sole
plate.
Notice: With conventional steam ironing, water may leak from the sole plate if a too low temperature
has been select. If this happens, turn the temperature control to the advise position. Steam will
recommence as soon as the appropriate temperature has been reached.
BURST OF STEAM
This function provides an extra amount of steam to remove stubborn wrinkles.
• Fill the iron with water as described above.
• Turn the temperature control to the position for steam ironing.
• The pilot light turns off when the required temperature is reached.
• The iron is ready for use.
• Press the steam control knob once.
• Steam will penetrate into the garment removing the wrinkles.
• Wait a few seconds before pressing the steam control knob again when there are stubborn
wrinkles.
Usually all wrinkles can be removed within three pressings.
By pressing the shot-steam button at intervals you can also iron vertically (curtains, hung garments,
etc.)
DRY IRONING
• Connect the iron to a suitable mains supply outlet.
• Ensure that the steam control knob is in position “ ” (0).
• Select the setting on the temperature control.
• When the pilot light turns off, the required temperature is reached. The iron is ready for use.
CARE AND CLEANING
1. Disconnect the iron from the wall outlet and let it cool down completely.
2. Deposits and other residues on the sole plate can be removed with a rough cloth soaked in a
vinegar/water solution.
3. The casting may be wiped with a damp cloth and then polished with a dry one.
4. Never use any abrasives to clean the sole plate.
5. Keep the sole plate smooth: avoid hard contact with metal objects.
STORAGE
• Turn the temperature control to “MIN” and set the steam control knob to position “ ” (0) (= no
steam)
• Disconnect the iron from the wall outlet.
• Pour any remaining water out of the water tank.
• Stand the iron upright and let it cool down completely.
• The power cord can be wound around the iron.
• Always store the iron in an upright position.
5
ENGLISH
4
ENGLISH
Содержание FA-5615
Страница 10: ...18 19 A 0 MIN MAX min 1 2 3 4 5 6 7 8 9 10 11 12...
Страница 11: ...21 20 0 1 2 3 4 5 MIN 220 240 50 60 1800 2200...
Страница 17: ...32 33 0 10 15 A 1 2 3 4 5 6 7 8 9 10 11 12 8 8...
Страница 18: ...0 MIN 0 35 34 MIN MAX min MAX...
Страница 25: ...48 49 A 0 Acetete m nima 1 2 3 4 5 6 7 8 9 10 11 12 8 0 10 15...
Страница 26: ...50 A off 1 2 3 4 5 MIN 0 1 2 3 5 7 6 8 9 4 10 51 I 11 12...


