background image

5


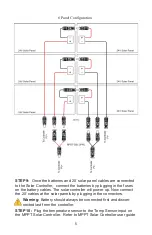
STEP 9:

  Once the batteries and 

20’ 

solar panel cables are connected 

to the Solar Controller,  connect the batteries by plugging in the fuses 

on the battery cables. The solar controller will power up. Now connect 

the 

20’ 

cables at the solar panels by plugging in the connectors.


Warning: 

Battery should always be connected first and discon-

nected last from the controller.


STEP 10:  

Plug the temperature sensor to the Temp Sensor input on 

the MPPT Solar Controller.  Refer to MPPT Solar Controller user guide 

6 Panel Configuration


Содержание RemotePro RPAL MPPT

Страница 1: ...closure 720 1440Ah Battery 720 2160W Solar Safety For your own protection follow these safety rules Perform as many functions as possible on the ground Do not attempt to install on a rainy windy or snowy day or if there is ice or snow accumulation at the install site or if the site is wet Make sure there are no people pets etc below if you are working on a roof or ladder Recommended Tools Phillips...

Страница 2: ...r mount instructions STEP 3 Assemble solar array with mount using solar mount instruc tions Warning Batteries are very heavy always use 2 people when handling the batteries STEP 4 Place battery box under solar panels Install 4 8 batteries in the box Use handles to lower batteries into the box Remove the bat tery fuses from the battery cables before proceeding Connect Bat teries in series or parall...

Страница 3: ...3 ...

Страница 4: ... cables through the cable gland and connect to the solar controller PV inputs You can shorten the cables as necessary for a cleaner install You can also lengthen the cables by adding addi tional lengths of 12AWG cable Please note that the longer the cable the more cable loss you will see STEP 8 Connect the solar panel pairs in series Positive to Negative by plugging the positive from panel 1 to th...

Страница 5: ...es The solar controller will power up Now connect the 20 cables at the solar panels by plugging in the connectors Warning Battery should always be connected first and discon nected last from the controller STEP 10 Plug the temperature sensor to the Temp Sensor input on the MPPT Solar Controller Refer to MPPT Solar Controller user guide 6 Panel Configuration ...

Страница 6: ...efer to the controller user guide for specific information about the controller operation 2 Fuse There is a fuse in line in the battery cables If fuse is blown there was some sort of short in the battery connection and the control ler will appear dead Replace with 3AG 6 3 x 32mm 30A Slo Blo fuse 3 VENTING The enclosure is vented thru a thermostatically 45C controlled fan and vents on the ends of t...

Страница 7: ...ake sure Solar Panels are wired in se ries for 48V configuration B There is no voltage output If battery voltage is too low the charge controller will turn off the load outputs If load current is too high the load output will turn off automatically C Why is my solar panel voltage so high Open circuit voltage on a 48V panel array could be as high as 95V This is normal D My system turns off at night...

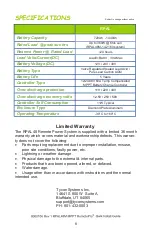
Страница 8: ...Systems Inc 14641 S 800 W Suite A Bluffdale UT 84065 support tyconsystems com PH 801 432 0003 SPECIFICATIONS Subject to change without notice RPAL Battery Capacity 720Ah 1440Ah Rated Load peak sun hrs Up to 360W 6hrs sun RPAL48M 14 2160 system Reserve Power Rated Load 24 hours Load Volts Current DC LoadV BattV 30A Max Battery Voltage DC 12V 24V 48V Battery Type Valve Regulated Sealed Lead Acid Pur...

Отзывы: