background image

17

MAP LIG HT S

Mapping

Choose a mapping type

2D mapping

3D mapping

Cancel

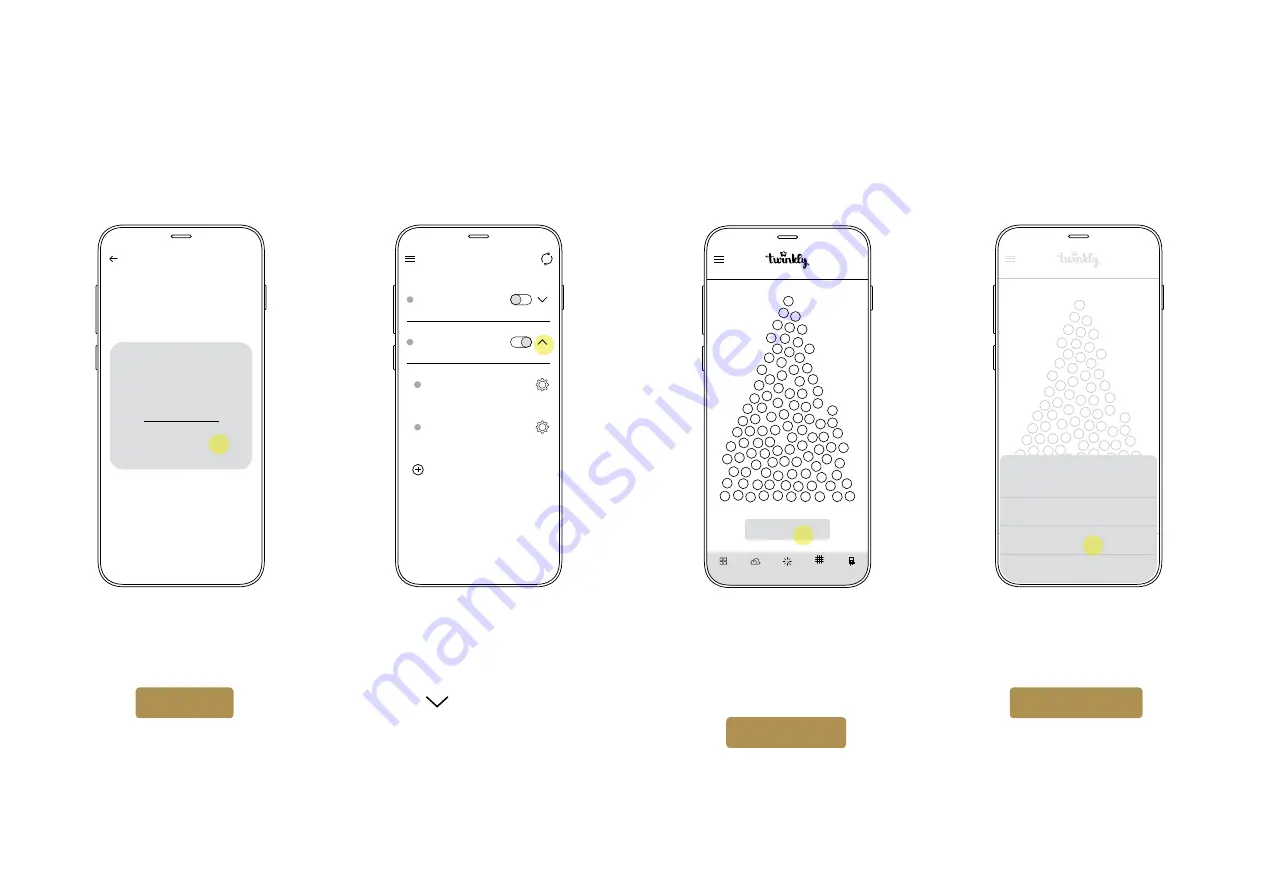
Name your group and press 

SAVE

Your group will now appear 

in 

DEVICES list.

Use the       icon to show the 
dropdown menu to manage 

the devices within the group

Navigate to Layout 

then press

MAP LIGHTS

Select 

3D mapping

3.10

3.9

3.11

3.12

C R E A T E   G R O U P

Group name

Give a name to the group

Twinkly-4m_02

CANCEL               SAVE

D E V I C E S

Twinkly-4m_02

3.000 LEDs - Join

TwProDevice. 1

1.500 LEDs RGB

Add another device

TwProDevice. 2

1.500 LEDs RGB

Twinkly-4m

3.000 LEDs - Join

Layout

MAP LIGHTS

M A P   L I G H T S

STEP 3

Re-configuring the Cone Tree

TROUBLESHOOTING

Содержание TWP-S-CA-4mx3k-STP-G

Страница 1: ...1 Smart decoration solutions for professionals USERGUIDE TWP S CA 4mx3k STP G REV 1 200922...

Страница 2: ...the product or extension cords as this may damage the wire insulation 11 Read and follow all instructions that are on the product or provided with the product 12 Save these instructions USE AND CARE...

Страница 3: ...is in the packaging The connecting cable cannot be repaired or replaced THE LAMPS ARE NOT REPLECEABLE The lighting chain must not be used without all gaskets being in place Lighting chains not intende...

Страница 4: ...on the Section A light strings 9 Power up the Cone Tree 10 ONBOARDING Connect to the Twinkly App 12 Connect the Cone Tree s router to Internet using a SIM card 13 Connect the Cone Tree s router to Int...

Страница 5: ...ocedure for your device s By reading this step by step guide you will avoid making common installation mistakes learn the technical and practical knowledge needed to operate and manage your device s p...

Страница 6: ...Contents 5 Screw Kit 4 x Dado M8 4 x Vite M8x20 4 x Rosetta M8 1 Cone Tree section A 2 Cone Tree section B 3 2 x Twinkly PRO Controller 1500 ETH already setup 4 Plug Cable What is inside the box A B...

Страница 7: ...7 Assembling Process...

Страница 8: ...SEMBLING PROCESS N O T E At least two persons are recommended for assembly Position section A over section B so that the joints coincide enter the appropriate door and fix the screws Make sure the red...

Страница 9: ...9 STEP 2 Connect the Section A light strings ASSEMBLING PROCESS Connect the strings from Section A to the controller ports from Section B Follow the labels correspondence A B C D A B C D...

Страница 10: ...ower up the Cone Tree ASSEMBLING PROCESS Connect the cable from the IP65 box inside the tree to the cable plug Ensure a tight fit for waterproof Connect the plug to a power socket to power up the Cone...

Страница 11: ...11 Onboarding...

Страница 12: ...ller 3 The Cone Tree has already been mapped Follow the instructions from Step 3 at page 15 in case of troubleshooting 1 Connect to the Cone Tree s wi fi router 2 SSID Twinkly 4m_OV443_01 Password Ins...

Страница 13: ...pen the IP65 box where the router resides 3 Insert the SIM card in the router s SIM card slot 4 Power back on the Cone Tree 5 Connect the iPhone to the router and check if there s internet connection...

Страница 14: ...Cone Tree 5 Using your iPhone or PC recomended for this process connect to the router browsing to the address 192 168 1 1 or 192 168 0 1 and access with the password admin 6 Navigate to the section A...

Страница 15: ...following devices have been discovered on your network SETUP SELECTED DEVICES 1 TwProDevice 192 168 1 101 2 TwProDevice 192 168 1 100 Open Twinkly Select Devices Press Add another device Select the d...

Страница 16: ...2 1 500 LEDs RGB Devices Select devices to join group CREATE GROUP Configure selecting LED RGB 250 lamps per port 6 ports then press SAVE Press CREATE GROUP Choose Join and press NEXT Select the devic...

Страница 17: ...ices within the group Navigate to Layout then press MAP LIGHTS Select 3D mapping 3 10 3 9 3 11 3 12 CREATE GROUP Group name Give a name to the group Twinkly 4m_02 CANCEL SAVE DEVICES Twinkly 4m_02 3 0...

Страница 18: ...To keep mapping press ADD ANOTHER and repeat from step 3 13 until all the LEDs are green to ensure the best layout when done press I M SATISFIED Frame your installation and press MAPPING Once you star...

Страница 19: ...ed onto your account 3 18 3 17 T R Y A G A I N O K Mapping completed Save the layout RAINBOW SNOW VERTIGO HEARTBEAT Gallery 3 19 Return to the Gallery to browse the effects with your new mapped layout...

Страница 20: ...20 If you need any further information please feel free to contact us sales pro twinkly com...

Отзывы: