Twin-Star International DFS-760-1 Скачать руководство пользователя страница 23

PREPARACIÓN

S-4

Antes de comenzar la instalación del producto, asegúrese de contar con todas las piezas. Compare 

las piezas con la lista de contenidos del paquete y los diagramas incluidos anteriormente. Si falta 

alguna pieza o si alguna pieza está dañada, no intente armar, instalar u operar el producto. Para 

obtener repuestos, póngase en contacto con el servicio al cliente. 

Tiempo estimado de armado: 15 minutos 

Herramientas necesarias para el armado: Manual Phillips (no incluidas)

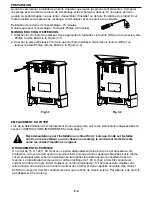
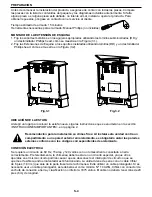
MONTADO DE LA EXTENSIÓN DE ESQUINA

1. Fije los soportes metálicos en los agujeros apropiados utilizando los tornillos subministrados (DD) y

    un destornillador Phillips head, cómo se muestra en la Figura (3.1).

2. Fije las Extensiones de Esquina a los soportes instalados utilizando tornillos (DD) y un destornillador

    Phillips head, cómo se muestra en la Figura (3.2).

UBICACIÓN DE LA ESTUFA

Al elegir un lugar para colocar la estufa nueva, siga las instrucciones que se enumeran en la sección 

<INSTRUCCIONES IMPORTANTES>, en la página 2.

Recomendación para la instalación en climas fríos: Al instalar esta unidad contra un 

compartimiento o una pared exterior sin aislamiento, es obligatorio aislar las paredes 

externas conforme con los códigos correspondientes de aislamiento.
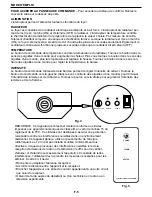
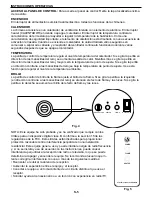
CONEXIÓN ELÉCTRICA

Se requiere un circuito de 60 Hz, 15 amp y 120 voltios con un tomacorriente conectado a tierra 

correctamente. Preferentemente, la chimenea deberá estar en un circuito especial, ya que otros 

aparatos en el mismo circuito podrían causar que se desconecte el interruptor de circuito o que se 

queme el fusible cuando el calentador esté funcionando. La unidad viene de serie con un cable trifilar 

de 6 pies (1.83 m) que sale de la parte trasera de la chimenea. Evite utilizar un cable prolongador. Si es 

necesario usar un cable prolongador, éste deberá ser como mínimo N.º 14 AWG, trifilar, con conector de 

enchufe de conexión a tierra y clasificación no inferior a 1875 vatios. El cable no deberá tener más de 20 

pies (6 m) de longitud.

Fig.3.1

Fig.3.2

Содержание DFS-760-1

Страница 1: ...L nea para llamadas en ingl s 800 318 9373 L nea para llamadas en espa ol 800 318 9373 L nea para llamadas en franc s 800 318 9374 STOP STOP PARE PARE ATTENTION SI VOUS AVEZ DES PROBL MES OU DES QUEST...

Страница 2: ...ead all instructions and warnings carefully before starting installation Failure to follow these instructions may result in a possible electric shock fire hazard and or injury and will void the warran...

Страница 3: ...th the current CSA C22 1 Canadian Electrical Code or for U S A installations follow local codes and the National Electrical Code ANSI NFPA NO 70 17 There is a thermostat limiter inside the heater When...

Страница 4: ...ireplace If any part is missing or damaged do not attempt to use or plug in the power cord until the missing or damaged part is correctly replaced To avoid electric shock use only identical replacemen...

Страница 5: ...a location for your new stove follow the instructions listed in the IMPORTANT INSTRUCTIONS section in page 2 Cold climate installation recommendation When installing this unit against a non insulated...

Страница 6: ...bient temperature level FLAME The flame brightness control knob adjusts the flame brightness Turning the knob to the left counterclockwise dims the lights and flame effect Turning the knob to the righ...

Страница 7: ...batteries are disposed of correctly you will help preventing potential negative consequences for the environment and human health The recycling of materials will help to converse natural resources Fo...

Страница 8: ...wer cord from the wall outlet 2 If the stove has been operating let the unit cool at least 2 hours 3 The back of the unit has a small panel located at the bottom of the main panel unit in the center T...

Страница 9: ...maintenance or cleaning to reduce the risk of fire electrical shock or personal injury TROUBLESHOOTING PROBLEM POSSIBLE CAUSE CORRECTIVE ACTION 1 No power switches do not light up 1 Power cord was not...

Страница 10: ...ion or other related costs expenses arising from defective part s repair replacement or otherwise of same will not be covered by this warranty nor shall the manufacturer assume responsibility for same...

Страница 11: ...he cet appareil IMPORTANT Veuillez lire attentivement toutes les instructions et tous les avertissements avant de commencer l installation Le non respect de ces instructions risquerait de causer des c...

Страница 12: ...onform ment la derni re dition de la norme CSA C22 1 du Code canadien de l lectricit ou si le produit est install aux tats Unis aux codes locaux et la norme ANSI NFPA 70 du National Electrical Code 17...

Страница 13: ...t l assemblage du foyer S il y a des pi ces manquantes ou endommag es n essayez pas d utiliser le foyer ou de brancher le cordon d alimentation avant que ces pi ces soient remplac es Pour viter les ch...

Страница 14: ...lacement du nouveau po le suivre les instructions indiqu es dans la section INSTRUCTIONS IMPORTANTES de la page 2 Recommandation pour l installation en climat froid Lorsque l unit est install e contre...

Страница 15: ...ande d intensit de la flamme permet de r gler l intensit de celle ci Tournez le bouton de commande vers la gauche dans le sens contraire des aiguilles d une montre pour diminuer l intensit des lumi re...

Страница 16: ...utiliser la t l commande durant une p riode prolong e 1 Le compartiment piles se trouve l arri re de la t l commande 2 Appuyez sur la petite languette vers l int rieur en glissant le couvercle du comp...

Страница 17: ...terrupteur d alimentation principal puis d brancher le cordon d alimentation de la prise murale 2 Si le foyer a t utilis laisser l unit refroidir pendant au moins deux heures 3 Il y a un petit couverc...

Страница 18: ...de blessure D PANNAGE F 8 PROBL ME CAUSE POSSIBLE MESURE CORRECTIVE 1 Aucune alimentation les interrupteurs ne s allument pas 1 Le cordon d alimentation n a pas t branch dans la prise 1 V rifier que...

Страница 19: ...euses de la r paration du remplacement ou d une intervention du m me type ne sont pas couverts pas la pr sente garantie et le fabricant n assume aucune responsabilit cet gard 7 Le propri taire ou l ut...

Страница 20: ...es y advertencias con detenimiento antes de comenzar la instalaci n Si no se siguen las instrucciones podr a provocarse riesgo de descarga el ctrica incendio o lesiones y adem s la garant a perder a v...

Страница 21: ...o con c digos locales y el C digo Nacional de Electricidad ANSI NFPA N 70 17 El calentador incluye un limitador de termostato Si la temperatura interior aumenta demasiado o se produce un calentamiento...

Страница 22: ...mblando la chimenea Si falta alguna pieza o alguna pieza est da ada no intente usar o enchufar el cable el ctrico hasta repararla o reemplazarla Para evitar una descarga el ctrica utilice s lo piezas...

Страница 23: ...stufa nueva siga las instrucciones que se enumeran en la secci n INSTRUCCIONES IMPORTANTES en la p gina 2 Recomendaci n para la instalaci n en climas fr os Al instalar esta unidad contra un compartimi...

Страница 24: ...eratura de punto de ajuste Use esta funci n para regular el nivel de la temperatura ambiente BRILLO La perilla de control de brillo de la flama ajusta el brillo de la flama Si se gira la perilla a la...

Страница 25: ...bater a y retire las bater as viejas 3 Reemplace con 1 bater a CR2032 no incluidas controle que los polos y de la bater a coincidan con el interior del compartimiento 4 Vuelva a colocar la puerta del...

Страница 26: ...ci n desenchufe el cable de alimentaci n del tomacorriente de pared 2 Si la chimenea ha estado en funcionamiento deje que la unidad se enfr e durante un m nimo de 2 horas 3 Detr s de la unidad hay un...

Страница 27: ...ones personales SOLUCI N DE PROBLEMAS S 8 PROBLEMA CAUSA POSIBLE ACCI N CORRECTIVA 1 No hay alimentaci n los interruptores no encienden 1 El cable el ctrico no estaba enchufado en el tomacorriente 1 V...

Страница 28: ...abricaci n transporte o de otro tipo que surja de la pieza defectuosa su reparaci n reemplazo u otra situaci n y el fabricante no asume ninguna responsabilidad por las mismas 7 El due o usuario asume...

Страница 29: ...L nea para llamadas en ingl s 800 318 9373 L nea para llamadas en espa ol 800 318 9373 L nea para llamadas en franc s 800 318 9374 STOP STOP PARE PARE ATTENTION SI VOUS AVEZ DES PROBL MES OU DES QUEST...

Отзывы: