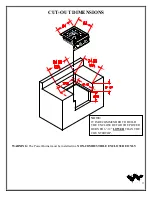


15
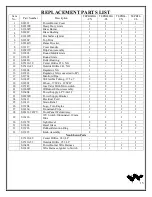
REPLACEMENT PARTS LIST
Item
No.
Part Number
Description
TEPB24HG
-CN
TEPB24HG
-CL
TEPB24-
CN
TEPB24-
CL
1
S22321
Power Burner Cover
1
1
1
1
2
S22330Y
Heavy Duty Grate
1
1
-
-
3
S13362Y
Brass Burner
1
1
1
1
4
S14289
Brass Bushing
1
1
1
1
5
S16322Y
Hot Surface Igniter
1
1
1
1
6
S22309
Top Trim
1
1
1
1
7
S22341Y
Flame Diverter
1
1
1
1
8
S13117
Cover Handle
1
1
1
1
9
S20915Y
Drip Pan Assembly
1
1
1
1
10
S13892
Round Middle Grate
-
-
1
1
11
S13891
Round Grate
-
-
1
1
12
S14420
Roller Bearing
4
4
4
4
13
S15110-30
Center Orifice #30, NG
1
-
1
-
14
S15110-41
Outside Orifice #41, NG
1
-
1
-
15
S12408
Regulator, NG
1
-
1
-
16
S16323
Regulator, NG (converted to LP)
-
1
-
1
17
S12762
Manifold Pipe
1
1
1
1
18
S12407
SS Flexible Tubing, .375 x 7
2
2
2
2
19
S12601
Elbow, .375CC x .125FIP
2
2
2
2
20
S15149
Gas Valve With Microswitch
2
2
2
2
21
S12688Y
IR Burner Elbow Assembly
2
2
2
2
22
S16404
Power Supply, LPV-60-12
1
1
1
1
23
S26366Y
Power Supply Bracket
1
1
1
1
24
S16111
Electrical Cord
1
1
1
1
25
S16112
Strain Relief
1
1
1
1
26
S13204
Logo, Twin Eagles
1
1
1
1
27
S14160
Tinnerman Clips
2
2
2
2
28
S26331-24WY
Front Panel Welded Assy.
1
1
1
1
29
S16196
12V Switch, Illuminated, 19mm,
Blue
1
1
1
1
30
S13270
Light Bezel
2
2
2
2
31
S13224
Bezel Glass
2
2
2
2
32
S13226
Rubber Retention Ring
2
2
2
2
33
S13235
Knob Assembly
2
2
2
2
Non-Shown Parts
S15110-49
Center Orifice, #49, LP
-
1
-
1
S15110-53
Outside Orifice, #53, LP
-
1
-
1
S16403
Power Burner Wire Harness
1
1
1
1
S16300
Wire Harness, Igniter to Switch
1
1
1
1


