background image

Playback &Backup 

SMT  User  Manual


67 

The detailed snapshot information and personal information can be viewed from the detail face 
match box. Click ―More‖ and then choose ―Playback‖ to view the record quickly. Click ―More‖ 
and then choose ―Export‖ to back up the captured face picture. 
 
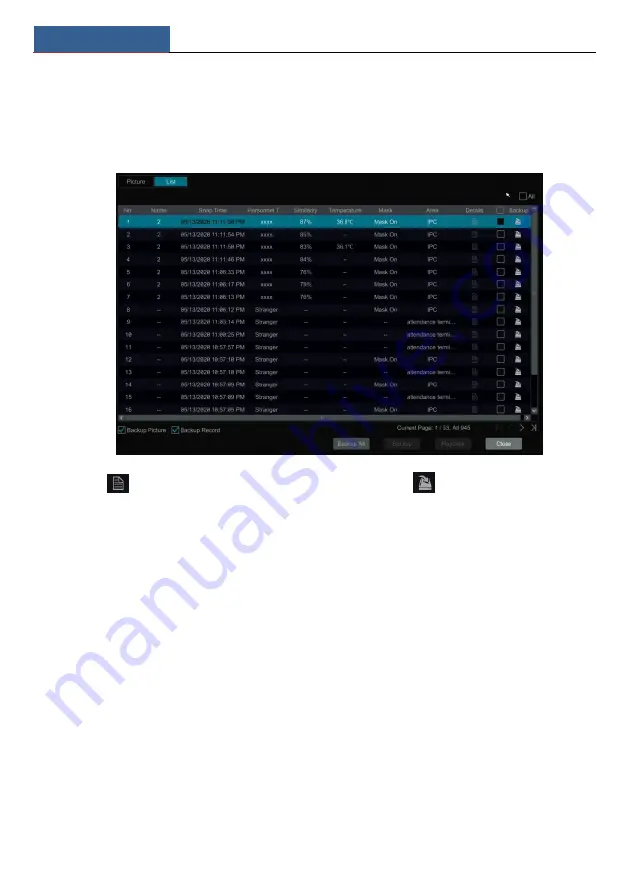
Click the ―List‖ tab to view the snapshot information list as shown below 


Click 

  to view the detailed face match information; click 

  to back up the image. 


Face Search by Attribute 


  Click  ―By  Attribute‖  and  then  select  the  search  time.  Click  the  ―Today‖  tab  to  select  the 

search time. Please choose the search time as needed. After you select the time and then click 
―OK‖ to confirm the time you set. 


  Select the cameras you want to search. 


  Select the attribution. Please select the mask status and temperature type as needed.   


Содержание Smart Management Terminal

Страница 1: ...Smart Management Terminal User Manual Please read this manual carefully before operating the unit and keep it for further reference...

Страница 2: ...uct names service names company names products that are not owned by our company are the properties of their respective owners It is recommended to back up and clear the personal data stored in the de...

Страница 3: ...TTP port HTTPS port Data Port It is not recommended to expose the device to the public network When it is necessary to be exposed to the public network please set the external hardware firewall and th...

Страница 4: ...nt Directive EU 2015 863 on the restriction of the use of certain hazardous substances in electrical and electronic equipment 2012 19 EU WEEE directive The Directive on waste electrical and electronic...

Страница 5: ...e 18 3 2 1 Main Interface Introduction 18 3 2 2 Setup Panel 20 3 2 3 Main Functions 21 4 Camera Management 23 4 1 Add Edit Camera 23 4 1 1 Add Camera 23 4 1 2 Edit Camera 25 5 Live View Introduction 2...

Страница 6: ...10 5 3 View Disk and S M A R T Information 59 11 Playback Backup 60 11 1 Instant Playback 60 11 2 Playback Interface Introduction 60 11 3 Record Search Playback Backup 64 11 3 1 Smart Face Search 64 1...

Страница 7: ...P Configuration 93 14 1 2 Port Configuration 94 14 1 3 PPPoE Configuration 96 14 1 4 DDNS Configuration 96 14 1 5 E mail Configuration 97 14 1 6 UPnP Configuration 98 14 1 7 802 1X 98 14 1 8 NAT Confi...

Страница 8: ...layback via Web Client 113 15 4 6 Search and Backup via Web Client 114 15 4 7 Settings via Web Client 114 15 4 8 Upgrade via Web Client 115 Appendix A FAQ 116 Appendix B Calculate Recording Capacity 1...

Страница 9: ...iple users to be created multiple web clients login by using one username at the same time and the user s permission control to be enabled or disabled Support a maximum of 5 web clients login at the s...

Страница 10: ...e time and batch or single configuration of the record stream Support manual and auto record modes Support schedule recording sensor alarm recording and motion detection recording etc Support schedule...

Страница 11: ...ared manually Support system auto reboot when exception happens Network Functions Support TCP IP and PPPoE DHCP DNS DDNS UPnP NTP SMTP protocol and so on Support allow and block list function and the...

Страница 12: ...t mouse button for 5 seconds in any interface to switch the output to VGA and the SMT will display the video at the lowest resolution which the SMT supports 1 3 Front Panel Descriptions The following...

Страница 13: ...locations of the interfaces are only for references The real product shall prevail No Name Descriptions 1 RS485 A B interface Connect to a keyboard A is TX B is TX 2 RS485 Y Z interface Connectors fo...

Страница 14: ...IN Alarm inputs for connecting sensors 5 GND Grounding 6 AUDIO OUT Audio output connect to sound box 7 AUDIO IN Audio input connect to audio input device like microphone pickup etc 8 VGA Connect to mo...

Страница 15: ...ay output connect to external alarm 12 ALARM IN Alarm inputs for connecting sensors 13 GND Grounding No Name Descriptions 1 RS485 A B interface Connect to a keyboard A is TX B is TX 2 RS485 Y Z interf...

Страница 16: ...icrophone pickup etc Audio Output Connect to headphone sound box or other audio output devices Alarm Connections Some models may not support this function Take 8CH alarm inputs and 4CH alarm output fo...

Страница 17: ...t Then insert the signal wires of the alarm output devices into the port of NO and COM separately Finally tighten the screws Provided that the external alarm output devices need power supply you can c...

Страница 18: ...unit will power off after a while by clicking the OK button Disconnect the power By mouse Click Start Shutdown to pop up the Shutdown window Select Shutdown in the window The unit will power off afte...

Страница 19: ...eset setting in PTZ mode Cruise Button To go to cruise setting in PTZ mode Track Button No track function temporarily Wiper Button No function temporarily Light Button No function temporarily Clear Bu...

Страница 20: ...nel and the panel will disappear automatically after you move the mouse away from it Mouse control in text input Move the mouse to the text input box and then click the box The input keyboard will pop...

Страница 21: ...n below Button Meaning Button Meaning Backspace key Switch key of punctuation character Delete Key Enter key Switch key between upper and lower letter Space key Switch key of language 2 5 Common Butto...

Страница 22: ...he following wizard steps are for reference only Choose the language and locality as needed if it is the first time for you to use the wizard and then read the privacy statement checkmark I have read...

Страница 23: ...disk number disk capacity of the SMT and serial number R W status of the disk Click Format to format the disk Click Next to continue Then click Wizard Setup Network Settings Check Obtain an IP addres...

Страница 24: ...e below Please refer to 14 1 1 TCP IP Configuration for detail introduction of the internal Ethernet port Add Camera Click Refresh to refresh the list of online IP cameras which are in the same local...

Страница 25: ...the new camera name IP address port username and the password of the camera Then click Test to test the connection Click OK to save the settings You can change the device name only when the added devi...

Страница 26: ...ion in the interface or set it in the network configuration after exiting the wizard please refer to 14 1 8 NAT Configuration for details You can scan the QRCode through mobile client which is install...

Страница 27: ...yback operations 11 2 Playback Interface Introduction click to go to the playback interface For instance if you choose 5 minutes ago as the default playback time you can playback the record from the p...

Страница 28: ...rface see 6 People Management for details Statistics Click to view the statistics of over temperature face snapshot non mask attendance and personnel records Search and Backup Click it to go to record...

Страница 29: ...s and Motion see 12 4 Motion Configuration for details Record The module covers the functions such as Encode Parameters and Record Schedule and so on Please see Chapter 10 Record Disk Management for d...

Страница 30: ...r details and so on System The module covers the functions such as Basic Configuration see14 2 Basic Configuration for details Device Information see14 8 View System Information for details Log Inform...

Страница 31: ...the Add Camera window as shown below You can quickly add or add the IP camera manually Quickly Add Select the cameras panels and then click Add to add them The system will automatically identify the t...

Страница 32: ...network camera can be selectable Facial panel or attendance terminal is suggested Facial IPC The IPC which supports face recognition can choose this one Please select the terminal type according to t...

Страница 33: ...e IP camera panel which occupies the PoE resource has a prefix shown before its camera name The prefix consists of PoE plus PoE port number The IP camera which connects to the PoE port cannot be delet...

Страница 34: ...cord yellow stands for motion based record blue stands for schedule record and cyan stands for intelligence record Click the preview window to show the tool bar as shown in area right click on the pre...

Страница 35: ...mperature Screening Click it to enter the smart temperature screening mode only available for thermal network cameras Camera Info Click it to view the camera information The instructions of Area If it...

Страница 36: ...mperature mask status etc A dropdown list will be displayed by clicking More Click Register to add the face picture to the face database click Search to quickly enter the smart search interface click...

Страница 37: ...requirements shall be satisfied a The mask detection must be supported by the IP cameras panels and this function shall be enabled in the IP cameras panels b The non mask detection alarm of the SMT sh...

Страница 38: ...lick More to view more menus Click Register to add the face picture to the face database click View Original Image to view the original image click Search to quickly enter the smart search interface c...

Страница 39: ...be shown under this tab such as mask off over temperature or blacklist Click to choose target box or rule line overlaid on the live image Introduction of area In the live display interface you can dir...

Страница 40: ...ace Press and drag the blue box to select the zoom in area Click to zoom in out the image Click the camera selection box to select other cameras for amplification Click Back to return to the live prev...

Страница 41: ...ature measurement and over temperature counts the real time captured face pictures can be viewed Disable Thermal to view the optical image only Click to return to the live view interface 5 1 2 Corrido...

Страница 42: ...image view area to change the OSDs display position and select the date and time formats Click Apply to save the settings 5 2 2 Image Settings Click Start Settings Camera Image Image Settings to go t...

Страница 43: ...ture Drag the slider to set the camera s brightness contrast saturation and hue value Check sharpen wide dynamic and denoise and then drag the slider to set the value Click Default to set these parame...

Страница 44: ...LC lowers the brightness of the entire image by suppressing the brightness of the image s bright area and reducing the size of the halo area BLC If enabled the auto exposure will activate according to...

Страница 45: ...f auto mode is selected the time interval setup will be available Click to increase decrease the focal length Click it to focus instantly Day night mode switch autofocus If checked the lens will focus...

Страница 46: ...st group is mainly used for attendance management Please enter the company name department and personal position as needed Add department and position Click to pop up the following window In this inte...

Страница 47: ...people information Then click Add to add the face picture and the relevant information Click Select face to choose a face from snapshot gallery or external faces Fill out other information and then cl...

Страница 48: ...Search to search the captured face pictures 3 Select a picture and then click Select to add this face picture To add a face picture from external faces 1 Insert your mobile storage device into the SMT...

Страница 49: ...You can also search the person by selecting attendance area and pass through area Click Reset to reset the search content If you want to change the information of the person you can select it and then...

Страница 50: ...ple Management SMT User Manual 42 In this interface you can view whether the added picture is synchronized to the face database of the camera panel Please click to view the detailed synchronization ru...

Страница 51: ...and leave early rules 2 Select work calendar type and set the working day and holiday as needed Special date settings customization Click a date on the calendar to switch between working day and holid...

Страница 52: ...k Add to add the person who wants to ask for leave or go on a business trip The system will automatically display the people information of the company group Of course you can also search the person b...

Страница 53: ...to add the leave or business trip information of this person Then the leave business trip information will be shown on the calendar Click the leave or business trip tag to view its detailed informati...

Страница 54: ...then click to view the detailed attendance information of the person In the above interface you can see the detailed attendance information of the selected person Attendance date click to select the m...

Страница 55: ...n drag the mouse on the small window to draw the crossing line Click Clear to clear the current line Click Stop Draw to stop drawing Click Switch Direction to switch the entrance and exit direction Cl...

Страница 56: ...o stay and enable auto reset Please set the available number and auto reset as needed If the auto reset is enabled the system will automatically reset the number of the people inside at the set time e...

Страница 57: ...of the statistical information Various statistical information can be viewed such as over temperature counts captured face counts non mask counts people entry exiting counts attendance statistics and...

Страница 58: ...attendance personnel records over temp captured face statistics and mask off Click Search to view the statistics during the specified time Click Export to export the statistical data Click the Real t...

Страница 59: ...ys 24 7 Record Motion Record Normal record is enabled all the time motion alarm record will be started when motion alarm happens Always 24 7 Record Sensor Record Normal record is enabled all the time...

Страница 60: ...ll be taken up Bitrate Type CBR and VBR are optional CBR means that no matter how much change is seen in the video scene the compression bitrate will be kept constant VBR means that the compression bi...

Страница 61: ...re the actual recording begins Post alarm Record Time set the time to record after the actual recording is finished Expiration Time set the expiration time for recorded video If the set date is overdu...

Страница 62: ...Start Settings AI Event Event Notification Edit Schedule 24 7 24 5 and 24 2 are the default schedules you cannot edit or delete 24 7 while 24 5 and 24 2 can be edited and deleted Click the schedule n...

Страница 63: ...selected area You can manually set the record start time and end time Click or and then click Manual on each day to pop up a window as shown below Set the start and end time in the window and then cli...

Страница 64: ...swap the selected and unselected time in a week click Clear All to clear all the selected area in a week 10 3 2 Record Schedule Configuration Click Start Settings Record Record Schedule Schedule Conf...

Страница 65: ...on based recording when the motion object appears in the setup schedule The setup steps are as follows Set the motion based recording schedule of each camera See 10 3 Schedule Settings for details Ena...

Страница 66: ...encrypt and then enter the password After you encrypt the data of a disk this disk cannot be read by other SMTs unless it is unlocked Data Decryption Click Change Encrypt Enter the username and passwo...

Страница 67: ...er groups Each disk and camera can only be added into one group Select a disk group and then click in the disk or camera row to pop up a window Check the disks or cameras in the window and then click...

Страница 68: ...re below Drag the playback progress bar to change the playback time You can also click the right click menu Instant Playback in the camera window and then set the instant playback time to play back th...

Страница 69: ...time The added cameras will playback their records in the playback interface automatically You can also add the playback camera manually Click in the playback window to pop up the Add Camera window C...

Страница 70: ...lick it again to disable OSD Stop button Rewind button Click it to play video backward Play button Click it to play video forward Pause button Deceleration button Click it to decrease the playing spee...

Страница 71: ...ck it to snap Zoom In Click it to go to the zoom in interface The zoom in interface is similar to that of the camera window in the live preview interface Click to pause the record playing click to pla...

Страница 72: ...al record red block stands for sensor based record yellow block stands for motion based record blue block stands for schedule record and cyan block stands for intelligence record Click the record bloc...

Страница 73: ...t the events All Face Detection Face Matching Block List Face Matching Allow list Face Matching VIP Stranger or Stranger can be selected Click Search to search the captured pictures In this interface...

Страница 74: ...e quickly If Face Matching type is selected you can view the face match result Click Match to view the face recognition and comparison details as shown below In the face match search interface you can...

Страница 75: ...ab to view the snapshot information list as shown below Click to view the detailed face match information click to back up the image Face Search by Attribute Click By Attribute and then select the sea...

Страница 76: ...ture range you want to search Click Search to search the result Search Face by Name Click By Name and then select the search time Click the Today tab to select the search time Please choose the search...

Страница 77: ...e you set Select the cameras you want to search Select the access direction as needed Click Search to view the result as shown below In this interface you can view the captured people and the snapshot...

Страница 78: ...ation Click the Original tab to view the original pictures 11 3 3 Search by Time Sliced Image Click Start Search and Backup General Search By Time sliced Image to go to the following interface There a...

Страница 79: ...has image inside indicates that the record data exist Refer to the picture below Drag the color blocks on the time scale to select the record data and then click the Backup button to pop up the Record...

Страница 80: ...and Backup General Search By Time to go to the following interface Click on the bottom of the interface to add playback camera A maximum of 16 cameras can be added for playback Click Modify on the to...

Страница 81: ...the interface Check cameras on the left side of the interface or check All to select all the cameras and then click to search the record The searched record will be displayed in the list Click in the...

Страница 82: ...nt tab Click in the interface to play the record Click to edit the tag name Click to delete the tag 11 3 7 Image Management Click Start Search and Backup Image Management to go to Image Management tab...

Страница 83: ...Playback Backup SMT User Manual 75 11 3 8 View Backup Status Click Start Search and Backup Backup Status or click on the tool bar at the bottom of the playback interface to view the backup status...

Страница 84: ...aptured face picture and the alarm information will be shown under the real time warning tab of the live display interface Alarm linkage settings Enable Trigger settings and then select the schedule C...

Страница 85: ...view mode you will view the non mask alarm information mask off displayed under the captured face picture in the comparison interface and real time warning interface Note Before using this function p...

Страница 86: ...ous movement otherwise it will be considered as a single motion Record check it and then the Trigger Record window will popup automatically you can also click the Configure button to pop up the window...

Страница 87: ...sensor alarm is triggered To set the duration time of the message box please see 12 7 3 Display for details E mail if enabled the system will send an e mail when the sensor alarm is triggered Before y...

Страница 88: ...k Processing Mode to go to the alarm handling configuration interface of the motion alarm 12 4 2 Motion Alarm Handling Configuration Click Start Settings AI Event Motion Alarm to go to the following i...

Страница 89: ...wn below Enable or disable Snapshot APP Push Alarm out Buzzer Pop up Video Pop up Message Box and E mail The IPC Offline Settings are similar to that of the sensor alarm see 12 3 Sensor Alarm for deta...

Страница 90: ...edules to edit the schedules see 10 3 1 Add Schedule for details Click Apply to save the settings You can click Test to test the alarm output 12 7 2 E mail Click Start Settings AI Event Event Notifica...

Страница 91: ...er 12 7 5 APP Push Message Click Start Settings AI Event Event Notification APP Push Message to go to the interface as shown below Check Enable and then click Apply to save the settings Click Test to...

Страница 92: ...or click on the tool bar at the bottom of the live preview interface to view the alarm status Three types of alarm status can be viewed including General Alarm AI Alarm and Exception Click Clear Buzze...

Страница 93: ...AI Event Management SMT User Manual 85...

Страница 94: ...strator Advanced and Common available when adding accounts You can manually add new permission group see 13 3 1 Add Permission Group for details Only admin and the users that have the Account and Auth...

Страница 95: ...tion Click to delete the user the user admin cannot be deleted Edit Security Question You can set password security only for admin Click Edit Security Question and then set questions and answers in th...

Страница 96: ...the password to 123456 Edit User Click Edit User to pop up the window as shown below The admin is enabled its permission control is closed and permission group cannot be changed by default You can ena...

Страница 97: ...system Logout Click Start Logout or click Start Shutdown to pop up the Shutdown window Select Logout in the window and then click OK to log out the system 13 3 Permission Management 13 3 1 Add Permis...

Страница 98: ...1 Add Permission Group for details Click to save the group as another group Click to delete the permission group The three default permission groups Administrator Advanced and Common cannot be delete...

Страница 99: ...he following interface Set a camera and then enable or disable the preview permission on logout as required If a camera s preview permission on logout is ON you can view the live image of the camera w...

Страница 100: ...face In this interface you can set the level and expiration time of the password 13 8 View Online User Click Start Settings Account and Authority User Status to view the online user information you ca...

Страница 101: ...ernet Port to go to the following interface The internal Ethernet port is the port which is used to connect all the PoE ports with the SMT system The PoE ports are available if the internal Ethernet p...

Страница 102: ...number can be changed to others like 81 The port is mainly used to web client access If you want to access the SMT through a web browser you should enter IP address plus HTTP port in the address bar o...

Страница 103: ...st Then download the certificate request and submit it to the trusted certificate authority for signature After receiving the signed certificate import the certificate to the device After the certific...

Страница 104: ...is used to control the dynamic IP address through domain name You can access to the SMT easily if the DDNS is enabled and configured Click Start Settings Network DDNS to go to the interface as shown...

Страница 105: ...e and password if Anonymous Login is enabled Click Test to pop up a window Enter the e mail address of the recipient in the window and then click OK The e mail address of the sender will send an e mai...

Страница 106: ...and so on corresponding to the router Check Enable in the interface as shown below and then click Apply Click the Refresh button to refresh the UPnP status If the UPnP status is Invalid UPnP after re...

Страница 107: ...e user name and password must be the same with the user name and password applied for and registered in the authentication server 14 1 8 NAT Configuration Click Start Settings Network NAT to go to the...

Страница 108: ...he records and image to upload here 14 1 10 SNMP Click Start Settings Network SNMP to go to the interface for SNMP configuration Check SNMPv1or SNMPv2 to enable this function Set the port of the SNMP...

Страница 109: ...onfiguration 14 2 1 Common Configuration Click Start Settings System Basic General Settings to go to the following interface Set the device name device No language video format and main output Enable...

Страница 110: ...work through NTP Manual select Manual in the Synchronous option and then click after the System Time option to set the system time NTP select NTP in the Synchronous option and then enter the NTP serve...

Страница 111: ...e steps are as follows Copy the upgrade software tar into the USB storage device Insert the USB storage device into the USB interface of the SMT Click Start Settings System Maintenance Upgrade to go t...

Страница 112: ...k Backup finally click OK in the popup window Recover Select the USB device in Device Name option find the configuration backup file and then click Recover finally click OK in the popup window 14 6 Re...

Страница 113: ...pop up a menu list Check contents in the menu list and then the log list will show the checked log contents only Click to play the video log 14 8 View System Information Click Start Settings System In...

Страница 114: ...QR code After scanning the QRCode successfully enter the login password to log in mobile client 15 2 Web LAN Access Click Start Settings Network TCP IP to go to the TCP IP interface Set the IP addres...

Страница 115: ...nload and install the relative plug in according to the tip if you access the SMT through NAT for the first time Notes 1 Please make sure that the IP address of the SMT and the computer are both in th...

Страница 116: ...SMT and the router If the UPnP function is not available in the router you need to forward the LAN IP address HTTP port and server port of the SMT to the router Port mapping settings may be different...

Страница 117: ...the preview area and then click one online camera inArea1 to preview the camera in the window You can click in Area 1 to preview all the cameras Button Descriptions of Area 1 Button Meaning Click it t...

Страница 118: ...Click it again to enable OSD Click it to expand the preview area Click it to show full screen Button Descriptions of Area 1 1 Button Meaning Click it to start record of all cameras to computer Click i...

Страница 119: ...s in the live display interface Click More to go to the statistics interface See 9 Statistics for details Home Introduction Move the cursor on the Home This will bring a pull down list You can view mo...

Страница 120: ...Select people from VIP group Click Select to select the people 3 Select the welcome area date and time 4 Upload the background picture and audio prompt 5 Set the text prompt and select the text color...

Страница 121: ...layback interface Check camera and set the record date on the calendar beside the time scale Select the event The record will automatically play on the window The operation of the playback time scale...

Страница 122: ...the playing speed Previous frame button It works only when the forward playing is paused in single screen mode Next frame button It works only when the forward playing is paused in single screen mode...

Страница 123: ...b Client Click Settings System Maintenance Upgrade Get the upgrade file from your supplier and then save it in your local PC Click Browse to select your upgrade file and then click Upgrade The upgrade...

Страница 124: ...adapt to the screen of which the resolution is lower than 1280 1024 and then the screen will remind you that the screen resolution is not supported by the SMT or just have no display Please change a s...

Страница 125: ...been directly connected to the PoE port The 12 CH IP cameras occupy the 8 network resources from CH1 to CH8 and 4 PoE resources from CH9 to CH12 which are supposed to be occupied by connecting the IP...

Страница 126: ...P camera are correct The IP camera s username and password can be modified through the two ways mentioned as below Click Edit Camera in the Camera module of the setup panel to go to the interface as s...

Страница 127: ...ress is in the black list or out of the white list cannot access the SMT remotely Q10 ActiveX control cannot be downloaded What can I do a IE browser blocks ActiveX control Please do setup as per the...

Страница 128: ...and then click Open Folder in the middle of the interface to select the record data Refer to Fig 11 1 Select camera in the resource tree on the left side of the interface to play the camera record Cli...

Страница 129: ...FAQ SMT User Manual 121 Fig 11 1 Fig 11 2...

Страница 130: ...1MB 1024KB 1Byte 8bit Record Bitrate Kbps Used Space MB H Used Space MB D 10240 4500 108000 8192 3600 86400 6144 2700 64800 4096 1800 43200 3072 1350 32400 2048 900 21600 1024 450 10800 768 337 5 8100...

Страница 131: ...er day and the record stores for 30 days The SMT adopts dual stream recording The main stream is 4096Kbps and the sub stream is 1024Kbps then the total recording capacity is 49 45TB 39 56TB 9 89TB Con...

Страница 132: ...TB SV35 Series recommended 1TB 2TB 3TB Surveillance HDD Series recommended 1TB 2TB 3TB 4TB 6TB 8TB 10TB Western Digital Blue Series 500GB 1TB Green Series 2TB 3TB 4TB Purple Series recommended 1TB 2TB...

Страница 133: ...assword Digest Encryption AES 9036 TCP Description This port is opened by default which is mainly used to receive the information sent by the POS terminal or printer The information will be overlaid o...

Страница 134: ...ata Type Transmission Type Storage Type Authentication PPPoE Username Password TLS AES256 password Password AES256 Username Password DDNS Username Password TLS AES256 password Password AES256 Username...

Страница 135: ...e without password You must set the password of admin in the above mentioned interface first Then you can log in by using root Statement Remote testing debugging doesn t support Telnet SSH unavailable...

Страница 136: ...rs himc himd himd l himm hostname hwclock i2c_read i2c_write id ifconfig ifstat init insmod iostat ip ipaddr iplink iproute iprule iptables iptunnel kill killall killall5 ln login logname ls lsmod lso...

Страница 137: ......

Отзывы: