background image

Name and function of each part

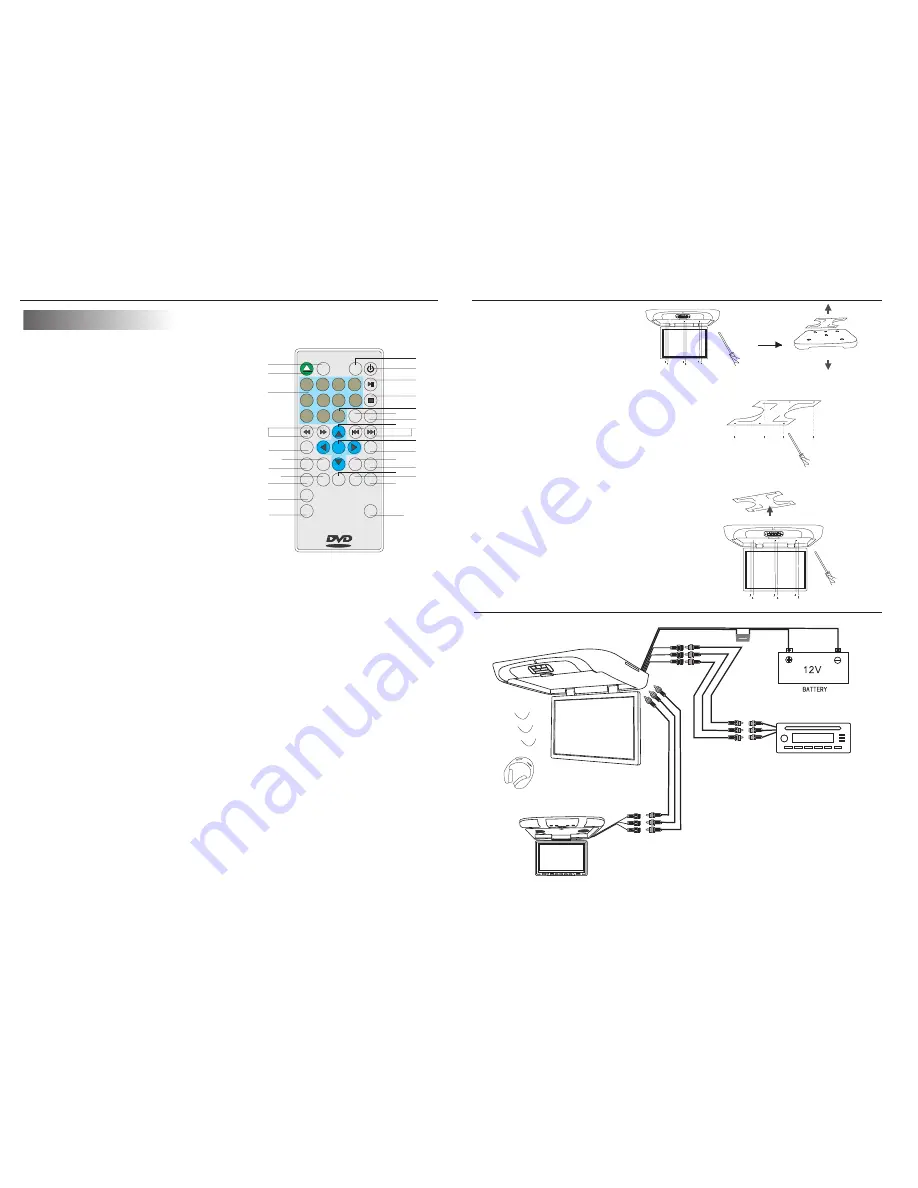
Remote Control Unit

4. REV/FWD-Scan buttons
Use these buttons to scan forward and 
backward through pictures or sound.

8. ANGLE button
Press it to switch the picture's angle.

2

.

 EJECT button

Press this button to slide the disc out and in.

3. NUMBER buttons
Press these buttons to input numbers.

5. TITLE button
Press this button to display the DVD's title.

7. ZOOM button
Zoom in or zoom out the picture on screen.

9. FM button
Press this button switch different audio FM transmitting frequency.

10. Program button
Use this button to program individually.

1. MENU button
Press this button to display the
LCD’s menu screen.

12

.

 PBC button

Playback control.

14. Play/Pause button
Use this button to play picture or 
sound or stop temporarily.

15. STOP button
Press this button to stop playback of the picture or sound

16.10+ button
Press this button to select a program of 
which the sequence number on the disc is more than 10.

17 . DVD/AV buttons
Press these buttons to DVD/AV functions
switch screen.

6

.

MENU


button

Press


this


button


to


display


the


DVD

'

s

menu


screen

.

4

Connection


Diagram

CAR VIDEO(DVD OR VCD)

Installation

(

Professional


installation


recommended

)

1

.

contents

.

Disassemble


the


meral


support


bracket


from


the


unit


as


shown


in


the


illustration

,

by


unscr


ewing

the


six


screws


on


the


unit

body

.

Unpack


and


check


the


2

.

Tighten


the


metal


support


bracket


to


the


ceilling


support


beam

(

s

)

,


using


the


supplied


screws

.

Take

extra


care


to


not


penetr


ate


the

roof


of


your


car

.

3

.

Connect


the


wiring


harness

,


according


to


the


diagram


under

"

Connection


Diagram

"

on the following 

diagram 

.

to


the


wires


located


in


the


dome light


of


your


vehicle

.

4

.

Flip


the


monitor


screen


down


 and


tighten


the


monitor


to


the


support

bracket

using


the


supplied


screws

.

13

IR/FM


wireless


headphone

(

optional

)


MENU

1

PBC

2

3

4

5

6

7

8

9

0

10

+

A

-

B

MUTE

TITLE

ZOOM


DVD

MENU

ENTER

SUBTITLE

SETUP

REPEAT

FM

ANGLE

GOTO

AUDIO

DISP

PROGRAM

VOL

+

VOL

-

EJECT

1

2

3

4

5

6

7

8

9

10

11

12

14

13

15
16

17

18

19

20

21
22

23

24

25

26

27

28

V


I


D


E


O

TFT

MODE

CH

+

CH

-

POWER

11. VOL+ button
Press this button to volume up.

13. POWER button
The power turns on and off when
 this button is pressed.

other monitor

FUSE

Wire color marking function:
1.Yellow RCA --video
2.Red RCA--right audio 
3.White RCA--left audio

INPUT

OUTPUT

Содержание T20DVFD

Страница 1: ...R S MANUAL FLIP DOWN DVD PLAYER COMPATIBLE WITH DVD SVCD DVCD VCD CD MP3 MP4 JPEG DIVX Before operating the monitor please read this manual thoroughly and retain it for future reference www tview us MADE IN CHINA ...

Страница 2: ...ion Playback Function Advanced Function Installation Connect Diagram Disc Information Cautions of Use Trouble Shooting Specifications 1 2 3 4 5 6 6 6 7 8 9 10 11 12 13 13 14 15 16 17 This equipment has been tested and has been found to comply with the limits for a Class A digital device pursuant to part 15 of the FCC Rules These limits are designed to provide reasonable protection against harmful ...

Страница 3: ...nel of your video monitor If the screen cracks due to misuse your warrantly will be void 1 WARNING The lightning flash with arrowhead symbol within an equilateral triangle is intended to alert the user to the presence of dangerous voltage within the product s enclosure that may be of sufficient magnitude to constitute a risk of electric shock to persons CAUTION The exclamation point within an equi...

Страница 4: ... ground vehicle It is not suitable for operation under other conditions or voltages Caution Check Point Cautions on Use Handing Do not use damaged cracked or werped disc Do not scratch signal surface or let it dirty Do not stick a label or a glue based note on either side of the disc Do not use discs that have glue or damaged label with exposed adhesive residue it might result in damage to your DV...

Страница 5: ... saved in it and some functions cannot be utilized Discs that cannot be played DVD RW DVD REM CD ROM CD EXTRA discs cannot be played on this unit Also a CD or a CD RW which was recorded on special software cannot be played Region code Your DVD player is designed and manufactured to region management information that is recorded on a DVD disc The region number of this DVD Player is 1 This DVD playe...

Страница 6: ...is button to display the DVD s menu screen 4 Connection Diagram CAR VIDEO DVD OR VCD Installation Professional installation recommended 1 contents Disassemble the meral support bracket from the unit as shown in the illustration by unscr ewing the six screws on the unit body Unpack and check the 2 Tighten the metal support bracket to the ceilling support beam s using the supplied screws Take extra ...

Страница 7: ...or a speacific scene 1 Press the SEARCH button 2 Press the number button to select specific time or title chapter 3 Press the ENTER button and playback starts from the nominated chapter Selecting the DVD s angle multi angle Press the ANGLE button while playing back a scene record with multiple angels If your DVD disc is not recorded with multiple angles ANGLE button is not effect Repeat play DVDs ...

Страница 8: ... the previous chapter or track DVDs Video CDs and CDs Press the previous button during playback When pressed playback returns to the beginning of the previous chapter or track Moving ahead to the next chapter or track DVDs Video CDs and CDs Press the next button during playback When pressed once playback moves forward to the next chapter or track Removing discs 1 Press the STOP button 2 Press the ...

Страница 9: ... Press the number button on the remote control unit to select item To display the menu screen The way in which the menu screen is displayed differs from disc to disc Press the MENU TITLE button during playback or DVDs the RETURN button during PBC playback of video CDs For details refer to documentation included with the disc TITLE MENU 1 POP 2 JAZZ 3 COUNTRY 4R B 5 CLASSICAL If a menu screen appea...

Страница 10: ...TUP RATING DEFAULT RESTORE MENUS Language Setting OSD Language Setting AUDIO LANG SUBTITLE LANG MENU LANG LANGUAGE SETUP FRENCH SPANISH GERMAN ENGLISH PORTUGUESE ITALIAN OSD LANGUAGE LANGUAGE To setup OSD languages OSD LANGUAGE SUBTITLE LANG MENU LANG LANGUAGE SETUP FRENCH SPANISH GERMAN ENGLISH PORTUGUESE LATIN CHINESE JAPAN AUDIO LANG Audio Language Setting 1 AUDIO To setup disc output languages...

Отзывы: