background image

7

Assembly / adjustment of brake cable

Note: Do not pull the brake cable out of the handle tube when installing or adjusting the

handle height to avoid accident or damage to the brake system.

1. The position of brake cable

Note: The brake cable should moves through inside the handle tubing whilst in use.

2. Choose to release brake or tighten brake following below instruction:


A. Release the adjustment knob: turn it in counter-clockwise direction.


B. Lock the adjustment knob: turn it clockwise side.

Use/Lock/Activate the brake

NOTE: Refer to Assembly warnings in the Safety warning in this instruction sheet.

Use of hand brake:

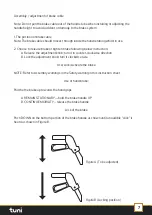
Pull the the brake up towards the hand grips.


A. REMAIN STATIONARY—hold the brake handle UP


B. CONTINUE MOBILITY – release the brake handle

Lock of the brake

Push DOWN on the bottom portion of the brake handle as shown until an audible “click” is

heard as shown in Figure B.

Figure A (To be adjusted)

Figure B (Locking position)

Содержание Prism WA01072

Страница 1: ...User Manual CareCo Hubert Road Brentwood Essex CM14 4JE Product Code WA01072 lightweight rollator...

Страница 2: ...11 11 1 INTRODUCTION Thank you for purchasing the Tuni Prism outdoor rollator This product is intended for use by people who need assistance with mobility in outdoor activities This product is adjust...

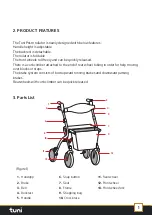
Страница 3: ...climber attached to the end of rear wheel tubing in order for help moving over blocks or steps The brake system consists of both upward running brakes and downward parking brakes Rear wheels with curb...

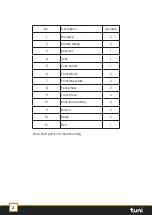
Страница 4: ...e than 5kg No Description Quantity 1 Handgrip 2 2 Handle tubing 2 3 Backrest 1 4 Seat 1 5 Cane holder 1 6 Front wheel 2 7 Front wheel fork 2 8 Rear wheel 2 9 Cross brace 2 10 Main frame tubing 2 11 Bu...

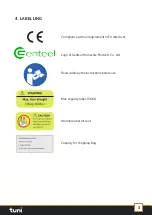
Страница 5: ...ING Compliance with all requirement of EU directives Logo of Genteel Homecare Products Co Ltd Read carefully the instructions before use Max capacity label 136KG Warning label for seat Capacity for sh...

Страница 6: ...ents are secure and that casters and moving parts are in good working order before using this or any mobility aid All wheels MUST be in contact with the floor at ALL TEMES during use This will ensure...

Страница 7: ...ise it may cause damage to the knob or the handle bar 6 INSTRUCTIONS FOR USE Instructions 1 Open the box and take out the product out with care 2 Place the product on a platform and assemble the rear...

Страница 8: ...e rollator could be folded inwards side after the seat is lifted up Figure 4 Installation Adjustment of the handle Note Pull out of handle bar with gentle and stable force to protect brake system and...

Страница 9: ...ion A Release the adjustment knob turn it in counter clockwise direction B Lock the adjustment knob turn it clockwise side Use Lock Activate the brake NOTE Refer to Assembly warnings in the Safety war...

Страница 10: ...the rollator 7 WARRANTY Quality Warranty Declaration Products are to be fit for purpose and of excellent quality and performance For valid warranty claims CareCo UK Ltd will at their discretion replac...

Отзывы: