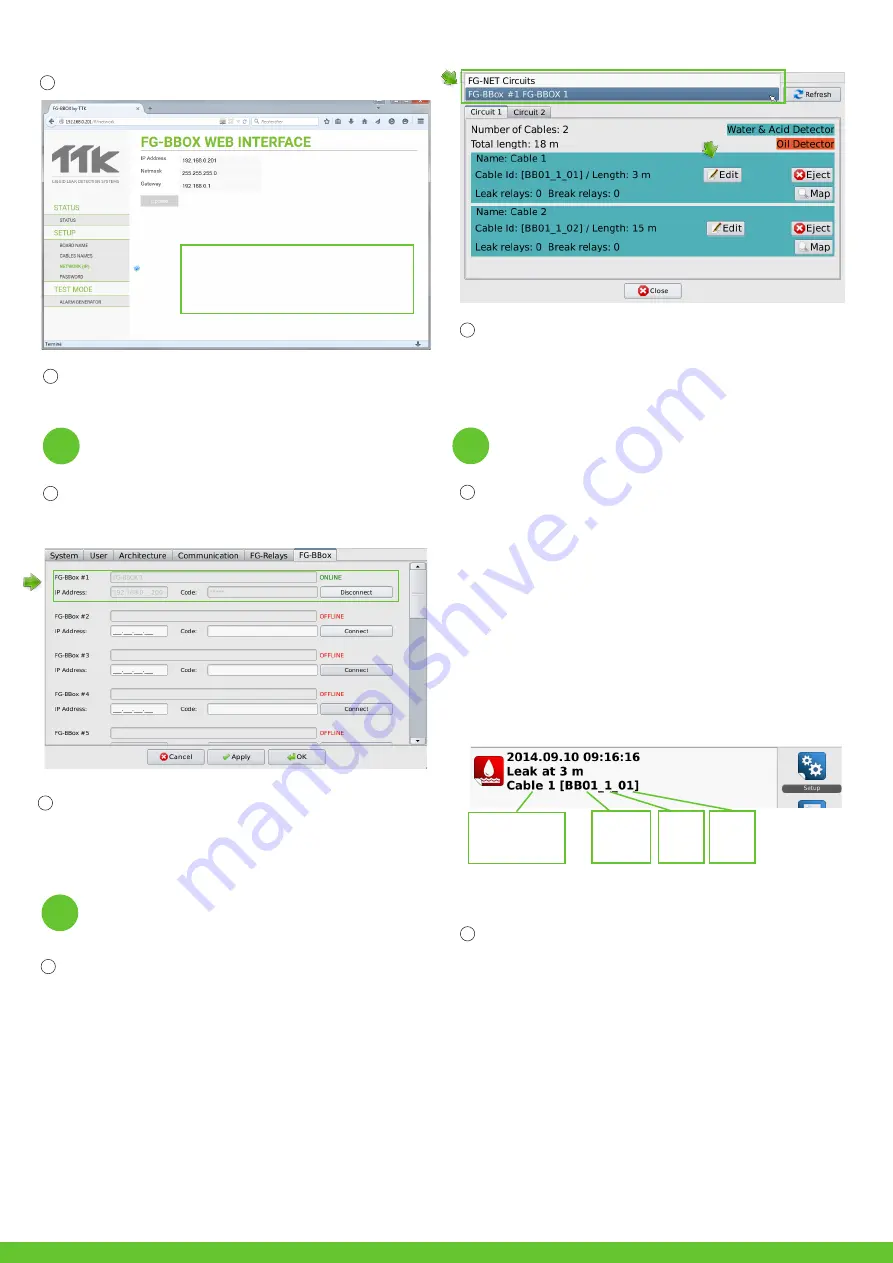
From the web interface, you can change the IP settings according to your needs,
change the box name for easier identification, and change the box password.
Mit der Webschnittstelle können Sie die IP-Einstellungen Ihren Bedürfnissen
anpassen, den Namen der Box für eine einfachere Identifizierung ändern und ein
neues Passwort festlegen.
EN
FG-BBO
X_QSG_EN_DE_v1.3 _122015
6
EN
Repeat steps 1 to 5 if several FG-BBOX are to be installed.
Once the installation is complete, carry out leak simulations on sense cables
connected to FG-BBOX.
Check the response on FG-BBOX:
•
The relevant relay is activated;
•
The LED on the corresponding circuit changes from green to red.
Check the response on FG-NET:
•
An alarm appears on the touch screen;
•
Details of the leak: location, date, time and the floor plan is displayed.
Then acknowledge the alarm and dry the sense cable, verify on FG-BBOX:
•
The relevant relay returns to its normal status;
•
The LED on the corresponding circuit changes to green.
Check on FG-NET:
•
The alarm is cleared then disappears from the screen, but viewable in the «His-
tory» menu.
•
FG-NET backs to monitoring mode.
Wiederholen Sie die Schritte 1 bis 5, falls mehrere FG-BBOX installiert werden
sollen.
Wenn die Installation abgeschlossen ist, führen Sie Lecksimulationen an den mit
der FG-BBOX verbundenen Kabeln durch.
Überprüfen Sie die Reaktion der FG-BBOX:
•
das entsprechende Relais wird aktiviert;
•
die LED der entsprechenden Schleife wechselt von Grün auf Rot.
Überprüfen Sie die Reaktion von FG-NET:
•
Auf dem Touchscreen erscheint ein Alarmsignal;
•
Details zum Leck: Ort, Datum, Uhrzeit sowie ein Plan des Stockwerks werden
angezeigt.
Bestätigen Sie anschließend den Alarm und trocknen Sie das Sensorkabel. Über-
prüfen Sie das Verhalten von FG-BBOX:
•
das aktivierte Relais wechselt wieder in den Normalzustand;
•
die LED der entsprechenden Schleife wechselt von Rot auf Grün.
Überprüfen Sie FG-NET:
•
Der Alarm wird gelöscht und verschwindet vom Bildschirm, kann jedoch im Menü
„Verlauf” eingesehen werden.
•
FG-NET wechselt in den Überwachungsmodus zurück.
Cable name - can be
customerized
/
Kabelname
- kann geändert werden
Panel name
/
Name des
Geräts
: BBOX
#1
Circuit n°
/
/
Nr. der
Schleife
:
Schleife
#1
Cable n°
/
Nr. des
Kabels:
Kabel #1
[
Cable’s location
/
Position des Kabels
]
The setup of sense cables on FG-BBOX is similar to that on FG-NET. Go to the
home page
of FG-NET then go to “
Cables
” menu. Click on the
drop down menu
and select FG-BBOX #N to view all cables connected.
The “
Edit
” button allows configurations (modify cable name, alarm delay time,
set relays, etc) on the corresponding sense cable.
EN
Die an die FG-BBOX angeschlossenen Sensorkabel werden ähnlich konfiguriert
wie bei FG-NET. Gehen Sie zum
Startbildschirm
von FG-NET und wählen Sie
anschließend das Menü „
Kabel
“ aus. Gehen Sie in das
Aufklappmenü
und wählen
Sie FG-BBOX #N, um alle verbundenen Kabel zu sehen.
Wenn Sie auf die Schaltfläche „
Bearbeiten
“ klicken, können Sie das jeweilige Sen-
sorkabel konfigurieren (Kabelnamen ändern, Alarmverzögerung einstellen, Relais
konfigurieren, usw.).
Tests and Simulations of Leaks
Tests und Lecksimulationen
7
DE
DE
FG-BBOX IP Address: 192.168.1.200
Netmask: 255.255.255.0
Gateway: 192.168.1.1
A link must be created between FG-NET and FG-BBOX. Go to the “
Setup
” menu of
FG-NET, then under the “
FG-BBOX”
tab, select one available field and enter the
FG-BBOX IP and password. Press the “
Connect
” button, the FG-BBOX’s name will
appear and the status will change to “
online
”.
5
Pairing with FG-NET
Verbindung mit FG-NET
EN
Es muss eine Verbindung zwischen FG-NET und FG-BBOX hergestellt werden. Ge-
hen Sie in das Menü „
Einstellungen
” von FG-NET, wählen Sie in der Registerka-
rte „
FG-BBOX
“ ein freies Feld und geben Sie die IP-Adresse der FG-BBOX und das
Passwort ein. Klicken Sie auf die Schaltfläche „
Verbinden
“. Der Name der FG-
BBOX erscheint und der Status wechselt auf „
verbunden
“.
Sense Cable Settings
Konfiguration der Sensorkabel
DE
DE


