


7
3. Set Up
3.1 Setting Up the Printer
1. Place the printer on a flat, secure surface.
2. Make sure the POWER switch is off.
3. Connect the printer to the computer with the provided Centronics cable.
4. Plug the power cord into the AC power cord socket at the rear of the printer,
and then plug the power cord into a properly grounded power outlet.
3.2 Ribbon Installation
1. Open printer right side cover and lower front panel.
2. Disengage print head lift lever.
3. Install a new ribbon roll onto the ribbon supply spindle.
Notice : Ribbon should be placed to the left end of spindle.
Figure 5. Ribbon supply spindle installation
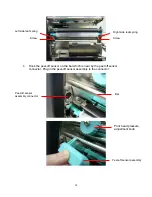
4. Place an empty paper core onto the ribbon rewind spindle. (The diameter of
empty paper core must be larger then 34 mm)
5. Pull the ribbon roll leading edge forward through the ribbon sensor, and
attach the ribbon leading edge (with a tape) to the empty paper core.
6. Manually rotate the ribbon rewind roll until the ribbon is properly stretched.
Содержание TTP-342M Plus
Страница 1: ...USER S MANUAL TTP 246M 344M THERMAL TRANSFER DIRECT THERMAL BAR CODE PRINTER ...
Страница 2: ......
Страница 4: ......
Страница 19: ...15 Plug in the peel off sensor assembly to the connector ...
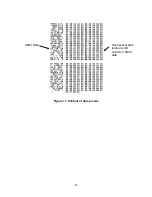
Страница 24: ...20 Figure 11 Printout of dump mode ASCII Data Hex decimal data related to left column of ASCII data ...


