background image

DC-4200 POWERCAM 

14 


Memory cards 

 Insert 

securely. 

  Format for first time use. (SET, Format, Yes, OK) 
  Only fits at one way. Do not force. 
  Only SD (up to 512MB) or MMC (up to 128MB) supported. 
  Memory out: push memory card and release. Take out memory card. 

 
If you have any problems, go to www.trust.com/14247 for FAQ, drivers and manuals. 
 

Safety 

• 

Do not open or repair this device yourself. 


• 

This device meets the essential requirements and other relevant conditions of the applicable European 
directives. The Declaration of Conformity (DoC) is available at www.trust.com/14247/ce 

 
Warranty & copyright 

• 

This product has a two-year manufacturer's warranty, which is effective from the date of purchase. For more 
information see www.trust.com/warranty  

• 

Reproduction of this manual or any part of it is prohibited without permission from Trust International B.V. 


Содержание DC-4200

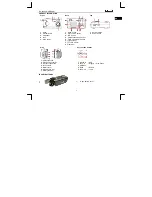
Страница 1: ...n 5 Voice memo delete button 6 Tripod socket 7 TFT LCD monitor 8 Viewfinder 1 Shutter button 2 Power button Side Key function buttons 1 USB connection 2 Video out connection 3 DC input connection 4 Focus switch 5 Battery cover 6 Memory card slot 7 Battery chamber 1 Self timer Up c 2 Zoom in Right f Play Pause 3 OK Menu 4 Flash Down d 5 Zoom out Left e INSERT BATTERIES 1 1 Open battery cover ...

Страница 2: ...rechargeable Ni MH batteries www trust com battery chargers Do not mix different types or old and new batteries TAKING PICTURES RECORDING VIDEOS 1 Turn on camera 2 Change mode Turn mode dial See icon left top corner in LCD PICTURE Set Still Image Mode VIDEO Set Movie Clip Mode 3 Set focus Macro 20 cm Normal 100 cm ...

Страница 3: ...5 PICTURE Press shutter VIDEO Start recording press shutter On LCD REC flashes Stop recording press shutter PLAYBACK ON CAMERA TELEVISION 1 Turn on camera Press playback thumbnail Press once Playback Mode Press twice Thumbnail mode Press again back in original mode ...

Страница 4: ...television Connect video cable camera Connect video cable yellow plug television Turn on TV set to video input refer manual TV Camera video output set to PAL Mode dial SET VIDEO select PAL NTSC OK Use power adapter to save battery power www trust com cam access CONNECT TO COMPUTER 1 Turn on computer Start Windows Connect USB cable to computer Windows 98 install driver first before connect Insert T...

Страница 5: ...M 5 UK 2 Connect USB cable to camera 3 Turn on camera Drivers installed automatically Use power adapter to save battery power www trust com cam access PLAYBACK ON COMPUTER Windows XP Æ Windows 2000 ME 98SE Æ 1 3 2 3 1 ...

Страница 6: ... step 3 Open folder DCIM 100MEDIA JPG Picture files AVI Video files WAV Audio files 2 Windows 2000 ME 98 Double click My Computer Double click Removable Disk Open folder DCIM 100MEDIA JPG Picture files AVI Video files WAV Audio files 3 Copy files to folder My Documents ...

Страница 7: ...utton 2 Click Safely remove USB Mass Storage Device In display appear Safe to remove hardware 3 Disconnect camera from USB cable 2 Windows 2000 ME 1 Click symbol with left mouse button 2 Click Stop USB Mass Storage Device In display appear The USB Mass Storage Device can now be safely removed from the system 3 Disconnect camera from USB cable CHANGE SETTINGS To change items in menu follow steps 1 ...

Страница 8: ...ce Auto Daylight Cloudy Fluorescent Tungsten Sunset Custom Change white balance according to difference indoor and outdoor environment Still Image Mode Exposure Auto 2 0 Æ 0 Æ 2 0 step 0 5 Change light setting Size 2848 x 2048 5 8M 2304 x 1728 4M 2048 x 1536 3M 1600 x 1200 2M Quality S Fine Fine Normal Night Mode LT Long time shutter LT Auto 1 8 1 4 1 2 1 2 3 4 5 second Adjust shutter speed Advice...

Страница 9: ...ns off automatically when set Language English French German Spanish Italian Dutch Adjust language OSD Format No Yes Format internal memory memory card inserted D Type Date type YY MM DD MM DD YY DD MM YY Set Date type Date Adjust date Time Adjust time Imprint Off On Print date on picture automatically Beep Off On Beeps when press button Video PAL NTSC Set TV standard Europe PAL Q view Quick view ...

Страница 10: ... Delete all No Yes Copy to card One pic All pics Copy images from internal memory to memory card DPOF One pic All pics Printout images on memory card on printer without computer Select quantity prints 0 99 Playback Mode press button S Image Start up Image Select image as start up image Default setting PLAY GAMES 4 attractive games are included in the camera Start game Set mode dial to SET Select G...

Страница 11: ...res stored on memory card when inserted Format for first time use SET Format Yes OK Memory card fits one way only Do not force LCD OVERVIEW No Item Symbol Remarks Full Half drained 1 Battery Status Drained 2 Digital Zoom Zoom factor Available shots remaining 3 Remaining memory Remaining recording time audio video 2848 x 2048 4 Size 2304 x 1728 Change in Setup ...

Страница 12: ... Change in Setup 9 Exposure Change in Setup 10 Metering Spot Multi 11 Focus range Macro Use focus switch 12 Voice Memo Press voice memo delete 10 seconds 2 seconds 13 Self timer Double Press Self timer Auto Flash Auto Flash with red eye reduction Fill in Flash Slow Sync 14 Flash Mode Flash off Press Flash 15 Handshake Keep camera steady when take picture Still Image Mode Night Scene Mode Photo Fra...

Страница 13: ...E ERROR File format error Insert new SD MMC card Format media MEMORY ERROR Memory is damaged or failed Format media CARD ERROR Card is damaged or failed Insert new SD MMC card LOW BATTERY BLINKING Battery power is drained Insert new batteries LOW LIGHT Environment too dark in Flash off or Night Scene Set flash Auto Flash or Full in Flash HAND SHAKE ICON Environment is too dark in Flash off or Nigh...

Страница 14: ...uals Safety Do not open or repair this device yourself This device meets the essential requirements and other relevant conditions of the applicable European directives The Declaration of Conformity DoC is available at www trust com 14247 ce Warranty copyright This product has a two year manufacturer s warranty which is effective from the date of purchase For more information see www trust com warr...

Отзывы: