Trust 71317 Скачать руководство пользователя страница 8

8

EN

ZCM-300 BUILD-IN DIMMER

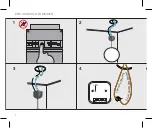
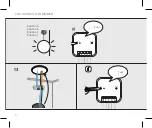
1. Turn OFF mains power

Always turn OFF the power (in the fuse box) before 

installing or removing this product. The ZCM-300 can 

be used for two wall switches connected to one lamp 

(stairwell/hotel circuit) or for a single wall switch connected 

to one lamp.

2. Loosen ceiling lights

Remove the existing lighting from the ceiling and leave 

the wires connected to the lighting. The lighting must not 

exceed the maximum wattage. If no live wire (brown) 

is present, it must be pulled. If in doubt, consult an 

electrician.

3. Disconnect the switch wire (black) and neutral 

wire (blue)

To install the ZCM-300, disconnect the switch wire (black) 

and neutral wire (blue) from the lamp. (Disconnect terminal 

block or cut wires if necessary) If in doubt about wire 

colors, consult an electrician.

4. Connect the live wire to a terminal block

Connect the live wire (brown) from the ceiling box to a 

terminal block. Also connect the other end of the live wire 

(brown) to same terminal block.

5. Connect the wires to the module

Connect the neutral wire (blue) from the 

ceiling box to the outer [N] contact of the module. 

Optional:

 The S-contact does not need to be connected. 

Connect the switch wire (black) from the ceiling box with 

the [S] terminal if you want to (continue to) make use of a 

wall switch. Connect the neutral wire (blue) of the lamp 

with the center [N] contact. 

Connect the switch wire (black) of the lamp 

to the [ 

LL

 ] contact. Connect one new live wire (brown) 

from the terminal block to the [L] terminal. 

Tighten the terminal screws securely.

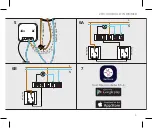
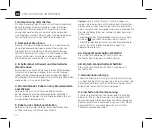
6A. Double wall switch installation diagram

This is the technical installation diagram of the ZCM-300 

with two wall switches (hotel / stairwell circuit).

6B. Single wall switch installation diagram

This is the technical installation diagram of the ZCM-300 

with one wall switch.

7. Download App

Download and install the Trust Smart Home Switch-in App 

from the Google Playstore or App Store to connect the 

dimmer to an Smart Bridge or ICS-2000.

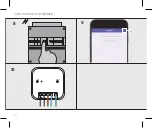
8. Switch on the mains voltage

Turn on the power before proceeding with the installation. 

Do not touch any stripped parts of the wires after this 

step. The LED indicator on the module will flash for 60s 

when power is on to indicate it is in connect mode

9. Connect Module

A

 Select a room in the App. 

Press the + button and choose Trust Smart Home. Press 

Premium Line and choose built-in dimmer. Then follow the 

steps in the App. 

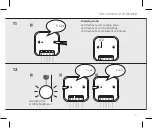
10. Optional: Also connect with Zigbee remote 

control

Go to www.trust.com/faq for more information on how the 

dimmer can be connected with a zigbee remote control.

Содержание 71317

Страница 1: ...ZIGBEE Smart Build in Dimmer ZCM 300 USER MANUAL Item 71317 Version 1 0 Always read the instructions before using this product PREMIUM LINE ZCM 300 SWITCH IN ...

Страница 2: ...2 ZCM 300 BUILD IN DIMMER 1 3 2 4 6B L i v e w i r e b r o w n L i v e w i r e b r o w n L S L N N join mode LED ...

Страница 3: ...LD IN DIMMER 5 7 6A 6B P P L N Wall Switch Wall Switch L N S N L P L N Wall Switch L N S N L L i v e w i r e b r o w n N e u t r a l w i r e b l u e Sw itch wire blac k L S L N N join mode Trust Smart Home Switch in ...

Страница 4: ...4 ZCM 300 BUILD IN DIMMER A 9 10 8 L S L N N join mode ...

Страница 5: ... N join mode 5 sec L S L N N join mode LED Dimming mode LED flashes 1x red Leading Edge LED flashes 2x red Trailing Edge LED flashes 3x red Filament LED mode A A C B Turn lamp ON at 100 brightness L S L N N join mode L S L N N join mode 3 sec Short ...

Страница 6: ...6 1 3 4 ZCM 300 BUILD IN DIMMER D L S L N N join mode 3 sec Position 4 Position 3 Position 2 Position 1 L S L N N join mode 1 sec 13 ...

Страница 7: ...7 5 7 6 8 ZCM 300 BUILD IN DIMMER L S L N N join mode 6 sec RESET L S L N N join mode 1 sec ...

Страница 8: ...tch wire black from the ceiling box with the S terminal if you want to continue to make use of a wall switch Connect the neutral wire blue of the lamp with the center N contact Connect the switch wire black of the lamp to the L L contact Connect one new live wire brown from the terminal block to the L terminal Tighten the terminal screws securely 6A Double wall switch installation diagram This is ...

Страница 9: ... lamp and set it to 100 brightness B Press and hold the join button for 3 sec The lamp will go to the lowest brightness Then release the join button C Short press the join button to decrease the minimum brightness The minimum brightness starts at position 4 Every time the join button is pressed shortly the lamp will dim 1 position deeper 4 3 2 1 If you shortly press the join button again after set...

Страница 10: ...er aan op dezelfde lasklem 5 Verbind de draden met de module Verbind de nuldraad blauw uit de plafonddoos met het buitenste N contact van de module Optioneel Het S contact hoeft niet aangesloten te worden Verbind de schakeldraad zwart uit de plafonddoos met het S contact als u gebruik wilt blijven maken van een wandschakelaar Verbind de nuldraad blauw van de lamp met het middelste N contact Sluit ...

Страница 11: ...dimreeks te activeren met een 230V wandschakelaar schakelt u deze eerst AAN Schakel hierna snel de wandschakelaar UIT en AAN Om het dimniveau vast te zetten schakelt u de wandschakelaar nogmaals snel UIT en AAN 12 Dimbereik aanpassen Mocht de aangesloten LED verlichting niet diep genoeg dimmen of trillen dan kunt u de ondergrens van het dimbereik aanpassen A Zet de lamp aan en zet deze op 100 held...

Страница 12: ...zaam voor 60 sec om aan te geven dat deze zich in de verbindingsmodus bevindt Reset module Waarschuwing Met deze stap wordt de module van de Smart Bridge ICS 2000 of de ZYCT 202 verwijderd Om de dimmer te resetten drukt u 6 sec op de join knop De LED zal snel knipperen Druk opnieuw kort op de knop De aangesloten lamp gaat AAN UIT AAN UIT om de reset te bevestigen en activeert hierna de verbindings...

Страница 13: ...13 ZCM 300 BUILD IN DIMMER NL ...

Страница 14: ...n Kabels braun mit derselben Klemmenleiste 5 Kabel an das Modul anschließen Verbinden Sie den Neutralleiter blau der Deckendose mit dem äußeren N Kontakt des Moduls Option Der S Kontakt braucht nicht verbunden zu werden Verbinden Sie das Schalterkabel schwarz der Deckendose mit der Klemme S wenn Sie weiterhin einen Wandschalter verwenden möchten Verbinden Sie den Neutralleiter blau der Lampe mit d...

Страница 15: ...euchtet die LED Lampe 3x rot auf Dieser Modus ist für dimmbare Filament LED Lampen vorgesehen Aktivieren der Dimmsequenz mit einem 230V Wandschalter Aktivieren Sie die Dimmsequenz mit einem 230V Wandschalter indem Sie das Modul zunächst mit dem Wandschalter EINschalten Schalten Sie den Wandschalter anschließend schnell AUS und wieder EIN Um die gewünschte Dimmstufe festzulegen schalten Sie den Wan...

Страница 16: ...rbunden ist können Sie den Verbindungsmodus durch kurzes Drücken der Verbindungstaste am Modul aktivieren Die LED Leuchte blinkt für 60 Sekunden langsam als Zeichen dass der Verbindungsmodus aktiviert ist Zurücksetzen ZCM 300 Warnung Mit diesem Schritt wird das Modul aus der Smart Bridge oder dem ICS 2000 oder dem ZYCT 202 entfernt Zum Zurücksetzen des Dimmers drücken Sie 6 Sekunden lang die Verbi...

Страница 17: ...besoin d être connecté Connectez le fil de commutation noir du boîtier de plafond à la borne S si vous souhaitez continuer à utiliser un interrupteur mural Connectez le fil neutre bleu de la lampe avec le contact central N Connectez le fil de commutation noir de la lampe au contact L L Connectez un nouveau fil sous tension brun du bornier au terminal L Serrez solidement les vis de la borne 6A Sché...

Страница 18: ...de gradation avec un interrupteur mural 230V Pour activer la séquence de gradation avec un interrupteur mural 230V allumez d abord le module avec l interrupteur mural Ensuite éteignez et rallumez rapidement l interrupteur mural Pour verrouiller le niveau de gradation éteignez et rallumez rapidement l interrupteur mural 12 Ajuster la plage de gradation Si l éclairage connecté clignote dans le nivea...

Страница 19: ...Bridge ou à un ICS 2000 vous pouvez entrer en mode de connexion en appuyant brièvement sur le bouton de jointure du module La LED clignote lentement pendant 60s pour indiquer qu elle est en mode de connexion Réinitialiser ZCM 300 Avertissement Cette étape supprime le module du Smart Bridge ou ICS 2000 ou du ZYCT 202 Pour réinitialiser le gradateur appuyez sur le bouton de jointure pendant 6 second...

Страница 20: ...llegare i fili al modulo Collegare il filo neutro blu dalla scatola elettrica a soffitto al contatto esterno N del modulo In via facoltativa Non è necessario collegare il contatto S Collegare il filo dell interruttore nero dalla scatola elettrica a soffitto al morsetto S se si desidera continuare a utilizzare un interruttore a parete Collegare il filo neutro blu della lampada al contatto centrale ...

Страница 21: ...pade LED e alle lampade con un trasformatore varialuce elettronico Premere nuovamente per 5 secondi per passare alla modalità di regolazione dell intensità luminosa successiva Per la modalità lampada LED a filamento il LED lampeggia in rosso per 3 volte Questa modalità è destinata alle lampade LED con filamento a intensità luminosa regolabile Attivare la sequenza di regolazione dell intensità lumi...

Страница 22: ... l intensità dell illuminazione varia correttamente Posizionare il varialuce nella scatola elettrica a soffitto Rimontare la lampada Assicurarsi di poter sempre raggiungere il varialuce incorporato ad esempio per ripristinarlo o ricollegarlo Attivare la modalità di connessione Se il modello ZCM 300 non è collegato a uno Smart Bridge o ICS 2000 è possibile accedere alla modalità di connessione prem...

Страница 23: ...ables al módulo Conecte el cable neutro azul desde la caja del techo hasta el contacto exterior N del módulo Opcional no es necesario conectar el contacto S Conecte el cable del interruptor negro desde la caja del techo al terminal S si desea seguir utilizando el interruptor de pared Conecte el cable neutro azul de la lámpara con el contacto N central Conecte el cable del interruptor negro de la l...

Страница 24: ...de lámpara LED de filamentos el indicador LED parpadeará tres veces en color rojo este modo está diseñado para las lámparas LED de filamentos Activar la secuencia de atenuación con un interruptor de pared de 230 V Para activar la secuencia de atenuación con un interruptor de pared de 230 primero deberá activar el módulo con el interruptor de pared A continuación rápidamente apague y encienda de nu...

Страница 25: ...á entrar en el modo de conexión pulsando el botón de unión del módulo brevemente El indicador LED parpadeará lentamente durante 60 segundos para indicar que está en modo de conexión Restablecer el ZCM 300 Advertencia Este paso elimina el módulo del Smart Bridge o la ICS 2000 o el ZYCT 202 Para restablecer el atenuador pulse el botón de unión durante seis segundos El indicador LED parpadeará rápida...

Страница 26: ...xu k vnějšímu N kontaktu modulu Volitelně S kontakt není nutné připojit Pokud chcete nadále používat nástěnný vypínač připojte kabel spínače černý ze stropního elektrického boxu ke svorce S Připojte neutrální vodič modrý lampy ke středovému kontaktu N Připojte kabel spínače černý lampy ke kontaktu L L Připojte jeden nový živý vodič hnědý ze svorkovnice ke svorce L Bezpečně utáhněte šrouby svorek 6...

Страница 27: ...Tento režim je určen pro stmívání vláknových LED žárovek Aktivujte sekvenci stmívání pomocí nástěnného vypínače 230 V Chcete li aktivovat sekvenci stmívání pomocí nástěnného vypínače 230 V nejprve zapněte modul pomocí nástěnného vypínače Poté rychle vypněte a znovu zapněte nástěnný vypínač Chcete li uzamknout úroveň stmívání rychle vypněte a znovu zapněte nástěnný vypínač 12 Nastavte rozsah stmívá...

Страница 28: ... Smart Bridge nebo ICS 2000 můžete vstoupit do režimu připojení krátkým stisknutím tlačítka připojení na modulu LED kontrolka bude pomalu blikat po dobu 60 sekund na znamení že je v režimu připojení Resetování ZCM 300 Výstraha Tento krok odebere modul z rozhraní Smart Bridge nebo ICS 2000 nebo ZYCT 202 Chcete li stmívač resetovat stiskněte tlačítko připojení na 6 sekund LED kontrolka začne rychle ...

Страница 29: ... Conectați firele la modul Conectați firul neutru albastru de la cutia de tavan la contactul exterior N al modulului Opțional Nu este necesar să se conecteze contactul S Conectați firul întrerupătorului negru de la cutia tavanului cu terminalul S dacă doriți să continuați să folosiți un întrerupător de perete Conectați firul neutru albastru al lămpii cu contactul central N Conectați firul întrerup...

Страница 30: ...ED ul clipește de 3 ori roșu Acest mod este destinat pentru atenuarea lămpilor Filament LED Activarea secvenței de diminuare cu un întrerupător de perete de 230V Pentru a activa secvența de diminuare cu un întrerupător de perete de 230V porniți mai întâi modulul cu întrerupătorul de perete Apoi opriți rapid întrerupătorul de perete și porniți l din nou Pentru a bloca nivelul de intensitate opriți ...

Страница 31: ...e sau ICS 2000 puteți activa modul de conectare prin apăsarea scurtă a butonului de conectare de pe modul LED ul va lumina intermitent încet timp de 60 de secunde pentru a indica faptul că se află în modul de conectare Resetați ZCM 300 Avertizare Acest pas scoate modulul din Smart Bridge sau ICS 2000 sau din ZYCT 202 Pentru a reseta variatorul apăsați butonul de conectare timp de 6 secunde Ledul v...

Страница 32: ...d prúdom hnedého k rovnakej svorkovnici 5 Pripojenie vodičov k modulu Pripojte neutrálny vodič modrý zo stropnej skrinky k vonkajšiemu kontaktu N modulu Voliteľné Kontakt S nie je potrebné pripájať Pripojte spínací vodič čierny zo stropnej skrinky k svorke S ak chcete ďalej používať nástenný vypínač Pripojte neutrálny vodič modrý svietidla k stredovému kontaktu N Pripojte spínací vodič čierny svie...

Страница 33: ...stlačením na 5 sekúnd prejdete do ďalšieho režimu stmievania Pri spustení režimu Filament LED lamp zabliká LED indikátor 3 krát načerveno Tento režim slúži na stmievanie vláknových LED svietidiel Aktivácia sekvencie stmievania pomocou 230 V nástenného vypínača Ak chcete aktivovať sekvenciu stmievania pomocou 230 V nástenného vypínača najskôr zapnite modul pomocou nástenného vypínača Potom nástenný...

Страница 34: ...art Bridge alebo riadiacej jednotke ICS 2000 môžete prejsť do režimu pripojenia stlačením tlačidla spojenia na module LED indikátor bude 60 sekúnd pomaly blikať čo znamená že je v režime pripojenia Resetovanie ZCM 300 Upozornenie Týmto krokom demontujete modul zo zariadenia Smart Bridge riadiacej jednotky ICS 2000 alebo diaľkového ovládača ZYCT 202 Stmievač resetujete stlačením tlačidla pripojenia...

Страница 35: ...un till samma plint 5 Anslut ledningarna till modulen Anslut den neutrala ledningen blå från takboxen till den yttre N kontakten på modulen Valfritt S kontakten behöver inte anslutas Anslut strömbrytarledningen svart från takboxen med S uttaget om du vill fortsätta att använda en väggbrytare Anslut den neutrala ledningen blå på lampan med den mittersta N kontakten Anslut strömbrytarledningen svart...

Страница 36: ...ens med 230V väggströmbrytare För att aktivera dimningssekvensen med en 230V väggströmbrytare slå först på modulen med väggströmbrytaren Stäng sedan snabbt AV och PÅ väggströmbrytaren igen För att låsa dimningsnivån vrid snabbt till OFF och PÅ väggströmbrytaren igen 12 Justera dimningsområdet Om den anslutna belysningen flimrar i den lägsta dimnivån eller inte dämpar tillräckligt djupt kan du just...

Страница 37: ...oden blinkar långsamt i 60 sek för att indikera att den är i anslutningsläge Återställ ZCM 300 Varning Detta steg tar bort modulen från Smart Bridge eller ICS 2000 eller ZYCT 202 Återställ dimmern genom att trycka på anslutningsknappen i 6 sekunder Lysdioden blinkar snabbt Tryck kort på knappen igen Den anslutna lampan kommer att gå PÅ AV PÅ AV för att bekräfta återställningen och sedan gå in i an...

Страница 38: ...ice is subject to Directive 2012 19 EU Disposal of batteries Used batteries may not be disposed of in household waste Only dispose of batteries when they are fully discharged Dispose of batteries according to local regulations Trust Electronics Ltd declares that item number 71317 71317 02 is in compliance with Directive Electromagnetic Compatibility Regulations 2016 Radio Equipment Regulations 201...

Страница 39: ...es Geräts die Sicherheitshinweise unter www trust com safety Die Funkreichweite ist stark abhängig von den örtlichen Gegebenheiten wie dem Vorhandensein von HR Glas und stahlbewehrtem Beton Trust Smart Home Produkte dürfen nicht für lebenserhaltende Systeme eingesetzt werden Dieses Produkt ist nicht wasserfest Versuchen Sie nicht das Produkt selbst zu reparieren Die Farben der Kabel können in eini...

Страница 40: ...mme de fréquence de transmission radio 2400 2483 5 MHz Trust International B V déclare que l article numéro 71317 71317 02 est conforme aux directives 2014 53 EU 2011 65 EU Le texte complet de la déclaration de conformité de l UE est disponible à l adresse suivante www trust com compliance IT Istruzioni sulla sicurezza Assistenza prodotto www trust com 71317 Condizioni di garanzia www trust com wa...

Страница 41: ...contacto con un técnico electricista si tiene dudas sobre el cableado Nunca conecte luces o equipamiento que excedan la carga máxima del receptor Actúe con precaución durante la instalación de un receptor puede existir tensión aunque el receptor esté apagado Eliminación de materiales de embalaje deseche los materiales de embalaje que ya no se necesiten de conformidad con las regulaciones locales v...

Страница 42: ...Den fullständiga texten i EU försäkran om överensstämmelse finns på följande webbadress www trust com compliance CS Bezpečnostní pokyny Podpora produktu www trust com 71317 Záruční podmínky www trust com warranty Pro zajištění bezpečné manipulace s přístrojem dodržujte bezpečnostní pokyny uvedené na www trust com safety Bezdrátový dosah je velmi závislý na místních podmínkách jako je přítomnost HR...

Страница 43: ...ej adrese www trust com compliance RO Instrucţiuni de siguranţă Asistenţă produs www trust com 71317 Condiţii privind garanţia www trust com warranty Pentru a asigura manipularea în siguranţă a dispozitivului respectaţi instrucţiunile privind siguranţa de pe www trust com safety Raza de acţiune wireless depinde foarte mult de condiţiile locale cum ar fi prezenţa sticlei de înaltă eficienţă şi beto...

Страница 44: ...s of the following directives ROHS 2 Directive 2011 65 EU RED Directive 2014 53 EU The full text of the EU declaration of conformity is available at the following web address www trust com compliance TRUST SMART HOME LAAN VAN BARCELONA 600 3317DD DORDRECHT NEDERLAND www trust com Trust Electronics Ltd Sopwith Dr Weybridge KT13 0NT UK All brand names are registered trade marks of their respective o...

Страница 45: ...halogen lamps 20 300W 12V halogen lamps with electronic transformer 20 300W 12V halogen lamps with iron core transformer 40 300W Dimmable ESL LED 3 150W Number of LED drivers may not exceed the maximum load Not suitable for fluorescent tubes with starter switch momentary switch and compact fluorescent lamps ...

Страница 46: ......

Страница 47: ......

Страница 48: ...www trust com ...

Отзывы: