background image

15°

30°

8

To turn on the tool press the switch on the “ON” side.  To 

stop the tool, press the switch on the “OFF” side.

Turning On

• Use moderate and constant pressure on the work piece. Use uniform movements to get a soft grind. If you use excessive 

pressure the motor will overheat and the grinding wheel will wear out faster. 

• Locate the bevel angle in the piece to hone and try to keep its shape.

• The disc shall turn against the object to be honed.

• Keep a tray with water handy to immerse regularly there the work piece to prevent overheating. Otherwise, the metal 

may weaken.

Operation

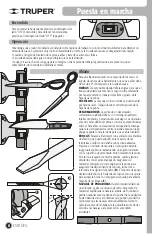
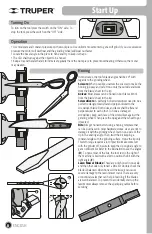
In most cases, the tool’s blade angle shall be 20° with 

regards to the grinding wheel.

Scissors:

 When possible, unscrew the scissors to make the 

honing job easy and safe. Hone only the outside and work 

from the blade’s heel to the tip.

Knives:

 Most knives can be honed in both faces. Work 

from the blade’s heel to the tip.

Screwdrivers:

 A perfectly honed screwdriver need to be a 

perfect rectangle, totally flat and perpendicular to the 

screwdriver blade. Both sides and faces shall be flat and 

perpendicular to each other. To hone a damaged 

screwdriver, keep each face of the screwdriver against the 

grinding wheel. Then place the tip against the wheel to get 

it leveled.

Bits: 

Bits get honed better using a honing template that 

can be purchased in most hardware stores. Use care not to 

damage it with the grinding wheel. Start in one side of the 

tip in the existing angle. Then, twist the bit keeping a 

constant angle with the grinding surface. Hone the tip only. 

This technique requires a lot of practice. Make some test 

with the grinder off. Assure to keep the tip original angle to 

get an efficient bit. Refer to the illustration to see the angles 

(

D

). To hone most of the bits, the tool rest in the right of 

the machine is built with a slot to position the bit with the 

right angle (

E

).

Lawn Mower Blades:

 These are only honed in one side 

and the other side only toned a little bit. Double check the 

blade is balanced when honed. Otherwise it can cause 

severe damage to the lawn mower crank. There are very 

economical scales that can help in learning if the blades 

are well balanced. To prevent to accidentally start up the 

lawnmower always remove the spark plug cables before 

servicing.

Honing

Start Up

D

E

ENGLISH

Содержание 16054

Страница 1: ...Instructivo por completo antes de usar la herramienta Esmeril de banco EBA 650 250 EBA 650 260 Modelos C digos EBA 650 250 EBA 650 260 Este Instructivo es para 16054 16142 152 4 mm Ruedas abrasivas 6...

Страница 2: ...Autorizados Sucursales P liza de Garant a Guarde este Instructivo para futuras referencias Los gr ficos de este Instructivo son para referencia pueden variar del aspecto real de la herramienta 3 3 4...

Страница 3: ...un calibre inferior ocasionar ca das de tensi n en la l nea teniendo como resultado p rdida de potencia y sobrecalentamiento del motor La siguiente tabla muestra el tama o correcto que debe usarse dep...

Страница 4: ...o Esto permite un mejor control de la herramienta en situaciones inesperadas Vista adecuadamente No vista ropa suelta o joyas Mantenga su pelo su ropa y guantes alejados de las piezas en movimiento La...

Страница 5: ...ipo de movimiento inusual De ser detectados desconecte la herramienta y acuda a un Centro de Servicio Autorizado Verifique que las ruedas abrasivas giren libremente No apriete demasiado la rueda abras...

Страница 6: ...Abrazaderas para fijar los protectores de ojos Guardas Motor Rueda abrasiva Guardas antichispas Soportes de apoyo Perillas para fijar protectores de ojos Tornillos rondanas y rondanas de presi n para...

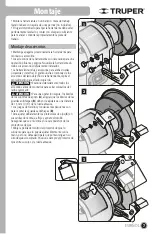
Страница 7: ...ra el lado izquierdo Examine detenidamente todos los accesorios antes de montarlos para evitar colocarlos del lado equivocado Para una operaci n segura los bordes de los soportes de apoyo A al igual q...

Страница 8: ...ente plano y perpendicular al v stago Los dos lados y las dos caras deben ser planos con caras perpendiculares entre s Para afilar un desarmador estropeado mantenga cada cara del desarmador contra la...

Страница 9: ...El di metro de la rueda abrasiva debe de ser de 152 4 mm 6 y su espesor m ximo de 19 mm 3 4 Compruebe que las ruedas nuevas no tengan grietas y mantenga la secuencia de ambas Retire la guarda de la ru...

Страница 10: ...EGIDORA No 76 A COL CENTRO C P 06060 CIUDAD DE M XICO TEL 01 55 5522 9976 FAX 01 55 5522 9966 671131 CERRADA PINO SUAREZ No 24 COL ZONA ESCOLAR C P 07230 GUSTAVO A MADERO CIUDAD DE M XICO TEL 01 55 22...

Страница 11: ...AV SEGUNDA DE MORELOS No 303 COL CENTRO TEHUAC N TEL 01 238 384 8640 670402 MOTORES Y HERRAMIENTAS EL CTRICAS AV 6 No 1004 B ESQ CALLE 19 COL LOMAS DE CASA BLANCA C P 76080 QUERETARO QRO TEL Y FAX 01...

Страница 12: ...structivo en www truper com o en los tel fonos proporcionados 01800 690 6990 01800 018 7873 En caso de tener problemas para hacer v lida esta P liza de Garant a rep rtelo a los tel fonos mencionados e...

Страница 13: ...Manual Bench Grinder EBA 650 250 EBA 650 260 Models Codes EBA 650 250 EBA 650 260 Applies for 16054 16142 Grinding Wheel 6 CAUTION Read this manual thoroughly before using the tool ENGLISH ESPA OL...

Страница 14: ...arranty Policy 3 3 4 5 6 7 8 9 10 12 12 ENGLISH Contents CAUTION Keep this manual for future references The illustrations in this manual are for reference only They might be different from the real to...

Страница 15: ...er of Conductors Extension Gauge WARNING WARNING Avoid the risk of electric shock or severe injury When the power cable gets damaged it should only be replaced by the manufacturer or at a Authorized S...

Страница 16: ...ontrol on the tool during unexpected situations Dress properly Do not wear loose clothing or jewelry Keep hair clothes and gloves away from the moving parts Loose clothes or long hair may get caught i...

Страница 17: ...t could break Top work with small work pieces fix them with clamps or vices Never use your hands to hold pieces Before Operating the Bench Grinder Keep your fingers in a safe distance away from the gr...

Страница 18: ...e Grinding wheel Switch Eye Protectors Fixing Clamps Guards Motor Grinding wheel Spark Arrester Guards Tool Rest Knob to set safety eyewear Mounting Screws Washers and Pressure Washers Eye Protectors...

Страница 19: ...e your time to examine all the accessories before mounting to prevent fixing them in the wrong side of the machine For a safe operation the edges of the tool rest A as well as the edges of the spark a...

Страница 20: ...d faces shall be flat and perpendicular to each other To hone a damaged screwdriver keep each face of the screwdriver against the grinding wheel Then place the tip against the wheel to get it leveled...

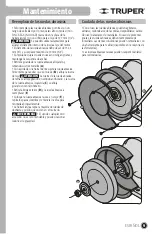
Страница 21: ...shall be 6 and the maximum thickness 3 4 Double check the new wheels have no cracks and keep the sequence of both Remove the wheel guard loosening and removing its three screws A Using a tool hold th...

Страница 22: ...A COL ESTRELLA C P 07810 GUSTAVO A MADERO CIUDAD DE M XICO TEL Y FAX 01 55 5577 9331 5781 7079 670350 TORNILLOS GUILA S A DE C V MASURIO No 200 ESQUINA GALIO COL LUIS ECHEVERRIA C P 34250 DURANGO DGO...

Страница 23: ...OL CENTRO TEHUAC N TEL 01 238 384 8640 670402 MOTORES Y HERRAMIENTAS EL CTRICAS AV 6 No 1004 B ESQ CALLE 19 COL LOMAS DE CASA BLANCA C P 76080 QUERETARO QRO TEL Y FAX 01 442 167 4733 671265 FERRETERA...

Страница 24: ...1 70 TIN R F C THE 791105 HP2 www truper com 09 2017 Stamp of the business Date of purchase SUCURSAL CENTRO FOR NEO AV PARQUE INDUSTRIAL No 1 A JILOTEPEC ESTADO DE M XICO C P 54240 CONMUTADOR 01 761 7...

Отзывы: