


Support: 1-855-473-7449 or 1-408-943-4100
Email:
Page 3
3 ES24 Rail Kit Assembly
3.1 Separate Cabinet Rails from Rack Rails
Extend the inner rack rail until it locks in place (
1
). Slide out the cabinet rail until it stops (
2
). Remove the cabinet rail
by sliding the white release tab away from the inner rack rail (
3
), then pull the cabinet rail free (
4
).
The cabinet rails are mounted on both sides of the system cabinet. Align the cabinet rail key holes with the three
posts on the side of the chassis and slide the rail until the post is secured in the key holes lot of the rail.
3.2 Mount Cabinet Rails
Align the rail hole with the screw hole and secure the rail with one M 4x4 L screw. Repeat this process to mount and
secure the second cabinet rail on the other side.
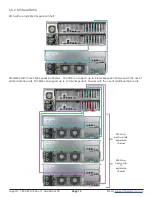
A TrueNAS ES24 requires 4U of vertical rack space. The rack rails are installed in the bottom 2U of the total 4U
height. The inner rack rail must be unlocked and retracted before installing the rail in the rack. Rotate the release
lever on the back of the inner rail clockwise as shown on the arrow label (
1
). Push the inner rail towards the back of
the rail assembly until it stops (
2
).
3.3 Mount the Rack Rails
Place the rail in the rack with the front end toward the front of the rack. Align the pins with the mounting holes in
the front of the rack. Push the pins into the holes until the latch clicks. At the rear of the rail, align the pins with the
holes. Make sure the rail is level. Swing the latch handle out (
1
) and pull it to extend the rail rearwards until the pins
are fully seated in the rack holes (
2
). Release the latch to lock it in place. Repeat the process for the second rack rail.
M4 Screws
Front
Back


