background image

true-i  PC Viewer

19

true-i  PC Viewer

18

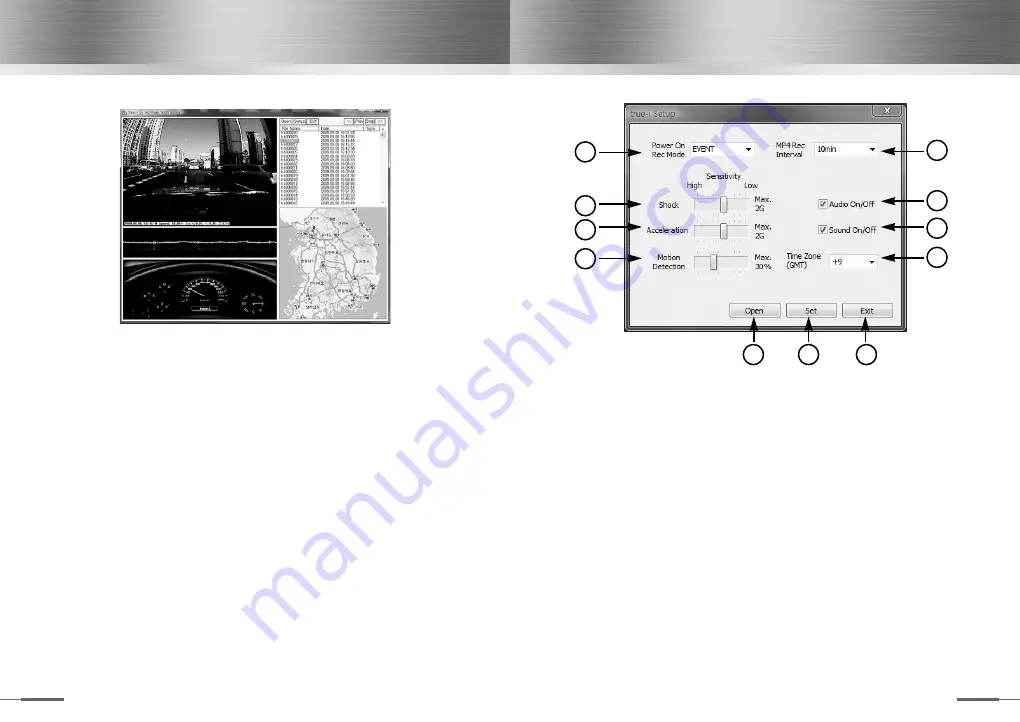
Shock level can be adjusted. If the accelerator value is selected too high,

device would not be able to detect shock needed for appropriate event record.
Likewise, selecting very low shock level will allow device to record even a small
shock event. Therefore, user is suggested to find an appropriate level to user

s

need.

Acceleration level can be adjusted. Define the level of acceleration or

deceleration that device will detect.

Motion detection level can be adjusted. Setting level maximum will focus

object close to the device lens, whereas setting the level minimum can detect
objects farthest away from the device viewing angle. The motion detection level
should be set appropriately to user

s environment.

Configure audio record of the device.

Turns on and off sound.

Set the time zone of your country.

Load blackbox configuration file.

Save blackbox configuration file.

Caution: 

The configuration file name must be 

setup.hms

and saved to

root directory of a SD memory card. Otherwise, configuration changes cannot
be reflected in your blackbox.

End configuration window.

1

3

4

5

2

6

7

8

9

10

11

On the bottom of video screen panel, time, speed and shock values will be
displayed.
Directly below the video screen panel, amplitude acceleration/shock will be
displayed before and after the event recorded.
And the left bottom of true-i Viewer screen, a simulated cockpit is displayed with
vehicle

s speed, direction and acceleration information.

Actual footage of event will be displayed on the Google map when the PC is
connected to the internet.

Caution: 

The map will not be displayed when PC is not connected to the

internet or valid GPS data is not recorded during the event.

3. Viewer Configuration

User can configure true-i blackbox by pressing 

SETUP

button located on the

upper right side of the viewer.

Select blackbox recording mode.  Select 

Event

and configure record event

mode to user defined shock level, whereas, 

MPEG4

configure continuous

record mode.

Select 

MPEG4

mode and configure recording time interval.  For example,

choosing 

10min

on the pull down menu will allow device to save every

10mins during continuous record mode.

Содержание HMBS-200

Страница 1: ...USER MANUAL Vehicle Blackbox HMBS 200 ...

Страница 2: ...e radio frequency energy and if not installed and used in accordance with the instructions any cause harmful interference to radio communications However there is no guarantee that interference will not occur in a particular installation If this equipment does cause harmful interference to radio or television reception which can be determined by turning the equipment off and on the user is encoura...

Страница 3: ...e placed along the signal path or sun protection film is installed on windshield Please take note that a video may not be recorded correctly when driving through tunnel under high beam from other side of the road against the direct sunlight and during the night Do not operate or look at the device when driving It can lead to unwanted vehicle accident Please take note that under extreme shock the d...

Страница 4: ...ton USB slot Mode button blackbox mode playback list backward Play button play stop blackbox event video Movie button continuous record playback list forward Status LED Microphone Speaker 1 2 3 5 4 9 10 11 6 7 8 Main Device Power Cable Holder USB Cable SD Memory Card 2GB User Manual ...

Страница 5: ...y device or GPS navigator through AV input socket Can be readily displayed on display device or GPS navigator s monitor screen without PC 1 Camera Module VGA 640x480 CMOS sensor and F 1 8 hi end lens with 160 5 viewing angle 121 horizontal 88 vertical 15fps video record speed at daylight night parking mode 2 G Sensor Max 8G measuring capability at forward backward up down and left right direction ...

Страница 6: ...evice 1 How to attach device holder Attach device holder on the windshield facing user Make sure that the holder does not block or obstruct the camera lens viewing angle Once proper location is found user can easily attach the holder onto the front windshield after removing the protection layer from 3M s tape 2 How to mount device to the holder When attaching holder to the main device please tilt ...

Страница 7: ...ellow plug is for video red for audio and white for external emergency recording button User can use AV cable when external trigger is needed Caution Use only standard AV cable as specified in the above Use of non complied AV cable will cause damage to the device User has to take responsibility for device damage or malfunction by use of inappropriate AV cable 4 Adjustment of camera angle Using pro...

Страница 8: ...ates itself when the power is connected In addition device activates with its internal battery by pressing device power button even when it is not connected to external power supply e g vehicle battery power supply In this case no other feature other than video audio player will be enabled power off When power is disconnected device will automatically be deactivated after few seconds The device ca...

Страница 9: ... com to user defined folder or an SD card 2 Unzip the downloaded file to uncompress User will see the files named hmbs200 bin and setup hms as successful unzip of the downloaded file 3 Copy and paste the files into SD card if user saved the files in a PC or other storage device 4 Remove the power supply cable from device and make sure that the device power is completely turned off 5 Insert the SD ...

Страница 10: ...t directory of a SD memory card Otherwise configuration changes cannot be reflected in your blackbox End configuration window 1 3 4 5 2 6 7 8 9 10 11 On the bottom of video screen panel time speed and shock values will be displayed Directly below the video screen panel amplitude acceleration shock will be displayed before and after the event recorded And the left bottom of true i Viewer screen a s...

Страница 11: ...에 대한 품질 보증을 실시합니다 제품보증서에 구입 일이 표기되어 있지 않은 경우 제품 내 기록된 제조번호에 의한 제조일 자에 1개월을 합하여 제품보증기간으로 산정합니다 고장 발생 시 한맨테크놀로지 또는 가까운 서비스센터를 방문하여 보증서를 제시해 주시고 수리 의뢰하여 주십시오 이 보증서는 대한민국에서만 유효하며 재발행하지 않으므로 잘 보관하여 주십시오 반품 및 환불 규정 제품 수령 후 7일 이내 반품 및 교환이 가능합니다 반품을 원하실 경우 제품 포장을 개봉하지 않은 상태에서 반송하여 주십시오 제품 포장을 개봉한 제품은 반품이 불가합니다 단 제품 불량으로 인한 반품의 경우는 제외 제품 반송 시 반송 비용은 고객님께서 부담하셔야 합니다 단 제품 불량으로 인한 반품의 경우는 제외 소비자 피해 유형 구입 후 10...

Отзывы: