Chipper / Shredder Servicing
4
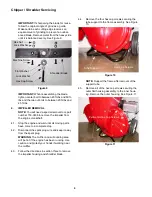
IMPORTANT:
If sharpening the blade for reuse,
follow the original angle of grind as a guide.
Make certain each cutting edge receives an
equal amount of grinding to prevent an unbal-
anced blade. Remove metal from the heavy side
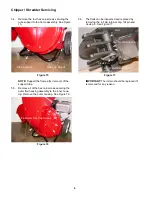
until it is balanced evenly. See Figure 9.
IMPORTANT:
When reassembling the blade,
tighten center bolt to between 45 ft-lbs and 60 ft-
lbs and the two out bolts to between 20 ft-lbs and
25 ft-lbs.
4.
IMPELLER REMOVAL
NOTE:
You will need a special removal tool, part
number 753-0638 to remove the impeller from
the engine crankshaft.
4.1.
Stop the engine and wait until all moving parts
have come to a complete stop.
4.2.
Disconnect the spark plug wire and keep it away
from the spark plug.
WARNING:
The muffler and surrounding area
will be hot if the engine has been running. Use
caution and protect your hands if working near
the muffler.
4.3.
Follow the directions in section three to remove
the impeller housing and shredder blade.
4.4.
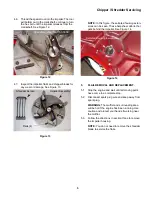
Remove the four hex cap screws securing the
tube support to the frame assembly. See Figure
10.
NOTE:
Support the frame after removal of the
support tube.
4.5.
Remove all of the hex cap screws securing the
outer flail housing assembly to the inner hous-
ing. Remove the outer housing. See Figure 11.
Figure 9
Hex Nut
Lock Washer
Machine Screw
Shredder Blade
Flat Washer
Lock Washer
Hex Cap Screw
Figure 10
Hex Cap Screws
Tube Support
Figure 11
Perimeter Hex Cap Screws
Содержание Chipper/Shredder -CS4210
Страница 2: ......


