


11
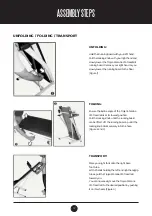
ASSEMBLY STEPS
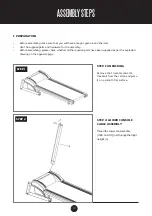
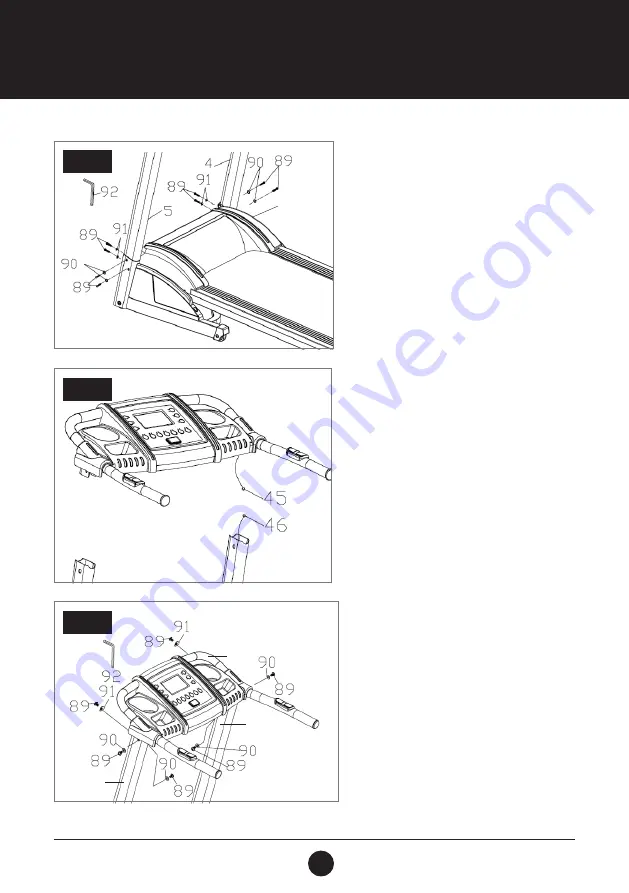
STEP 3: UPRIGHT ASSEMBLY
Insert the Right Upright (4) into the Frame Base (2) and
secure with 2 Flat Washers (5/16” x 23 x 1.5T) (91),
2 Curved Washers (5/16” x 18 x 1.5T) (90) and 4 Button
Head Socket Bolts (5/ 6” x 15 mm) (89).
Use the Combination (M5) Allen Wrench & Phillips Head
Screwdriver (92) to secure all bolts.
Note:
Curved Washers (5/16” x 23 x 1.5T) (91) are used
on the back of the Upright Frames (4 and 5) and the
Flat Washers (5/16” x 18 x 1.5T) (90) are used on the
sides of the Upright Frames (4 and 5).
Repeat the above procedure for the Left Upright (5).
STEP 3
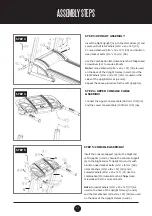
STEP 4: UPPER CONSOLE CABLE
ASSEMBLY
Connect the Upper Console Cable (900 mm 10P) (45)
and the Lower Console Cable (1900 mm 10P) (46).
STEP 5: CONSOLE ASSEMBLY
Insert the Console Support (6) into the Right and
Left Uprights (4 and 5). Secure the Console Support
(6) to the Right and Left. Uprights (4 and 5) with
6 Button Head Socket Bolts (5/16” x 15 mm) (89),
4 Flat Washers (5/16” x 18 x 1.5T) (90) and 2
Curved Washers (5/16” x 23 x 1.5T) (91). Use the
Combination (M5) Allen Wrench & Phillips Head
Screwdriver (92) to secure all bolts.
Note
: Curved Washers (5/16” x 23 x 1.5T) (91) are
used on the back of the Upright Frames (4 and 5)
and the Flat Washers (5/16 x 18 x 1.5T) (90) are used
on the sides of the Upright Frames (4 and 5).
STEP 4
STEP 5
2
6
4
5
Содержание Stamina 315
Страница 9: ...9 EXPLODEDDRAWING...
Страница 16: ...16 CONSOLEFUNCTIONS INCLINE INCLINE INCLINE...


