Trojan SPIN 120 Скачать руководство пользователя страница 17

17

CONDITIONING GUIDELINES

How you begin your exercise program depends on your physical condition. If you have been inactive for

several years, or are severely overweight, you must start slowly and increase your time on the equipment, a

few minutes per workout.

Initially, you may be able to exercise only for a few minutes in your target zone, however, your aerobic

fitness will improve over the next 6 to 8 weeks. Don’t be discouraged if it takes longer. It’s important

to work at your own pace. The better your aerobic fitness, the harder you will have to work to stay in your 

target zone. Please remember these essentials:

• Have your doctor review your training and diet programs to advise you of a workout routine you should adopt. 

• Begin your training program slowly with realistic goals that have been set by you and your doctor. 

• Monitor your pulse frequently. 

• Establish your target heart rate based on your age and condition.

EXERCISE INTENSITY

To maximise the benefits of exercising, it is important to exercise with the proper intensity. The proper 

intensity level can be found by using your heart rate as a guide. For effective aerobic exercise, your heart rate 

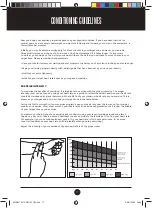
should be maintained at a level between 65% and 85% of your maximum heart rate as you exercise. This is 

known as your target zone. You can find your target zone in the table below.

During the first few months of your exercise program, keep your heart rate near the low end of your target 

zone as you exercise. After a few months, your heart rate can be increased gradually until it is near the middle 

of your target zone as you exercise.

To measure your heart rate, stop exercising but continue moving your legs or walking around and place 2 

fingers on your wrist. Take a 6 second heartbeat count and multiply the results by 10 to find your heart rate. 

For example, if your 6 second heartbeat count is 14, your heart rate is 140 beats per minute. (A 6 second 

count is used because your heart rate will drop rapidly when you stop exercising).

Adjust the intensity of your exercise until your heart rate is at the proper level.

#20M01T007 SPIN 120 UM.indd   17

28/01/2020   08:39

Содержание SPIN 120

Страница 1: ...isit facebook com trojanhealth www trojanhealth co za www instagram com trojanhealth CAUTION READ ALL PRECAUTIONS AND INSTRUCTIONS IN THIS MANUAL BEFORE USING THIS EQUIPMENT KEEP THIS MANUAL FOR FUTUR...

Страница 2: ..._____________ 9 Console Functions ____________________________________________ 15 Fitness Tips Techniques _____________________________________ 16 Conditioning Guidelines _____________________________...

Страница 3: ...avoid muscular pain and strain begin each workout by stretching and warming up and end each session by cooling down and stretching INSTALLATION Trojan recommends that all equipment Be secured to or s...

Страница 4: ...t attempt to use or repair the equipment yourself Please contact our service department on 0861 TROJAN 0861 876526 to arrange a repair Customers residing outside South Africa can contact us on 27 10 2...

Страница 5: ...pin 120 Spinning Bike provides a convenient and simple method to begin your assault on getting your body in shape and achieving a healthier lifestyle Before reading further please review the drawing b...

Страница 6: ...Crank 205 X 152 X 48 X 1 2 X 20 1 No Description Qty 28 Nut M7 8 X 24 X S32 X 5 1 29 Washer 33 5 X 22 5 X 2 5 1 30 Left Thread M7 8 X 24 X 45 X 12 1 31 Bowl 56 X 51 6 X 16 2 32 Bead groove 45 X 20 X...

Страница 7: ...10 X 20 1 64 Bushing F17 X 17 X 118 1 65 Belt 6PJ500 1 66 Seat 98 2 1 67 Foam 1 L 450 2 68 Foam 2 L 600 1 69 End Cap 25 X 1 5 2 70 Transportation Wheel 40 5 X 8 5 X 22 2 71 End Cap J40 X 20 X 2 0 2 72...

Страница 8: ...8 EXPLODEDDRAWING 20M01T007 SPIN 120 UM indd 8 28 01 2020 08 39...

Страница 9: ...eck whether all the required parts have been supplied as per the exploded drawing on the opposite page STEP 1 FRONT AND REAR STABILISERS INSTALLATION Attach the Front Stabiliser 6 and Rear Stabiliser...

Страница 10: ...2 x 20 27 L by rotating counterclockwise Once in place ensure secure fit using Spanner S 13 14 15 25 Attach the Right Pedal HD 16C 1 2 19 R into its corresponding Right Crank 205 X 152 X 48 X 1 2 X 2...

Страница 11: ...ch S6 26 Attach Seat 98 2 66 to Seat Slider 2 using Spanner S 13 14 15 25 Loosen and remove the Seat Slider Adjustment Knob 50 X 20 X M8 X 15 73 Insert Seat Slider 2 with Seat 98 2 66 into the Seat Sl...

Страница 12: ...le 10 to the bracket located on the Handlebar 8 using 2 Screws 79 Tighten and secure using Spanner 25 Connect the link wire of the Console 10 to the link wire of Inductor L 350 12 STEP 4 ASSEMBLYSTEPS...

Страница 13: ...98 2 66 to the desired height Once adjusted re insert and tighten the Adjustment Knob M16 X 1 5 X 22 X 56 62 to secure the Seat 98 2 66 in place To adjust the Seat 98 2 66 back and forth loosen and p...

Страница 14: ...he bike to an immediate stop ADJUSTING THE BALANCE In order to achieve a smooth and comfortable ride you must ensure that the stability of the bike is secured If you notice that the bike is unbalanced...

Страница 15: ...ill be shown whilst exercising SPEED The current speed will be show whilst exercising DISTANCE The distance of each workout will be shown whilst exercising CALORIE The calories burned will be shown wh...

Страница 16: ...s can store weight training is an essential part of the exercise routine process Weight training helps tone build and strengthen muscle If you are working above your target zone you may want to do a l...

Страница 17: ...efits of exercising it is important to exercise with the proper intensity The proper intensity level can be found by using your heart rate as a guide For effective aerobic exercise your heart rate sho...

Страница 18: ...s to relax as you reach down toward your toes as far as possible Hold for 15 counts and then relax Repeat 3 times Stretches Hamstrings back of knees and back 2 HAMSTRING STRETCH Sit with 1 leg extende...

Страница 19: ...ts on plastic parts Please wipe your perspiration off the Trojan Spin 120 Spinning Bike after each use Please inspect all assembly bolts and pedals on the machine for proper tightness before use STORA...

Страница 20: ...injury loss or damage direct indirect or consequential arising out of the use of or inability to use this product and whether or not occasioned by the Manufacturer s negligence or any act or omission...

Страница 21: ...ll be repaired free of charge as long as it complies with the terms and conditions of the warranty refer to warranties section in this manual Any items that need to be repaired that are NOT covered in...

Отзывы: