background image


10 


5. Remote Control 


Precautions: 

•  Aim the remote control at the remote receiver when using the remote control. Any object placed between 

the remote control and the remote receiver may interfere with operation. 

•  Protect the remote control from vibration. Do not expose the remote control to direct sunlight, as heat 

may deform it. 

•  When the remote receiver is subject to direct sunlight or strong light, the remote control may malfunction. 

In such case, please change the angle of lighting, reposition the device, or operate the remote control 

closer to the remote receiver. 

•  Replace the batteries in case of low battery as low battery power will reduce the range of the remote 

control. If the remote control is to be left unused for a long period of time or the batteries are depleted, 

please remove the batteries as battery leakage may damage the remote control. 

•  Do not use batteries of different types or mix a new battery with a used one. Always replace batteries in 

pairs. 

•  Do not throw the batteries into a fire or recharge or disassemble the batteries. Do not recharge, short-

circuit, disassemble/assemble, heat or burn any used batteries. Please dispose of waste batteries 

according to applicable environmental regulations. Do not expose batteries to any hot environment, like 

direct sunlight or fire. 


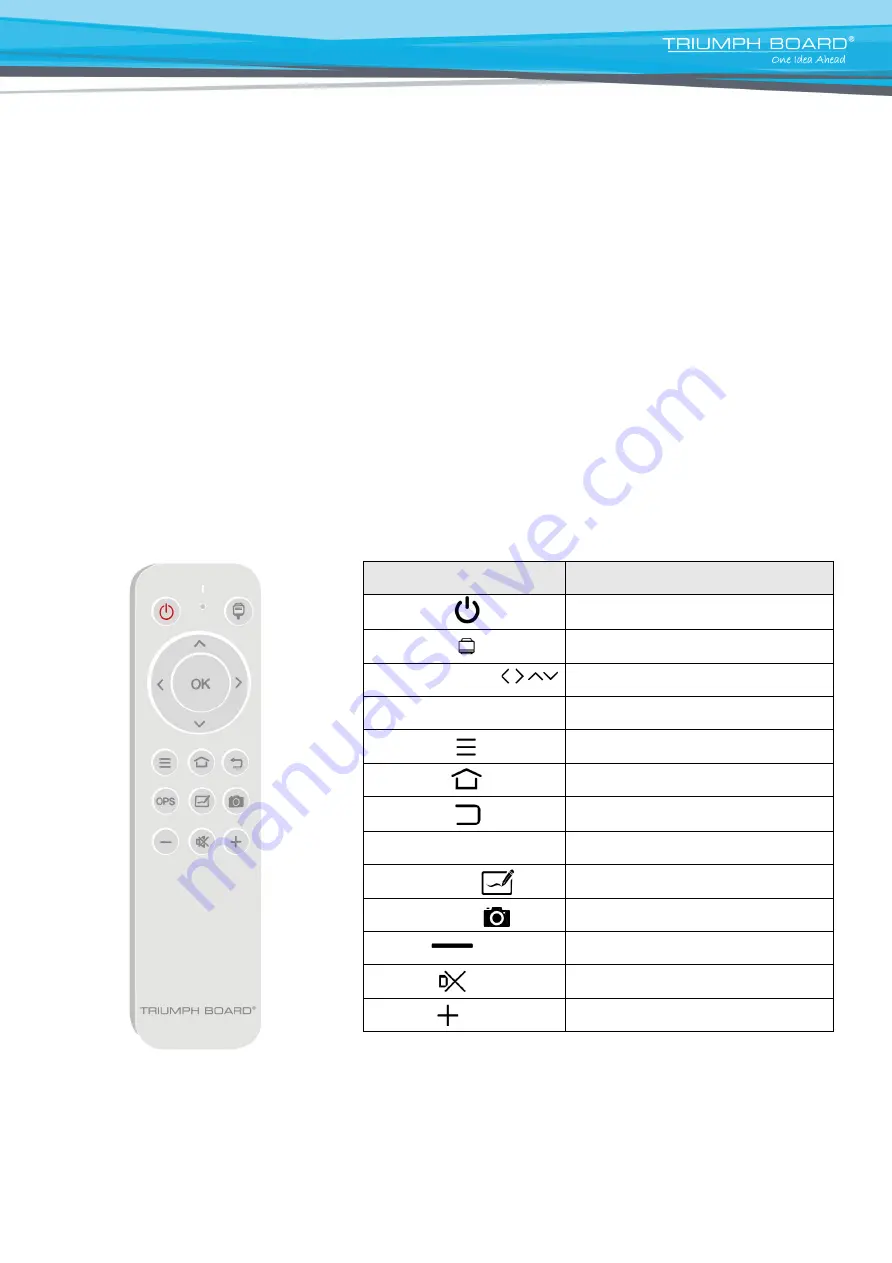
Remote control button instructions: 


Button 

Description 

Power 

Switch between power on and power 

(off) 

Source 

Open/close the signal source list 

Navigation keys  

Select or adjust menu options 

 OK 

Confirm the operation 

Menu 

Show/Hide the main menu 

Home 

Display the Android homepage 

Back 

Return to the previous interface 

OPS 

Switch to OPS source 

Annotation 

Switch to annotation application 

Screenshot  

Take a screenshot 

Vol -   

Decrease the volume 

MUTE 

Enable/Disable sound


Vol +  

Increase the volume


Содержание 8592580117220

Страница 1: ...User Manual INTERACTIVE FLAT PANEL Series 65 75 86 2021 ...

Страница 2: ...ol Panel 9 5 Remote control 10 Precautions 10 Button instructions 10 Instructions for Use 11 6 IFP Interface Inputs Outputs 11 7 Connection and Set Up 13 HDMI Connection 14 RS232 Connection 15 8 Android System 16 9 Basic Operations 17 Start up shutdown 17 Source Switching 17 Display Settings 17 Audio Settings 17 Security and Privacy 17 Keyboard and Input Method 17 Language Selection 17 System Time...

Страница 3: ...uct Dimensions 1489 x 897 x 88 mm 58 6 x 35 3 x 3 4 Package Dimensions 1656 x 1050 x 204 mm 65 2 x 41 3 x 8 Net Gross weight 38 49 75 kg 83 7 110 lb TRIUMPH BOARD 75 INTERACTIVE FLAT PANEL EAN 8592580117237 Screen Type Open Cell DLED Backlight Resolution 3840 2160 Brightness 400 cd m2 Contrast 4000 1 Response time 8 ms Refresh Frequency 60 Hz Display Area 1649 66 H x 927 94 V mm 64 92 H x 36 5 V P...

Страница 4: ...ype C VGA 1 1 AUDIO IN 1 AUDIO OUT 1 LAN 2 SPDIF 1 USB 2 0 3 USB 3 0 5 TOUCH USB 3 RS 232 1 Sound System Power Amplification 2 x 10 W 2 0 Power Power Requirements 100 240 V AC 50 60 Hz MAX Power Consumption 300 W 350 W 500 W Standby Power Consumption 0 5 W Depends on the model Ambient Conditions Operation Temperature 0 C 40 C Operation Humidity 20 80 RH Storage Temperature 10 C 60 C Storage Humidi...

Страница 5: ...lease do not use hard or sharp objects When the screen requires cleaning please unplug the power cord first Please use a soft dust free dry cloth to wipe the screen Do not use water or a spray cleaner to clean the device Please contact the service center for internal cleaning of the device Do not display image with high brightness on the screen for a long time Please turn off the device after usag...

Страница 6: ... not unplug the device from the socket As a result your equipment may not power on and repair by a service technician may be required The device can be turned off using the main switch and unplugged from the socket when the light is still red Battery Please dispose of used batteries properly and recycle To avoid danger please do not let children touch the battery and avoid contact with water Cauti...

Страница 7: ...nstallation Unpacking Accessories Quick Start Guide 2x styluses remote control Wi Fi Module power cables UK US EU touch USB cable Quick Start Guide 2x Stylus Remote control Power cable US UK EU Touch USB Cable HDMI Cable ...

Страница 8: ...re the wall mount is installed on a wall or other surface which can provide strong support This device should be installed on a vertical plane not on an oblique plane also it should not be installed in a horizontal position otherwise damage of the device or personal injury may be caused To avoid damage of the device or injury keep the wall mount out of the reach of children Tighten the screws duri...

Страница 9: ...drives USB drives USB keyboard and mouse etc 6 Light Sensor Automatically identifies the brightness based on ambient light 7 HDMI IN For connection to display devices with HDMI output function Maximum resolution supported by HDMI port is 4K 60HZ 8 TOUCH USB External computer touch signal input Default touch function is available under optional built in OPS PC When connecting an external computer i...

Страница 10: ...e the batteries as battery leakage may damage the remote control Do not use batteries of different types or mix a new battery with a used one Always replace batteries in pairs Do not throw the batteries into a fire or recharge or disassemble the batteries Do not recharge short circuit disassemble assemble heat or burn any used batteries Please dispose of waste batteries according to applicable env...

Страница 11: ...r of battery compartment and snap the clip fastener shut against the bottom of the remote 6 IFP Interface Inputs Outputs Right bottom side of IFP interface Right side of IFP interface Ports Description of Function 10 VGA Connect USB devices such as portable hard drives USB drives USB keyboard and mouse etc 11 AUDIO IN External computer audio input 12 SPDIF SPDIF Out digital optical audio output Th...

Страница 12: ...nput Default touch function is available under optional built in OPS PC When connecting an external computer in addition to connecting external computer VGA and audio signals the external computer s USB port needs to be connected to the equipment Under the condition that driver is installed the external computer can be touch controlled through the equipment touch function is effective in PC VGA an...

Страница 13: ...ter audio output interface 2 Use a USB cable to connect to the external computer USB port 3 After connection is completed plug in power cord and switch POWER to ON 4 Start external computer 5 Press key and the equipment is powered on 6 Press the INPUT key to switch to VGA channel NOTE For external computer output the device s best resolution is 3240x2160 The VGA standard does not support this reso...

Страница 14: ...is powered on 6 Press the INPUT key to switch to HDMI channel Connecting of HDMI VGA cable and USB touch cable HDMI 1 2 TOUCH USB 1 HDMI 3 VGA TOUCH USB 2 HDMI 4 TOUCH USB 3 RS232 Serial Port Connection After using the serial port line to connect central control equipment and the device certain functions of the device can be controlled via the central control device such as device ON OFF and adjus...

Страница 15: ...will disappear after 5 seconds of inactivity Control Menu Home Return to Android Home Page Crop Crop screen screenshot Switcher Switch through open apps and Inputs Timer All Apps All installed apps Spotlight Note Annotation Mark Annotation on glass Browser Stopwatch Record Recording of the screen Freeze AirClass Online Voting system Screen Lock Disappearing of Control menu Press on arrows between ...

Страница 16: ...tings will be used Source Switching You can use the remote control or Input Settings icon to switch the source by the following methods Method one press the Signal Source key on the remote controller to call Signal Source Menu press the cursor key on the remote control to select a signal source press the OK key the device will switch to the selected input signal source Method two Press the Input S...

Страница 17: ... on Wi Fi switch 3 Select the network to be connected from Network List enter the connecting password and press connect 4 If there is no desired network in Network List manually add a network This Wi Fi Built in Adapter is intended only for use in the Android mode Ethernet There are two LAN network ports on this device LAN 1 can be used to connect to a wired network When one network port is connec...

Страница 18: ...3 Enter the hotspot name in the textbox The default name is AndroidAP_7817 which is customizable 4 Enter the hotspot password in the textbox The default password is 12345678 Password is customizable 11 Wi Fi module Installation Procedure Warning Please make sure the power cord of the Interactive Flat Panel IFP is disconnected before installation Note This Wi Fi module only works for the IFP by plu...

Страница 19: ...ng interface Click Wi Fi enter the following Wi Fi setting interface Click the icon you can turn on off the Wi Fi function Key Specifications Wi Fi Standard Support 802 11 a b g n ac Bluetooth Support BT 2 1 3 0 4 0 Operating Frequency 2 4G 5G 5150MHz 5250MHz indoor use Antenna Type Dipole Antenna Gain BT 2 4G Wi Fi 3dBi 5G Wi Fi 4 3dBi Antenna Impedance 50Ω ...

Страница 20: ... down 3 Check whether there is no automatic shutdown PC module Signal out of range 1 Check whether display is set correctly 3 2 Check whether resolution is the best resolution Adjust line and field synchronization in menu Image lack of color color 1 Check whether video cable is possibly not securely connected or has a quality problem is incorrect 2 Adjust color and brightness or contrast in menu T...

Страница 21: ...are placed around the device No color color is weak or 1 Adjust color and brightness or contrast in menu image is weak 2 Check whether signal wire is securely connected Audio Malfunctions 1 Check whether mute button is pressed for mute Image but no sound 2 Press VOL to adjust volume 3 Check whether audio line is connected correctly 1 Adjust sound balance in menu Only one speaker has 2 Check whethe...

Страница 22: ...g Pad EAN 8592580083365 Be aware that using fabric softener might damage the screen Clean front frame Please use a dry soft lint free cloth to wipe the front frame Device to remain unused for extended period If the device will not be used for an extended time such as during a vacation please make sure to unplug the cord to prevent any possible dangers caused by power surges from lightning For clea...

Страница 23: ...com www triumphboard com Notices Every effort has been made to ensure all information contained in this user guide is correct but the accuracy or completeness is not guaranteed Before using this device you must evaluate it and determine if it is suitable for your intended application You assume all risks and liability associated with such use Any statements related to this device not contained in ...

Отзывы: