background image


OPERATION GUIDE

xv

Avoid locations near radiators, heaters, or other heat sources, or 
locations near flammable items, to avoid the danger of fire.

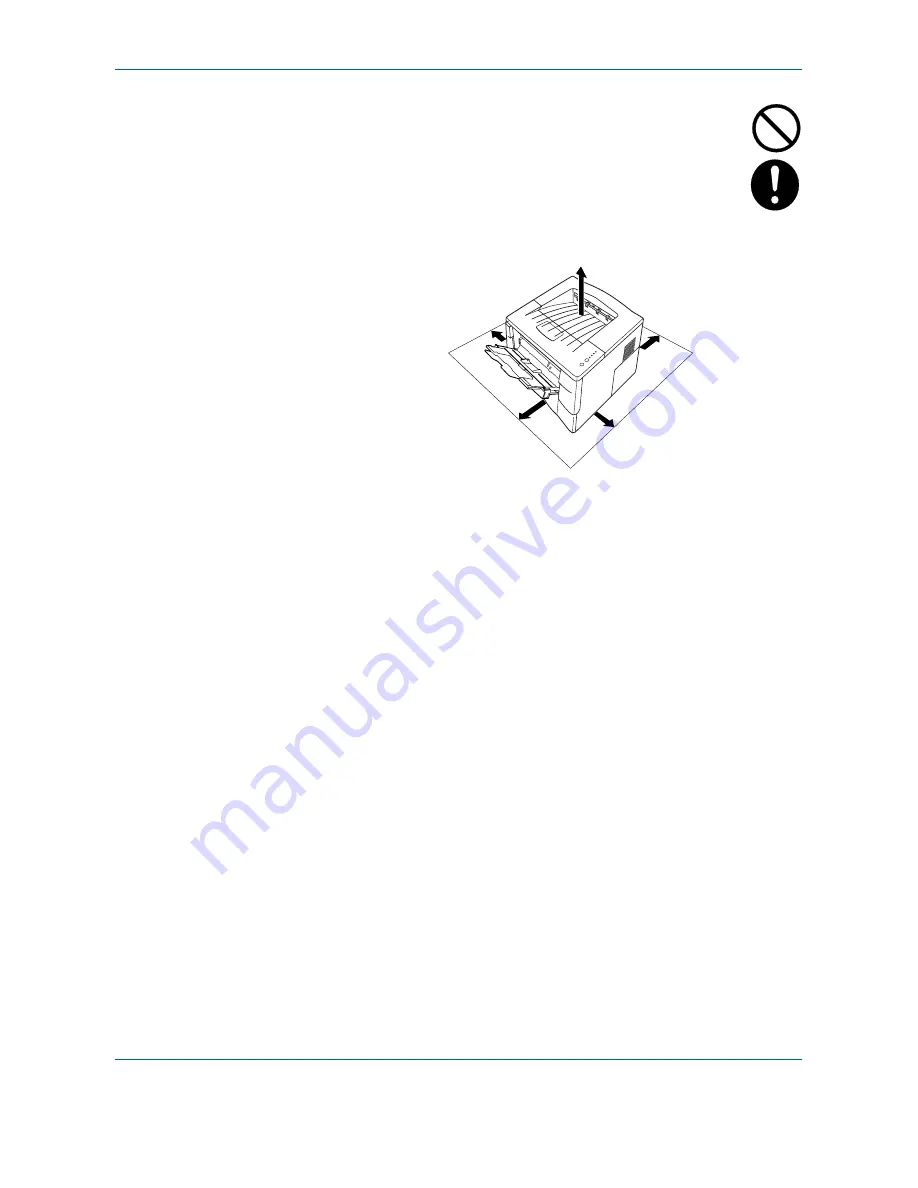
To keep the machine cool and facilitate changing of parts and 
maintenance, allow access space as shown below. Leave 
adequate space, especially around the vents, to allow air to be 
properly ventilated out of the machine.

Other Precautions

Adverse environmental conditions may affect the safe operation and 
performance of the machine. Install in an air-conditioned room 
(recommended room temperature: around 23°C, humidity: around 60% 
RH), and avoid the following locations when selecting a site for the 
machine.

Avoid locations near a window or with exposure to direct sunlight. 

Avoid locations with vibrations. 

Avoid locations with drastic temperature fluctuations. 

Avoid locations with direct exposure to hot or cold air.

Avoid poorly ventilated locations.

During printing, some ozone is released, but the amount does not cause 
any ill effect to one's health. If, however, the printer is used over a long 
period of time in a poorly ventilated room or when printing an extremely 
large number of copies, the smell may become unpleasant. To maintain 
the appropriate environment for print work, it is suggested that the room be 
properly ventilated.

250mm

300mm

250mm

400mm

500mm

Содержание LP 4022

Страница 1: ...Instruction Handbook LP 4022 Laser Printer b w ...

Страница 2: ......

Страница 3: ... 8 3 Connecting and Printing 11 Connections 11 Loading Software 13 Printing 14 4 Maintenance 15 Toner Container 16 Cleaning the Printer 18 Prolonged Non Use and Moving the Printer 20 5 Troubleshooting 21 General Guidelines 21 Print Quality Problems 22 Paper Jams 22 6 Options 29 Expansion Memory 30 CompactFlash CF Card 32 Network Interface Card 33 7 Specifications 35 ...

Страница 4: ...ii OPERATION GUIDE ...

Страница 5: ... guide any copyrightable subject matter without the prior written consent of UTAX GmbH is prohibited Any copies made of all or part of this guide any copyrightable subject must contain the same copyright notice as the material from which the copying is done Regarding Tradenames PRESCRIBE is a registered trademark of Kyocera Corporation KPDL is trademark of Kyocera Corporation Hewlett Packard PCL a...

Страница 6: ...rants you a license for the Programs only in the country where you acquired the Programs You obtain no rights other than those granted you under this license The term Programs means the original and all whole or partial copies of it including modified copies or portions merged into other programs IBM retains title to the Programs IBM owns or has licensed from the owner copyrights in the Programs 1...

Страница 7: ...tion of remedies also applies to any developer of Programs supplied to IBM IBM s and the developer s limitations of remedies are not cumulative Such developer is an intended beneficiary of this Section Some jurisdictions do not allow these limitations or exclusions so they may not apply to you 4 General You may terminate your license at any time IBM may terminate your license if you fail to comply...

Страница 8: ...he Software and Typefaces 4 You agree not to duplicate or copy the Software or Typefaces except that you may make one backup copy You agree that any such copy shall contain the same proprietary notices as those appearing on the original 5 This License shall continue until the last use of the Software and Typefaces unless sooner terminated This License may be terminated by Monotype Imaging KK if yo...

Страница 9: ...ication or disclosure is subject to restrictions applicable to restricted rights software as set forth in FAR 52 227 19 c 2 14 YOU ACKNOWLEDGE THAT YOU HAVE READ THIS AGREEMENT UNDERSTAND IT AND AGREE TO BE BOUND BY ITS TERMS AND CONDITIONS NEITHER PARTY SHALL BE BOUND BY ANY STATEMENT OR REPRESENTATION NOT CONTAINED IN THIS AGREEMENT NO CHANGE IN THIS AGREEMENT IS EFFECTIVE UNLESS WRITTEN AND SIG...

Страница 10: ...he printer does not produce hazardous laser radiation Since radiation emitted inside the printer is completely confined within protective housings and external covers the laser beam cannot escape from the printer during any phase of user operation Laser notice This printer is certified in the U S to conform to the requirements of DHHS 21 CFR Subchapter for Class I 1 laser products and elsewhere is...

Страница 11: ...bels The printer bears any of the following labels For Europe Asia and other countries Label inside the machine Laser radiation warning Label inside the rear Ozone concentration The printers generate ozone gas O3 which may concentrate in the place of installation and cause an unpleasant smell To minimize the concentration of ozone gas to less than 0 1 ppm we recommend you not to install the printe...

Страница 12: ...on that conforms with the standards of the ENERGY STAR Program This function makes it possible to reduce the amount of electrical power consumed by the printer For maximum power savings turn off the printer s power supply when not using the printer for extended periods of time For details on the sleep timer function and printer power consumption refer to this manual Initial settings of the sleep t...

Страница 13: ...he related section includes safety warnings Specific points of attention are indicated inside the symbol DANGER Indicates that serious injury or even death will very possibly result from insufficient attention to or incorrect compliance with the related points WARNING Indicates that serious injury or even death may result from insufficient attention to or incorrect compliance with the related poin...

Страница 14: ...ide are illegible or if the guide itself is missing fee required Installation Precautions Environment CAUTION Avoid placing the machine on or in locations which are unstable or not level Such locations may cause the machine to fall down or fall over This type of situation presents a danger of personal injury or damage to the machine Avoid locations with humidity or dust and dirt If dust or dirt be...

Страница 15: ... humidity around 60 RH and avoid the following locations when selecting a site for the machine Avoid locations near a window or with exposure to direct sunlight Avoid locations with vibrations Avoid locations with drastic temperature fluctuations Avoid locations with direct exposure to hot or cold air Avoid poorly ventilated locations During printing some ozone is released but the amount does not ...

Страница 16: ...e machine to an outlet with a ground connection to avoid the danger of fire or electrical shock in case of an electric short If an earth connection is not possible contact your service representative Other Precautions Connect the power plug to the closest outlet possible to the machine The power supply cord is used as the main disconnect device Ensure that the socket outlet is located installed ne...

Страница 17: ...re is a danger of fire electrical shock or damage to the laser If the laser beam escapes there is a danger of it causing blindness If the machine becomes excessively hot smoke appears from the machine there is an odd smell or any other abnormal situation occurs there is a danger of fire or electrical shock Turn the power switch off O immediately be absolutely certain to remove the power plug from ...

Страница 18: ...For safety purposes always remove the power plug from the outlet when performing cleaning operations If dust accumulates within the machine there is a danger of fire or other trouble It is therefore recommended that you consult with your service representative in regard to cleaning of internal parts This is particularly effective if accomplished prior to seasons of high humidity Consult with your ...

Страница 19: ... coughing develops contact a physician If you do happen to ingest toner rinse your mouth out with water and drink 1 or 2 cups of water to dilute the contents of your stomach If necessary contact a physician If you do happen to get toner in your eyes flush them thoroughly with water If there is any remaining tenderness contact a physician If toner does happen to get on your skin wash with soap and ...

Страница 20: ...This chapter explains on setting the printer up ready for use and how to print from your workstation Chapter 4 Maintenance This chapter explains how to replace the toner container and how to care for your printer Chapter 5 Troubleshooting This chapter explains how to handle printer problems that may occur such as paper jams Chapter 6 Options This chapter explains available options Chapter 7 Specif...

Страница 21: ...information about a function or feature NOTE For further information about the sizes and types of media that can be used refer to page 35 for information Important Use to provide important information IMPORTANT Ensure paper is not stapled and clips are removed Caution Cautions are statements that suggest mechanical damage as a result of an action CAUTION Do not attempt to incinerate the toner cont...

Страница 22: ...xxii OPERATION GUIDE ...

Страница 23: ...er Switch Parallel Interface Connector USB Interface Connector Cassette Rear Cover Side Cover Paper Stopper Operation Panel Ready Indicator Data Indicator Attention Indicator Toner Indicator Cancel Key GO Key Power Cord Connector Option Interface Slot Cover Front Cover ...

Страница 24: ...s Indicator Status Meaning Ready Green Lit Indicates online status printing is possible Flashing An error has occurred but printing resumes when the key is pressed Offline status You cannot print but the printer can receive data The printer is in sleep mode Off Printing has stopped because an error has occurred Data Green Lit The printer is processing data Flashing The printer is receiving data At...

Страница 25: ...ss for 1 second or more Cancels the data from the PC GO At Ready Press momentarily Switches On line Off line Press for 3 to 10 seconds Prints the status page Press for 10 seconds or more Prints the service status page At Error Press momentarily Clears the error After Power On Press until the indicator is lit Resets the toner counter after replacing the toner container ...

Страница 26: ...Machine Parts 4 OPERATION GUIDE ...

Страница 27: ...16K Other 148 210 to 216 356mm 4 1 8 3 to 8 5 14 MP Tray 50 sheets 80 g m2 60 to 163 g m2 A4 B5 JIS A5 Folio Legal Letter Oficio II Statement Executive A6 B6 B5 ISO Envelope C5 Envelope 10 Envelope 9 Envelope 6 Envelope Monarch Envelope DL 16K Other 70 148 to 216 356mm 2 8 5 8 to 8 5 14 Item Specification Weight Cassette 60 105 g m2 MP tray 60 163 g m2 Thickness 0 086 to 0 110mm 3 4 to 4 3 mils Di...

Страница 28: ... stapled and clips are removed Loading Paper into a Cassette 1 Pull the cassette completely out of the printer IMPORTANT When pulling the cassette out of the printer ensure it is supported and does not fall out 2 Adjust the paper length guide to the paper size required 3 Adjust the position of the width guides located on the left and right sides of the cassette Press the release button on the left...

Страница 29: ...rear until it stops 4 Load the paper in the cassette IMPORTANT Always adjust the paper length and width guides before loading paper to avoid skewed paper feed and or a paper jam Do not load paper above the triangle mark located on the width guide Ensure the side to be printed is facing down and the paper is not folded curled or damaged 5 Push the cassette back into the printer until it stops 1 2 ...

Страница 30: ...d unfold the flap 3 Adjust the paper width guides and slide the paper into the tray as far as it will go The side to be printed should be face up Ensure the paper width guides are flush against the edge of the paper Envelopes should be fed in the face up position right edge first NOTE Prior to purchasing envelopes print a sample to check quality Start printing after loading the MP tray ...

Страница 31: ...ON GUIDE 9 4 After use close the flap on the subtray then push in the subtray and close the MP tray NOTE Be careful not to push the tray back into the printer with the subtray folded out horizontally as shown in the figure ...

Страница 32: ...Loading Paper 10 OPERATION GUIDE ...

Страница 33: ...Interface Connector NOTE Use a USB cable with a rectangular Type A plug and a square Type B plug The USB cable should be shielded and no longer than 5 meters long 2 Connect the other end of the USB cable to the computer s USB interface connector USB Interface Connector Parallel Interface Connector Power Switch Power Cord Connector ...

Страница 34: ...e the clips on both sides to fix the connector in place 3 Connect the other end of the printer cable to the computer s parallel interface connector Connecting the Power Cord Install the printer close to an AC wall outlet If an extension cord is used the total length of the power cord plus extension should be 5 meters 16 feet or less NOTE Ensure the printer s power switch is off Only use the power ...

Страница 35: ...ion is complete Loading Software Ensure the printer is plugged in and connected to the computer s parallel or USB port before installing software from the CD ROM 1 Switch on the PC and activate Windows NOTE If the Welcome to the Found New Hardware Wizard dialog box displays select Cancel 2 Insert the CD ROM Software Library into the CD ROM drive 3 The installation program launches and the License ...

Страница 36: ...Use to select duplex or to create multiple pages on a single sheet of paper Also contains the scaling option Prologue Epilogue This option incorporates the PRESCRIBE commands into the document Setting Information Use this option to view a summary of the selected options in a tree format Imaging Select this tab to change the print quality and the font or graphic settings Output Use to select the nu...

Страница 37: ...th to clean dust and dirt from the printer Toner Container The toner container will need replacing approximately every 7 200 pages A starter toner container provides approximately 3 600 pages Assuming an average toner coverage of 5 Process Unit The process unit should be removed to allow for printer cleaning tasks The charger wire should be cleaned using the charger cleaner every time the toner co...

Страница 38: ... toner container 1 Open the top cover 2 Turn lock lever A to the unlock position push lock lever B to the right and pull out the toner container Place the used toner container in the plastic bag provided for disposal 3 Remove the packaging from the new toner container Shake the new toner container horizontally at least 5 times as shown in the figure in order to distribute the toner evenly 4 Remove...

Страница 39: ...l the new toner container in the printer Push firmly on the top of the container at the positions marked PUSH HERE until you hear a click 6 Turn lock lever A to the lock position and close the top cover LOCK UNLOC K LOCK UNLOCK A ...

Страница 40: ...ainer replacement 1 Open the top cover and front cover 2 Lift the process unit together with the toner container out of the printer NOTE The drum in process unit is sensitive to light Never expose the process unit to light for more than five minutes 3 Place the process unit flat on a clean level surface IMPORTANT Do not place the process unit on end ...

Страница 41: ...the transfer roller 2 during cleaning 5 Slide the charger cleaner green back and forth 2 or 3 times to clean the charger wire then return it to its original position CLEANER HOME POSITION 6 When cleaning is complete return the process unit to its position aligning the guides at both ends with the slots in the printer 7 Close the front cover and top cover 2 1 ...

Страница 42: ...l actions you should take to avoid possible damage that may occur when the printer is used next time Moving the Printer When you move the printer Move it gently Keep it as level as possible to avoid spilling toner inside the printer Be sure to consult a service technician before attempting long distance transportation of the printer WARNING If you ship the printer remove and pack the process unit ...

Страница 43: ...combination refer to page 2 for further information Turn the power switch Off O and then On again Submit the print job again Print quality is poor Refer to page 22 for information Paper is jammed Refer to page 22 for information on jam clearance The indicators are off and the fan is not working Check the power cable Connect both ends of the power cable securely Try replacing the power cable Refer ...

Страница 44: ...Action All black pages Contact your service technician Dropouts horizontal streaks or stray dots Clean the charger wire refer to page 18 for information Black or white vertical streaks Check the toner container and if necessary replace Refer to page 18 for information Clean the charger wire refer to page 18 for information Check the charger cleaner is in its original position Refer to page 18 for ...

Страница 45: ...inter warms up and resumes printing Cassette 1 Pull out the cassette Remove any partially fed paper Check to see if paper is loaded correctly If not reload the paper 2 Push the cassette back in securely Open and close the top cover to clear the error The printer warms up and resumes printing MP Tray 1 Remove the paper from the MP tray IMPORTANT Do not try to remove paper that has already been part...

Страница 46: ...he printer NOTE The drum in process unit is sensitive to light Never expose the process unit to light for more than five minutes 4 If the jammed paper appears to be pinched by rollers pull it along the normal running direction of the paper If it has not be fed as far as the metal registration roller remove the paper from the MP tray side ...

Страница 47: ... Close the front cover and top cover 6 Reload the MP tray The printer warms up and resumes printing Duplexer When a paper jam occurs in the duplex section clear it using the following procedure 1 Open the rear cover and remove the jammed paper as shown in the figure 2 Pull the cassette all the way out of the printer ...

Страница 48: ...med paper 4 Open the duplexer s front cover and remove any jammed paper 5 Insert the cassette into the slot in the printer 6 Open and close the printer s top cover to clear the error The printer then automatically warms up and resumes printing Printer 1 Open the top cover and front cover ...

Страница 49: ...o light for more than five minutes 3 If the jammed paper appears to be pinched by rollers pull it along the normal running direction of the paper If it has not be fed as far as the metal registration roller remove the paper from the MP tray side 4 Insert the process unit together with the toner container back machine Close the front cover and top cover The printer warms up and resumes printing ...

Страница 50: ...Troubleshooting 28 OPERATION GUIDE ...

Страница 51: ...ork Interface Card or the Serial Interface Board can be installed in the printer Network Interface Card IB 21E Enables printing from multiple computers via a network Expansion Memory DIMM The memory can be increased to a maximum of 288MB Paper Feeder PF 17 Holds approximately 250 sheets of A5 to Legal size paper Printer Serial Interface Board Kit IB 11 Connect to the computer s serial printer port...

Страница 52: ...nal memory modules from 64 128 or 256MB The maximum memory size is 288MB NOTE We recommend that expansion memory is installed by your dealer We shall not be liable for any damages caused by improper installation of expansion memory Installing the DIMM To install the DIMM switch off the printer s power unplug the power cord and disconnect the printer from the PC 1 Remove the screw from the rear of ...

Страница 53: ... DIMM replace the side cover and fasten it with the screw Setting the Printer Driver After you install the additional memory to the printer follow the instructions below to set the printer driver so that the printer can use the memories efficiently 1 Click the Windows Start button and then click Printers and Faxes 2 Right click the LP 4022 KX icon and click Properties The Properties dialog box wil...

Страница 54: ...pplied with the printer IMPORTANT Before inserting a CompactFlash card in the printer make sure that the printer is switched off 1 Turn off the printer 2 Remove the option interface slot cover When the Network Interface Card or the Serial Interface Board is installed remove it 3 Insert the CompactFlash card in the slot Insert as shown in the figure Push it in all the way 4 Close and secure the slo...

Страница 55: ... be used on network environments including Windows Macintosh UNIX NetWare etc NOTE If the Serial Interface Board is installed remove it to use the Network Interface Card 1 Turn off the printer and disconnect the power cord and printer cable 2 Remove the option interface slot cover 3 Insert the Network Interface Card and secure it with the screws removed in step 2 ...

Страница 56: ...Options 34 OPERATION GUIDE ...

Страница 57: ... C5 Envelope 10 Envelope 9 Envelope 6 Envelope Monarch Envelope DL 16K Other 70 148 to 216 356mm 2 8 5 8 to 8 5 14 Paper Types Cassette Plain paper recycled paper thick paper 60 to 105g m2 16 to 28 lbs MP Tray Plain paper recycled paper thick paper 60 to 163g m2 16 to 43 lbs Transparency adhesive backed labels envelopes and post cards supported Paper Feed Source Capacity Cassette 250 sheets MP Tra...

Страница 58: ... Operating Environment Temperature 10 to 32 5 C Relative Humidity 20 to 80 RH Altitude 2 500m maximum Illumination 1 500 lux maximum Dimensions W H D 378 235 375mm Weight Approx 10 5 kg Operating noise in accordance with ISO 7779 Bystander Position sound pressure level at the front During printing LpA 65dB A During standby LpA 30dB A During sleep mode Immeasurably low ...

Страница 59: ...nt cover 26 rear cover 26 E Envelope 8 G GO key 3 I Indicator 2 K Key Cancel 3 GO 3 Network Tool for Clients 2 M Maintenance 15 cleaning 18 cleaning tasks 15 process unit 15 toner container 15 Maximum memory size 30 MP tray 5 8 envelope 8 flap 8 paper size 5 paper width guides 8 subtray 8 9 N Network interface card 33 O Offline 2 Online 2 Operation panel 1 attention indicator 1 Cancel key 1 data i...

Страница 60: ...erface connector 12 Power connecting 12 cord connector 11 switch 11 Precautions for use xvii Printer cable 12 Process unit 18 charger cleaner 19 charger wire 15 cleaner home position 19 drum 18 R Ready indicator 2 S Serial interface board 33 Service status page 3 Sleep mode 2 Specifications 35 Status page 3 21 T Toner container 15 lock lever A 16 lock lever B 16 PUSH HERE 17 replacement 16 Toner i...

Страница 61: ...UTAX GmbH Ohechaussee 235 22848 Norderstedt Germany ...

Отзывы: