Triumph Adler DC 2118 Скачать руководство пользователя страница 71

Maintenance

6-6

3

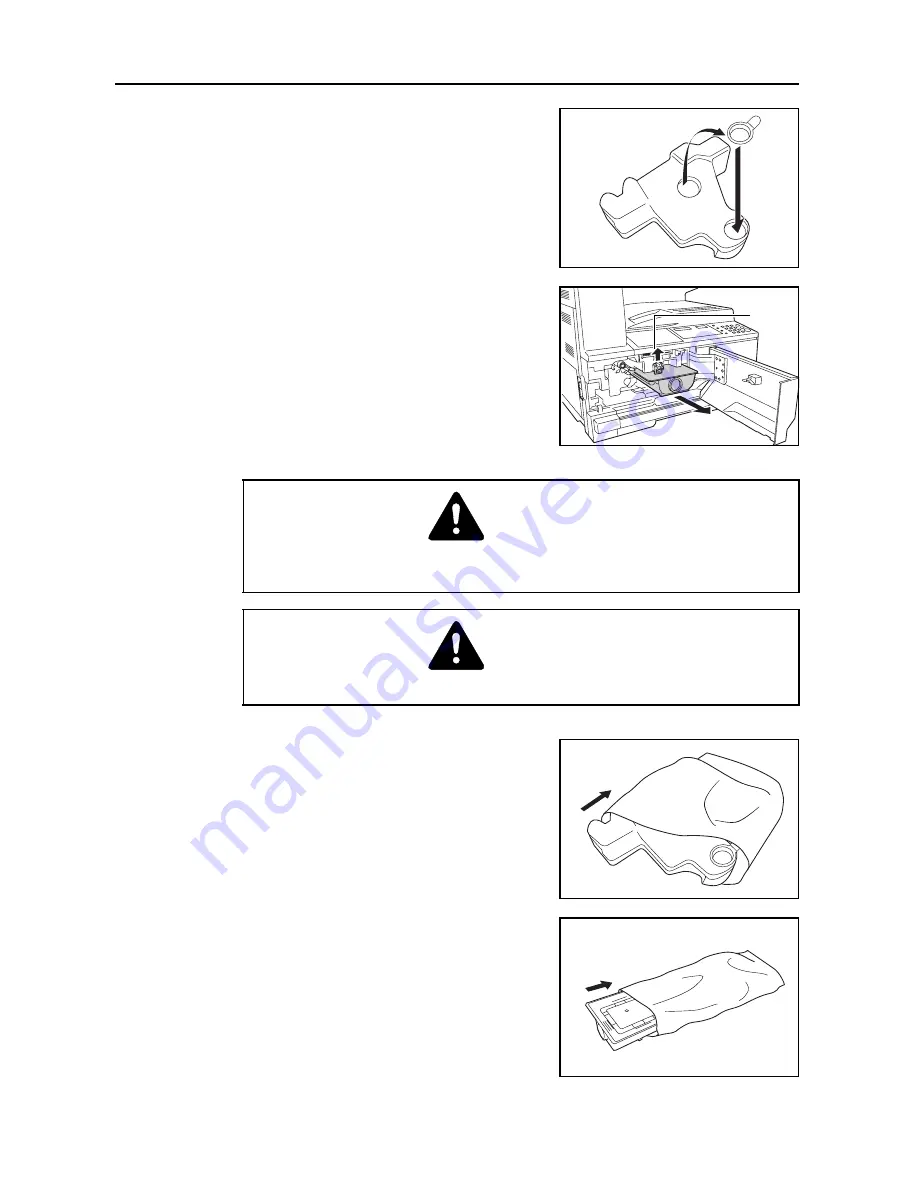
Use the cap attached to the center of the old waste 
toner box to cover the opening.

4

Turn the toner container release lever 

A

 to the left to 

pull out the toner container.

5

Place the old waste toner box in the plastic bag 
provided for disposal.

6

Place the old toner container in the plastic bag provided 
for disposal.

A

Caution

Do not attempt to incinerate the toner container or the waste toner box. Dangerous 
sparks may cause burns.

Caution

Do not attempt to force open or destroy the toner container or the waste toner box.

Содержание DC 2118

Страница 1: ...Instruction Handbook DC 2118 Digital Multifunctional System...

Страница 2: ...a simple troubleshooting action as necessary so that you can always use the machine in good condition Please read this Operation Guide before you start using the machine and keep it close to the machi...

Страница 3: ...or 2 11 Part Names of the Document Processor 2 11 How to Load Originals 2 12 Turning Power On 2 13 User Interface language 2 14 3 Basic Operation 3 1 Basic Copying Procedure 3 1 Zoom Copying 3 3 3 3 A...

Страница 4: ...6 1 Replacing the Toner Container and the Waste Toner Box 6 5 7 Troubleshooting 7 1 If Trouble Occurs 7 1 Notes 7 8 Removal Procedures 7 8 Appendix Appendix 1 Specifications Appendix 1 Main Body Appen...

Страница 5: ...t matter without the prior written consent of UTAX GmbH is prohibited Any copies made of all or part of this guide any copyrightable subject must contain the same copyright notice as the material from...

Страница 6: ...e The device automatically enters Sleep Mode when one minute has passed since the device was last used The amount of time of no activity that must pass before Sleep Mode is activated may be lengthened...

Страница 7: ...icates that the related section includes information on prohibited actions Specifics of the prohibited action are indicated inside the symbol DANGER Indicates that serious injury or even death will ve...

Страница 8: ...on are indicated inside the symbol Please contact your service representative to order a replacement if the safety warnings in this Operation Guide are illegible or if the guide itself is missing fee...

Страница 9: ...cing toner NOTE Do not remove these labels Label 2 High temperature inside Do not touch parts in this area because there is a danger of getting burned Label 3 Do not attempt to incinerate the toner co...

Страница 10: ...e changing of parts and maintenance allow access space as shown below Leave adequate space especially around the vents to allow air to be properly ventilated out of the machine Other precautions Adver...

Страница 11: ...ric shock Always connect the machine to an outlet with a ground connection to avoid the danger of fire or electrical shock in case of an electric short If an earth connection is not possible contact y...

Страница 12: ...removing it from the outlet If the power cord is pulled the wires may become broken and there is a danger of fire or electrical shock always grasp the power plug when removing the power cord from the...

Страница 13: ...nd gargle thoroughly with a large am ount of water If coughing develops contact a physician If you do happen to ingest toner rinse your mouth out with water and drink 1 or 2 cups of water to dilute th...

Страница 14: ...n below indicates compliance with the CDRH regulations and must be attached to laser products marketed in the United States On this machine the label is on the right 3 Optical unit When checking the o...

Страница 15: ...ment does cause harmful interference to radio or television reception which can be determined by turning the equipment off and on the user is encouraged to try to correct the interference by one or mo...

Страница 16: ...ts and methods of measurement for radio interference characteristics of information technology equipment EN55022 Class B Limits for harmonic currents emissions for equipment input current 16A per phas...

Страница 17: ...ins explanations on the basic procedures of simple copying and printing 4 Job Accounting This chapter explains the job accounting functions of this machine 5 Optional Equipment This chapter contains e...

Страница 18: ...touch panel Ready to copy is displayed Used to emphasize a key word phrase or references to additional information For more information refer to Sleep and Auto Sleep on page 3 5 Note Indicates supplem...

Страница 19: ...te the orientation of the original paper The size of the original paper that can be used depends on the function and source tray For further details refer to the page detailing that function or source...

Страница 20: ...5 Paper width adjusting tab Use this tab to adjust the paper width guides to fit to the width of the paper to be loaded in the cassette 6 Paper length adjusting tab Adjust this tab to adjust the paper...

Страница 21: ...on the platen 13 Left cover Open this cover if a paper jam occurs inside the machine 14 Waste toner box 15 Toner container release lever Operate this lever when replacing the toner container 16 Toner...

Страница 22: ...tch Turn this switch on before using this machine 20 Main power switch cover Open to operate the main power switch 21 Handles for transport Hold the four recessed portions at the right and left when t...

Страница 23: ...uto 100 Key 12 Paper Supply Indicator 13 Paper Selection Key 14 Paper Supply Level Indicator 15 Paper Misfeed Indicator 16 MP Indicator 17 No of Copies Zoom Display 18 Message Display 19 Original Size...

Страница 24: ...or Press this to switch the message display between copier mode and printer mode when the optional printer kit is installed 29 2 sided Key 30 Mixed Original Size Key 31 Combine Key 32 Split Key 33 Pro...

Страница 25: ...lt Setting for the copy density can be changed to the Auto Refer to appendix Auto Clear function After the copy has been produced and a fixed interval 10 to 270 seconds has elapsed the copier will aut...

Страница 26: ...uring copying the automatic cassette switching function will switch paper feed from the empty cassette to the other cassette that still contains paper NOTE An optional cassette is required to do this...

Страница 27: ...Names of Parts 1 8...

Страница 28: ...per clips have been removed Not doing so may result in poor images or malfunctions Straighten out any creases or curls in the paper before loading it Failure to straighten out creases and curls may le...

Страница 29: ...nt 8 1 2 13 Oficio II 8K and 16K Note When loading paper into the cassette set it with the side to be printed facing up 1 Pull the cassette out toward you as far as it will go Note Do not pull more th...

Страница 30: ...to the cassette Creases in the paper may lead to paper jams The maximum paper limit indicator A is provided on a paper width guide Make sure that the paper loaded is below the maximum paper limit indi...

Страница 31: ...al cassette 2 to 4 display 20 Cassette2Size 21 Cassette3Size and 22 Cassette4Size 3 Press or to select Auto Detect mm AutoDetect inch Oficio 2 8K or 16K 4 Press the OK key The display will blink and c...

Страница 32: ...Open the multi purpose tray Note Pull out the multipurpose tray extension to match the paper size 2 Adjust the sliders to the width of the paper to be set 3 Set the paper along the sliders and put it...

Страница 33: ...de which faced the top of its packaging facing down If the front end of the paper is curled straighten it out before setting it Make sure there are no creases etc in the paper Creases in the paper may...

Страница 34: ...and the edge with the flap facing towards you For portrait envelopes close the flap Insert the envelope all the way along the width guides keeping the printing side face down and the edge with the fl...

Страница 35: ...to the System menu 5 Press or to select 00 Setting done and press the OK key The display will blink and copying starts Selecting a Size from Other Regular Sizes 1 Select the Other Standards Refer to...

Страница 36: ...and press the OK key 4 Proceed to Step 4 of Selecting a Size from Regular Sizes on page 2 7 Selecting Special Paper Type Select the media type when copying on special types of paper such as thick pap...

Страница 37: ...re no originals left on the original table or on the original eject table Originals left on the original table or on the original eject table may fall off when the document processor is opened 2 Keep...

Страница 38: ...processor for the following types of originals Soft originals such as vinyl sheets Transparencies such as OHP film Carbon paper Originals with very slippery surfaces Originals with adhesive tape or gl...

Страница 39: ...17 Ledger and 11 x 8 1 2 or A4 and A3 at the same time in the auto selection mode Refer to Chapter 4 Auto Selection Mode 2 Arrange the originals in order and set them face up front side up for 2 side...

Страница 40: ...On To turn machine power on 1 Open the main power switch cover located on the right side of the machine and turn the main power switch on The machine starts to warm up 2 Once warm up is completed the...

Страница 41: ...language You can select the language that is used in the message display 1 Display the System Menu 2 Press the key or the key to select 02 Language Press the OK key 3 Press the key or the key to sele...

Страница 42: ...ligning it with the left rear corner of the platen along the original size indicator plates Note For the method of setting originals in the optional document processor see Loading Originals in the Doc...

Страница 43: ...80 g m The capacity varies depending of the paper that is used Image quality mode Description Text Photo Select to copy originals that contain a mixture of both text and photographs Text Select to co...

Страница 44: ...e message display 3 Press the Paper Selection key to select the copy paper The zoom ratio is displayed on the message display 4 Press the Start key Copying starts Mode Description Auto zoom ratio sele...

Страница 45: ...n be manually set between 25 and 400 in 1 increments 1 Set the original 2 Press the key or the key The zoom ratio will be displayed in the No of Copies display 3 Press the OK key to confirm the zoom r...

Страница 46: ...sides of the copy paper If the number of originals is odd the back side of the last copy page is blank Note In the 1 sided to 2 sided mode select the following setting Binding at left right of origin...

Страница 47: ...copying from 2 sided originals Front and back sides of originals are copied in the same way onto both sides of copy paper Note The paper sizes that can be used are A3 to A5R Folio 11 17 Ledger 8 1 2 1...

Страница 48: ...2 sided key for 3 seconds 2 The System Menu for the reverse side setting of 2 Sided Copies will be displayed Press or to select Rotation On in the case where the reverse side is to be rotated or Rotat...

Страница 49: ...ained below 1 Place the originals on the platen 2 Press Split select the type of original and select or to light up the corresponding display 3 Press Start to start scanning If the originals have been...

Страница 50: ...the number of copies and press the Start key Scanning of the original starts If the originals have been set in the optional document processor copying starts automatically If the original has been set...

Страница 51: ...Combine key to light up the or indicator Note Both the original size and the copy paper size must be standard size The following modes are available for combine copying Original Copy 2 1 1 2 Mode Desc...

Страница 52: ...asic Operation 3 11 2 in 1 The orientations of the originals and the finished copy are shown below Using the platen Using the document processor Copy Original Copy Original Copy Original Copy Original...

Страница 53: ...Operation 3 12 4 in 1 horizontal The orientations of the originals and the finished copy are shown below Using the platen Using the document processor Copy Original Copy Original Copy Original Copy Or...

Страница 54: ...Operation 3 13 4 in 1 vertical The orientations of the originals and the finished copy are shown below Using the platen Using the document processor Copy Original Copy Original Copy Original Copy Ori...

Страница 55: ...cally resumed 1 During a copy job press the Interrupt key The Interrupt indicator will blink 2 Remove the originals of the ongoing copy job 3 Set the original for interrupt copying and perform copying...

Страница 56: ...tions The recovery time before copies can be made is 10 seconds Note The machine also recovers from low power mode when the original cover is opened or an original is loaded in the optional document p...

Страница 57: ...ting time is one minute Press the Energy Saver key again to resume copying operations The recovery time 17 2 seconds Copiers and printers are generally in a standby mode more than they are in actual o...

Страница 58: ...an asterisk Job Accounting Description Available settings Reference Page 01 JobAccounting In order to carry out Job Accounting set this to on set Set this to oFF no setting when Department Management...

Страница 59: ...ob Accounting Refer to Job Accounting Operation Procedures on page 2 2 Press or to select display 02 Register code and then press the OK key 3 Enter the Department ID Code to be registered up to a max...

Страница 60: ...No of Copies Count for all departments can be cleared 1 Display Job Accounting Refer to Job Accounting Operation Procedures on page 2 2 Press or to select display 04 Count Clear and then press the OK...

Страница 61: ...operations can be carried out by entering the assigned Department ID Codes using the numeric keys IMPORTANT Always remember to press the Logout key after completing copying 1 Confirm the ID code to be...

Страница 62: ...it Key Counter Printer Kit Printer Server Additional Memory Document Processor This equipment automatically feeds and scans multiple sheet originals one by one Two sided originals are automatically tu...

Страница 63: ...2 8 1 2 Statement 8 1 2 13 Oficio II 8K and 16K Copy paper can be set in the same way as the standard cassette provided with the main body See page 2 1 The left covers are provided to allow paper to b...

Страница 64: ...printer kit can be installed to use the copier as a printer as well Ask you local dealer for more information In some countries a printer server is available as well Additional Memory A memory can be...

Страница 65: ...onal Equipment Overview of Optional Equipment The following optional equipment is available for the machine Document Processor Duplex Unit Additional Memory Key Counter Printer Kit Paper Feeder Print...

Страница 66: ...mild neutral detergent Important Never use thinner or other organic solvents Cleaning the Platen Open the original cover and wipe the platen with a soft cloth dampened with alcohol or mild neutral det...

Страница 67: ...A and B are dirty Wipe the slit glasses with a dry soft cloth Important Never use water thinner organic solvents or alcohol Note For cleaning the inside of the main body see Replacing the Toner Contai...

Страница 68: ...o the right side along the separation needle as shown in the illustration to remove any dirt or dust 5 Close the left cover Cleaning the Transfer Roller 1 Open the front cover 2 Remove the cleaning br...

Страница 69: ...4 4 While turning the left transfer roller gear to turn the roller as shown in the illustration move the brush from the left side to the right side along the roller to remove any dirt or dust 5 Close...

Страница 70: ...ep 11 on page 6 7 If any section is left dirty the performance of this product cannot be maintained 1 Open the front cover 2 While pushing the waste toner box holder to the left remove the waste toner...

Страница 71: ...e toner container 5 Place the old waste toner box in the plastic bag provided for disposal 6 Place the old toner container in the plastic bag provided for disposal A Caution Do not attempt to incinera...

Страница 72: ...ing gently the grid cleaner with your left hand pull out the electrical charge section as far as it will go and push it back until the portion B does not touch the white pad of the grid cleaner Repeat...

Страница 73: ...art five times or more 12 Shake the toner container up and down five times or more Turn the toner container upside down and shake it five times or more 13 Hold the toner container horizontally and sha...

Страница 74: ...Maintenance 6 9 16 Close the front cover After use always dispose of the toner container and the waste toner box in accordance with Federal State and Local rules and regulations...

Страница 75: ...Maintenance 6 10...

Страница 76: ...mode set To adjust the overall density level perform the auto density adjustment procedure Is the manual density mode set Use the Lighter key or the Darker key to adjust the density level properly 3...

Страница 77: ...finished copies may curl tightly resulting in a paper jam Remove the paper from the cassette turn it over and set it in the cassette again Is the paper curled folded over or wrinkled Replace the paper...

Страница 78: ...refresh The copies are curled Is the copy paper wet Replace the copy paper with dry new paper 2 1 Is Middle 2 set at the Paper type Paper Weight setting Normally Middle 2 is set Set Middle 1 at the P...

Страница 79: ...set to make a split copy or a 2 Sided Copy from a double page spread original A size that cannot be copied on both sides has been specified 2 Sided copies cannot be taken when A6R B6R Postcard Irregu...

Страница 80: ...he copying operation for the interrupted copy has been completed repeat the procedure again Memory is full Press the OK key to start outputting the copies read in Press the Reset key or the Stop Clear...

Страница 81: ...little toner remaining Copying can be continued for a short while before running out of toner Prepare the toner container The Periodic Maintenance indicator blinks on and off This is a notification th...

Страница 82: ...ms Do not reuse jammed papers If the paper tears during removal be sure to remove any loose scraps of paper from inside the machine Scraps of paper left in the machine could cause subsequent jamming D...

Страница 83: ...moval Procedures J11 J21 Paper Jam inside Cassette 1 Perform the following procedure to remove the jammed paper 1 Pull out the cassette 2 Remove any jammed paper without tearing it Note If the paper d...

Страница 84: ...o J57 J60 J61 Paper Jam in the Left Cover on page 7 10 J12 to J16 J22 to J24 Paper Jam inside Cassettes 2 to 4 Perform the following procedure to remove the jammed paper 1 Open the left cover of the c...

Страница 85: ...lti Purpose Tray except J10 Important If J20 is displayed remove the jammed paper referring to J20 to J50 J52 to J57 J60 J61 Paper Jam in the Left Cover If J40 is displayed remove the jammed paper ref...

Страница 86: ...he paper does happen to tear remove any loose scraps from inside the machine 4 Close the left cover J50 Paper Jam in the Paper Output Slot Perform the following procedure to remove the jammed paper Im...

Страница 87: ...l the left cover handle up to open the left cover 3 Remove any jammed paper without tearing it Note If the paper does happen to tear remove any loose scraps from inside the machine 4 Close the left co...

Страница 88: ...to do so may cause another paper jam later 4 Raise the paper feed unit A 5 Remove any jammed originals without tearing them Note If the original does happen to tear remove any loose scraps from insid...

Страница 89: ...Troubleshooting 7 14...

Страница 90: ...eets 80 g m 150 sheets 90 g m and above Multi Purpose tray 100 sheets 80 g m 25 sheets for A3 B4 Folio 11 17 Ledger 8 1 2 14 Legal 8 1 2 13 Oficio II and 8K sizes Output tray capacity 250 sheets 80 g...

Страница 91: ...cceptable originals Sheets of paper Original sizes Max A3 11 17 Min A5R 5 1 2 8 1 2 Original paper weight 45 g m to 160 g m Acceptable number of originals 50 sheets 50 g m to 80 g m Mixed original siz...

Страница 92: ...1 2 13 Oficio II 8K 16K 16KR Acceptable paper Weight 64 to 80 g m Types Standard paper recycled paper Dimensions W D H 14 19 64 x 2 9 64 x 7 9 64 368 54 181 mm Weight Approx 0 5 kg Recovery time from...

Страница 93: ...be selected at the time the copier is turned on Text Ph Dens Photo Density Text Density 04 Initial Dens Sets the copy exposure at the time the copier is turned on to Manual or Automatic There will be...

Страница 94: ...e 15 AutoSel Paper Specifies the media type when the copier automatically selects the paper OFF Plain Transparency Rough Vellum Labels Recycled Preprinted Bond Cardstock Color Colour Prepunched Letter...

Страница 95: ...m Metric specifications AutoDetect inch Inch specifications Oficio 2 8K 16K 20 Cassette2Size 21 Cassette3Size 22 Cassette4Size 23 MPTray Config Sets the size of paper to be manually fed in Paper Size...

Страница 96: ...specifications B5 E B6 R A6 R Hagaki Ledgr R Legal R Letter R Letter Statement R Oficio 2 8K 16K 16KR 11 15 R Customied Size YYY XXX mm Y direction 98 to 297mm X direction 148 to 432mm 25 Custom Size...

Страница 97: ...th sides of a sheet are to be copied This will not be displayed when the optional Duplex Unit is not installed Rotation On Rotation Off 43 Stitch Width Sets the initial value for the Binding Margin In...

Страница 98: ...d 52 AutoClearTime Sets the time interval prior to the automatic operation of the Auto Clear function when On Enable has been selected as the 50 Auto Clear setting This will not be displayed when 50 A...

Страница 99: ...m Menu Items NOTE Each of the System Menu Items can be selected by pressing the numeric keys Refer to Procedure for Changing the Default Settings regarding the following 3 After completing each operat...

Страница 100: ...original cover 6 1 Cleaning the platen 6 1 Cleaning the separation needle 6 2 Cleaning the slit glass 6 2 Cleaning the transfer roller 6 3 Clearing the job accounting count 4 3 Combine copying 3 10 Co...

Страница 101: ...er 1 2 Loading paper 2 1 Loading paper into the cassette 2 2 Low power mode 3 15 M Main power switch 1 3 2 13 3 1 Maintenance 6 1 Making copies in job accounting mode 4 4 Multi purpose tray 1 1 2 4 N...

Страница 102: ...usting tab 1 1 2 3 Paper width adjusting tab 1 1 2 2 Photo 3 2 Platen 1 2 3 1 Placing Originals 2 10 Printer kit 5 3 Printing the job accounting list 4 3 R Resolution Appendix 2 S Setting paper in the...

Страница 103: ...Index Index 4...

Страница 104: ...MEMO...

Страница 105: ...MEMO...

Страница 106: ...MEMO...

Страница 107: ...E1 For best print results and machine performance we recommend that you use only original TA Triumph Adler supplies for your TA Triumph Adler products...

Страница 108: ...UTAX GmbH Ohechaussee 235 22848 Norderstedt Germany...

Отзывы: