background image

English 

DF-710, MT-710, BF-710, PH-5A, PH-5B AND PH-5C OPERATION GUIDE

35

Staple cartridge holder B/C

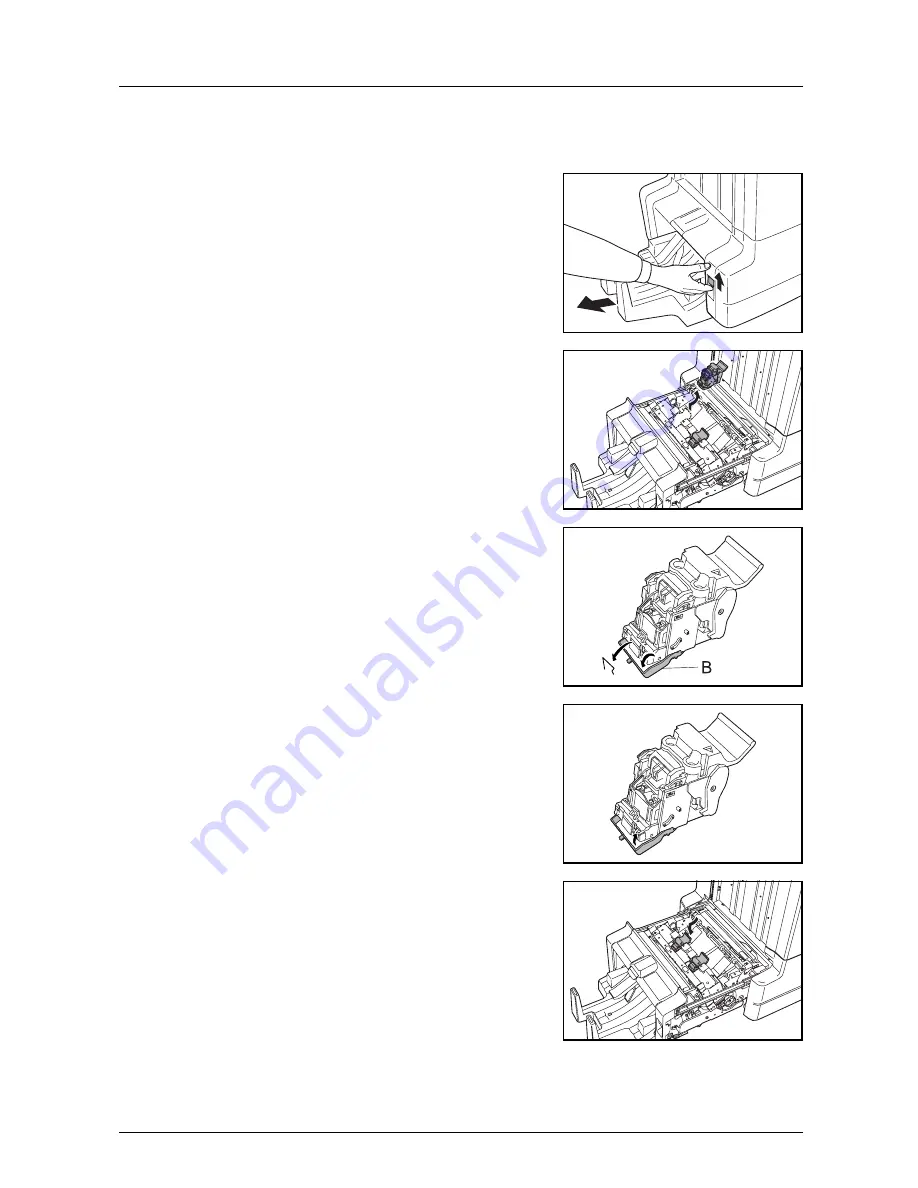
Follow the steps below to remove jammed staples from the optional folding unit. 

1

Push the folding unit release lever and pull out the 
folding unit. 

2

Remove staple cartridge holder B or C. 

3

Open the cover plate (B) of the staple cartridge 
holder and remove any jammed staples.

4

Close the cover (B) plate of the staple cartridge 
holder into its original position.

5

Re-install the staple cartridge holder. 

When re-installing, align the triangle marks on the 
staple cartridge holder and the staple unit. The 
staple cartridge holder will click into place when it 
has been inserted correctly.

6

Push the folding unit back into position. 

Содержание BF-710

Страница 1: ...Instruction Handbook DF 710 Finisher ...

Страница 2: ...do se usa con la función de copiadora Si desea más información acerca del funcionamiento desde un ordenador usando la función de impresora consulte la Guía de uso ampliada de controladores Cette section utilise des illustrations détaillant le fonctionnement du finisseur de documents installé sur une machine couleur Le fonctionnement est le même lorsque le finisseur de documents est installé sur d ...

Страница 3: ...ol Información de seguridad 75 Nombres de los componentes 80 Funcionamiento 81 Mantenimiento 89 Solución de problemas 93 Especificaciones 110 4 Français Informations de sécurité 113 Nomenclature 118 Fonctionnement 119 Entretien 127 Dépannage 131 Spécifications 147 5 Italiano Informazioni sulla sicurezza 149 Componenti 154 Modalità di funzionamento 155 Manutenzione 163 Risoluzione dei problemi 167 ...

Страница 4: ...2 DF 710 MT 710 BF 710 PH 5A PH 5B AND PH 5C OPERATION GUIDE ...

Страница 5: ...s of the prohibited action are indicated inside the symbol The z symbol indicates that the related section includes information on actions which must be performed Specifics of the required action are indicated inside the symbol Please contact your service representative to order a replacement if the safety warnings in this Operation Guide are illegible or if the guide itself is missing fee require...

Страница 6: ... your fingers caught in or burned by the finisher when clearing a paper jam NOTE DO NOT REMOVE THESE LABELS LABEL 1 CAUTION Paper is ejected into the eject section at high speeds Do not look into the eject section while the machine is in operation LABEL 2 The interior of this section reaches high temperatures DO NOT touch this section as there is a danger of being burned LABEL 3 DO NOT place any o...

Страница 7: ...r humidity locations with direct exposure to hot or cold air Handling of plastic bags WARNING Keep the plastic bags that are used with this product away from children The plastic may cling to their nose and mouth causing suffocation PRECAUTIONS FOR USE Cautions when using this product WARNING DO NOT place metallic objects or containers with water flower vases flower pots cups etc on or near this p...

Страница 8: ...s product DO NOT touch the ejection tray when the product is in operation as there is a danger of injury If dust accumulates within this product there is a danger of fire or other problems It is therefore recommended that you consult with your service representative in regard to cleaning of internal parts This is particularly effective if performed prior to seasons of high humidity Consult with yo...

Страница 9: ...er D6 13 Internal tray cover D7 14 Staple cartridge holder A 15 Right cover D8 16 Pressure roller bottom adjust knob E1 17 Pressure roller top adjust knob E2 Hole Punch Unit option 18 Waste Hole Punch box Center Folding Unit option 19 Unit release lever 20 Paper guide plate D9 21 Center Folding Unit conveyor knob D10 22 Center Folding Unit top cover 23 Folding tray 24 Staple cartridge holder B 25 ...

Страница 10: ...machine for Document Processor and Platen specifications 3 Select other features as required and press Start 4 Copies are ejected onto the specified tray If Tray A is selected each copy set can be offset from the previous set Refer to the Operation Guide for the machine for further details The machine displays a message when Tray A Tray B and Tray C have reached their tray capacity Remove all copi...

Страница 11: ...the machine for Document Processor and Platen specifications 3 Select other features as required and press Start 4 Copies are ejected onto the specified tray If Tray A is selected each stack can be offset from the previous stack Refer to the Operation Guide for the machine for further details The machine displays a message when Tray A Tray B and Tray C have reached their tray capacity Remove all c...

Страница 12: ...aple mode For stapling specifications refer to page 36 Auto Selection Staple Mode Staple mode is available even if the paper size is different if the paper width is the same as shown in the below combinations The staple capacity is 30 sheets A3 and A4 B4 and B5 11 17 and 11 8 1 2 8 1 2 14 and 8 1 2 11 1 Select Sort On Mode on the operation panel of the machine A4 B5 11x81 2 A3 B4 11x17 A4 B5 11x81...

Страница 13: ...inals in the Document Processor or one at a time on the Platen NOTE Refer to the Operation Guide for the machine for Document Processor and Platen specifications 4 Select other features as required and press Start Cassette Paper Load Direction Cassette Paper Load Direction Original Orientation Top Edge Original Orientation Top Edge Original Orientation Left Top Edge Original Orientation Left Top E...

Страница 14: ...o 16 sheets at a time NOTE The optional Center Folding Unit is required for automatic folding Only the folding tray is used for Booklet Stitching mode Booklet Feature Sheet originals Delivers booklet of two sided copies with facing pages from one sided or two sided originals Booklets such as magazines can be created by folding at the center Booklet Feature Facing originals Copies book originals to...

Страница 15: ... mode produces hole punched copies automatically Hole Punch mode can be used with Sort ON Staple and Sort OFF modes The following paper sizes can be used Inch models 2 hole punch 8 1 2 14 8 1 2 13 1 2 8 1 2 13 8 1 2 11 5 1 2 8 1 2 A3 B4 A4 A4R B5 B5R A5R and Folio 3 hole punch 11 17 11 8 1 2 A3 and A4 Metric models 2 hole punch A3 B4 A4 A4R B5 B5R A5R Folio 8 1 2 14 8 1 2 13 1 2 8 1 2 13 11 8 1 2 ...

Страница 16: ... individually therefore the location of the holes may vary on each sheet On completion of the job remove all the copies Interrupt Mode 1 Specify the settings for interrupt mode at from the machine operation panel NOTE For more information on interrupt mode operation see the machine operation guide Specify the output tray at the machine 2 Take out the any existing original and set the original to u...

Страница 17: ...d and attach the labels to the side of each tray NOTE Attach the labels in the location indicated on the illustration The bins to which labels should be applied are 1 2 3 4 5 6 7 as counted from the top down Configuring Mailbox Output from Computer 1 Use the printer driver on your computer to select a mailbox tray mailbox between 1 and 7 2 Select the paper size page s to be printed and number of p...

Страница 18: ...essage displays indicating that staples have run out the staple cartridge holder need to be replenished with staples NOTE If the Staple Unit runs out of staples contact your service representative or the place of purchase Refilling Staple Cartridge Holder A Follow the steps below to refill staples NOTE See page 17 to refill staple cartridge holder B C of the optional folding unit 1 While pushing t...

Страница 19: ...l the staple cartridge holder The staple cartridge holder will click into place when it has been inserted correctly 7 Close the right cover D8 and re install the finisher back into position on the machine Refilling Staple Cartridge Holders B C Option Follow the steps below to refill staples for the optional folding unit Follow the same procedure to refill staple cartridge holders B and C 1 Push th...

Страница 20: ...t contains no more staples 4 Insert the new staple cartridge into the staple cartridge holder and close the stopper 5 Re install the staple cartridge holder When re installing align the triangle marks on the staple cartridge holder and the staple unit The staple cartridge holder will click into place when it has been inserted correctly 6 Push the folding unit back into position ...

Страница 21: ... punch box Leave the main power switch on the machine switched ON while performing this procedure 1 Open the front cover 2 Grasp the waste hole punch box handle and remove the box from the Document Finisher NOTE Take care not to spill the waste hole punch scraps when removing the container 3 Dispose of the hole punch scraps appropriately 4 Re install the waste hole punch box Align it with the guid...

Страница 22: ... paper jam occurs copying stops and the machine operation panel will display a message indicating a paper jam has occurred NOTE Leave the main power switched ON while performing the procedure to clear paper jams The machine operation panel will return to the display previous to the paper jam when the paper jam has been cleared Coupling Section If the illustration shown displays on the machine s op...

Страница 23: ...veyor knob D2 to the left to feed the paper along to enable easy removal 5 Close Tray C and the front cover and re install the finisher back into position on the machine Tray A If the illustration shown displays on the machine s operation panel there is a paper jam in the conveyor section to Tray A 1 Lift open Tray B and remove the jammed paper ...

Страница 24: ...ont cover 3 Pull out the internal tray D5 4 Open the internal tray cover D6 5 Remove the jammed paper NOTE If a jammed paper is located at the bottom of the tray and it is difficult to remove lift the internal tray holder D3 and remove the jammed paper from the lower side of the tray ...

Страница 25: ...se the internal tray cover D6 securely until the magnet catches 7 Push the internal tray D5 back into position and close the front cover Tray B If the illustration shown displays on the machine s operation panel there is a paper jam in the conveyor section to Tray B 1 Remove any jammed paper from the ejection section ...

Страница 26: ...guide plate D1 and remove the jammed paper 4 Open the front cover 5 Turn the conveyor knob D2 to the left to feed the paper along to enable easy removal 6 Close the paper guide plate D1 NOTE Be sure to the close paper guide plate D1 Failure to do so will cause paper jams 7 Close the tray C and front cover ...

Страница 27: ...n the top cover and remove the jammed paper 3 Close the top cover and re install the finisher back into position on the machine Conveyor Internal Tray If the illustration shown displays on the machine s operation panel there is a paper jam in the conveyor section to the internal tray NOTE If frequent jamming occurs in the conveyor or internal tray the paper may be excessively curled Adjust curling...

Страница 28: ... left to feed the paper along to enable easy removal 3 Follow step 3 onward on page 22 to remove jammed paper Mailbox option If the illustration shown displays on the machine s operation panel there is a paper jam in the Mailbox 1 Open the mailbox cover 2 Remove the jammed paper 3 Close the mailbox cover ...

Страница 29: ...n the conveyor section of the Center Folding Unit 1 While pushing the finisher release lever pull the finisher out from the machine 2 Open the right cover D8 and remove the jammed paper If there is no paper jam in the right cover D8 proceed to the following step 3 Close the right cover D8 and re install the finisher back into position on the machine 4 Open the front cover 5 Pull out the internal t...

Страница 30: ...is located at the bottom of the tray and it is difficult to remove lift the internal tray holder D3 and remove the jammed paper from the lower side of the tray 8 Open the internal tray cover D7 and remove the jammed paper 9 Close the internal tray cover D6 and internal tray cover D7 NOTE Close the internal tray cover D6 securely until the magnet catches ...

Страница 31: ...ection Section If the illustration shown displays on the machine s operation panel there is a paper jam in the ejection section of the Center Folding Unit 1 Push the folding unit release lever and pull out the folding unit 2 Turn the center folding unit conveyor knob D10 to right to feed the paper along to enable easy removal and remove the paper ...

Страница 32: ...inal position Cautions to be taken when the internal tray is pulled out If you turn off the power or open the front cover accidentally during operation of the document finisher and the internal tray confirmation window 1 becomes red the internal tray D5 is automatically locked and cannot be pulled out If you turn off the main power turn the power on again If you open the front cover close it Then ...

Страница 33: ...ernal trays If this occurs follow the steps below to adjust for paper curling Paper curled downward 1 Open the front cover 2 Set pressure roller top adjust knob E2 to 1 For operation method see Paper curled upward on page 32 3 Pull pressure roller bottom adjust knob E1 outward and turn in the direction of a higher number Align the knob with a number to lock the knob by setting the knob protrusions...

Страница 34: ... bottom adjust knob E1 to 1 For operation method see Paper curled downward on page 31 3 Pull pressure roller top adjust knob E2 outward and turn in the direction of a higher number Align the knob with a number to lock the knob by setting the knob protrusions into the frame cutout area 4 Close the front cover 5 4 2 2 3 1 1 E1 5 4 2 3 1 ...

Страница 35: ...med staples Staple cartridge holder A Follow the steps below to remove jammed staples NOTE See page 35 to clear staple jams in the optional folding unit 1 While pushing the finisher release lever pull the finisher out from the machine 2 Open the right cover D8 3 Re install the staple cartridge holder A 4 Open the cover plate A of the staple cartridge holder A and remove any jammed staples ...

Страница 36: ...ver A plate of the staple cartridge holder into its original position 6 Re install the staple cartridge holder The staple cartridge holder will click into place when it has been inserted correctly 7 Close the right cover D8 and re install the finisher back into position on the machine ...

Страница 37: ...e cartridge holder B or C 3 Open the cover plate B of the staple cartridge holder and remove any jammed staples 4 Close the cover B plate of the staple cartridge holder into its original position 5 Re install the staple cartridge holder When re installing align the triangle marks on the staple cartridge holder and the staple unit The staple cartridge holder will click into place when it has been i...

Страница 38: ...A5R B6R A6R 11 8 1 2 8 1 2 11 5 1 2 8 1 2 16K 16KR 200 sheets Tray C 64 g m2 weight paper A4 B5 A5 A5R B6R A6R 11 8 1 2 5 1 2 8 1 2 16K 50 sheets Staple Unit Stapling Capacity 64 g m2 weight paper A3 B4 Folio 11 17 8 1 2 14 8 1 2 13 1 2 8 1 2 13 8K 30 sheets A4 A4R B5 11 8 1 2 8 1 2 11 16K 50 sheets Auto Select Staple Mode 30 sheets Paper Weight 90 g m2 or less Tray Capacity Stapling 2 to 4 sheets...

Страница 39: ...8 1 2 13 1 2 8 1 2 13 11 8 1 2 8 1 2 11 5 1 2 8 1 2 8K 16K 16KR Maximum Number for Storage 64 g m2 weight paper A3 B4 Folio 11 17 8 1 2 14 8 1 2 13 1 2 8 1 2 13 8K 50 sheets bin A4 A4R B5 B5R A5R 11 8 1 2 8 1 2 11 5 1 2 8 1 2 16K 16KR 100 sheets bin Dimensions W D H 510 mm 400 mm 470 mm 20 1 16 15 3 4 18 1 2 Weight 10 kg or less 22 lbs or less Item Description Sizes A3 B4 A4R 11 17 8 1 2 14 8 1 2 ...

Страница 40: ...English 38 DF 710 MT 710 BF 710 PH 5A PH 5B AND PH 5C OPERATION GUIDE ...

Страница 41: ...UTAX GmbH Ohechaussee 235 22848 Norderstedt Germany ...

Отзывы: