


24
ARGO U
SER
M
ANUAL
M
INI
M
ECH
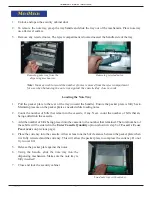
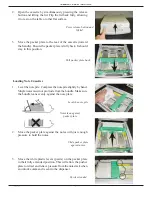
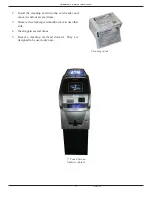
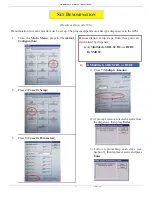
1. Unlock and open the security cabinet door.
2. To remove the note tray, grasp the tray handle and slide the tray out of the mechanism. Place note tray
on a
fl
at level surface.
3. Remove any rejected notes. The reject compartment is located nearest the handle side of the tray.
Removing note tray from the
dispensing mechanism.
Removing rejected notes.
Note:
You may wish to record the number of notes removed from the reject compartment
for use when balancing the note tray against the cassette/day close records.
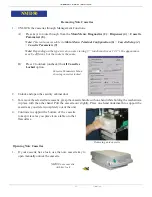
1. Pull the packer plate to the rear of the tray (toward the handle). Ensure the packer plate is fully back.
Maintain pressure on the packer plate as needed while loading notes.
2. Count the number of bills that remain in the cassette, if any. Next, count the number of bills that are
being added into the cassette.
3. Add the number of bills being placed into the cassette to the number that remained. The total number of
these bills will be entered in the
Enter Cassette Quantity
option (shown in step 6 of
C
ASSETTE
C
LOSE
P
ROCEDURES
on previous page).
4. Place the currency into the cassette. Allow at least one inch of clearance between the packer plate when
it is fully retracted and the currency. This will allow the packer plate to compress the currency. Do not
try to over
fi
ll.
5. Release the packer plate against the notes.
6. Using the handle, slide the note tray into the
dispensing mechanism. Make sure the note tray is
fully inserted!
7. Close and lock the security cabinet.
Loading the Note Tray
Load note tray with currency.
Содержание ARGO RL1713
Страница 5: ...SECTION 1 INTRODUCTION ...
Страница 11: ...SECTION 2 BASIC OPERATION ...
Страница 20: ...16 ARGO USER MANUAL 7 ARGO with printer and topper ...
Страница 21: ...SCDU HCDU MiniMech SDD NMD50 SECTION 3 CASSETTE CLOSE CASH REPLENISHMENT ...
Страница 33: ...ARGO USER MANUAL 29 12 1 ARGO Deep cabinet ...
Страница 34: ...12 1 ARGO with topper SECTION 4 GENERAL MAINTENANCE ...
Страница 40: ...12 1 ARGO with printer No topper SECTION 5 SETUP BASICS ...
Страница 54: ... 33 1 62 7 5 16 5 0 17 203 1 0 66 21 67 7 0 176 ...
Страница 58: ... 33 1 55 17 6 59 67 7 0 17 ...
Страница 65: ... 33 1 7 6 3 17 17 21 7 1 ...
Страница 66: ... 33 1 7521 2 6 1 77 5 675 7 2 7 6 1 2 7 ...
Страница 72: ... 33 1 0 1 2 6 ...
Страница 74: ...SUPPLEMENT A T5 AND T7 PCI EPP BATTERY REPLACEMENT PROCEDURES SA 1 ...
Страница 77: ...SA 4 THIS PAGE INTENTIONALLY LEFT BLANK ...
Страница 78: ...SUPPLEMENT B KEY MANAGEMENT PROCEDURES T5 PCI EPP T7 PCI EPP ...